background image

Digital Media Adapter User Guide 

22 

SETP 3:


Select 

Use  the  following  IP  address

 radio button, and then enter an IP ad-

dress  and  subnet  mask  for  your  PC.  Make  sure  that  the 

DMA-100

  and  your 

PC is on the same subnet.  

SETP 4:


Click on the 

OK

 button. The TCP/IP settings of your PC have now been con-

figured on the same subnet as the 

DMA-100

.


Setup the DMA Media Server 

After installation completed, you will see the icon  of 

DMA  Media  Server 

in  the  Win-

dows Programs and on the desktop.  

To run the DMA Media Server click 

Start > Programs >  DMA  Media  Server

, or just 

double click on the desktop icon. 


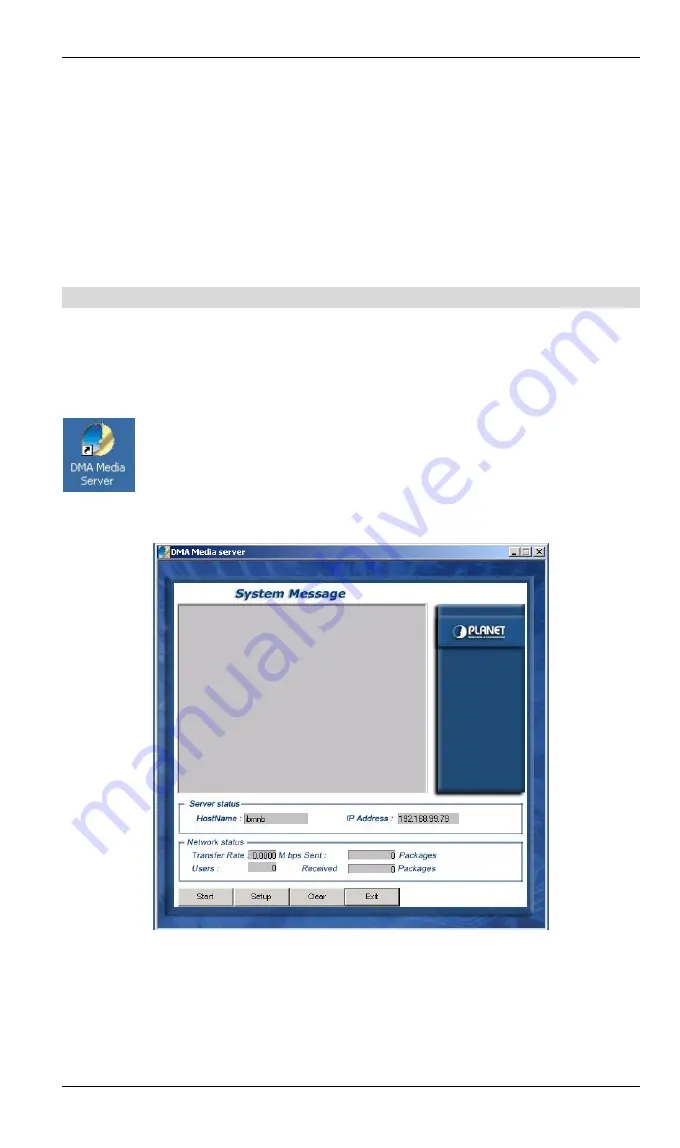
After launching the program, you will see the main setup screen, as the image depicts 
below.   


Click on the 

Setup

 button, to configure the destination of the media. You will then see 

the following screen. 

Desktop Icon 

Summary of Contents for DMA-100

Page 1: ...Digital Media Adapter DMA 100 User s Manual...

Page 2: ...commitment to update or keep current the information in this User s Manual and reserves the right to make improvements to this User s Manual and or to the products described in this User s Manual at...

Page 3: ...Package Contents 2 Physical Details 2 CHAPTER 2 INSTALLATION 5 Connecting the DMA 100 5 CHAPTER 3 MEDIA SERVER INSTALLATION 17 Preparation 25 CHAPTER 4 VIEWING THE MEDIA 25 CHAPTER 5 ADVANCED SETTING...

Page 4: ...tal photo is gaining its popularity the DMA 100 is capable of displaying slide show of your favorite pictures on TV sup ported formats in JPEG PNG BMP giving you the convenience of viewing and sharing...

Page 5: ...uld be included Digit Media Adapter unit Remote Control Power Adapter RCA Cable CD ROM Quick Installation Guide If any of the above items are damaged or missing please contact your dealer immedi ately...

Page 6: ...evice such as a flash disk to play media LAN Connect the RJ 45 cable to a PC or Switch The DMA Media Server must be installed on the PC Coaxial Connect a Coax cable to this port for better quality How...

Page 7: ...ip or Pause the media Video Control Use these buttons to Play Forward Skip or Pause the media CLEAR Use this button to clear an existing setting 0 9 A Z Use these buttons to enter digits or alphabets...

Page 8: ...TV As you can see in the above diagram the composite Audio Video cable is connected from the DMA 100 to the same ports of the TV One PC to One TV After you have connected the composite audio video cab...

Page 9: ...to enter the Setup screen You will then see three tabs on the left side of the screen Press the DOWN arrow twice so that that Initial Setting tab is selected SETP 4 Press the RIGHT arrow button to ent...

Page 10: ...lation 7 SETP 5 Press the RIGHT arrow once again and select Ethernet LAN then press the ENTER button SETP 6 Using the arrow keys and the numbers on the remote change the existing set tings to the foll...

Page 11: ...lt 192 168 0 100 4567 SETP 7 Press the ENTER button to save these settings You will then return to the previous menu Press the MENU button to go the main menu The DMA 100 will then restart itself auto...

Page 12: ...tch from the DMA 100s Then connect another straight RJ 45 cable from the Switch to your PC Follow the steps below for each DMA 100 so that each one has a separate IP address SETP 1 Switch the TV into...

Page 13: ...hree tabs on the left side of the screen Press the DOWN arrow twice so that that Initial Setting tab is selected SETP 4 Press the RIGHT arrow button to enter the Initial Setting tab Then press the DOW...

Page 14: ...Gateway of DMA 100 Default 192 168 0 254 Server IP The Server IP is the IP address that will be assigned to the PC that the DMA Media Server will be running and the port number is the one as signed t...

Page 15: ...audio video cable to your TV connect the USB Disk to your DMA 100 Follow the steps below to assign an IP address to the DMA 100 SETP 1 Switch the TV into AV1 or AV2 mode depending on how you have con...

Page 16: ...the screen Press the DOWN arrow twice so that that Initial Setting tab is selected SETP 4 Press the RIGHT arrow button to enter the Initial Setting tab Then press the DOWN arrow and select Network US...

Page 17: ...r User Guide 14 SETP 6 Then you can see the main menu updated as the following images SETP 7 Using your remote control press 1 to select USB Disk The screen will show Wait to get USB disk to sense if...

Page 18: ...ction is properly the screen will show Get USB DISK then you can choose to surf Audio Photo or view Playlist M Note Due to bandwidth limitation on the USB interface the Video function can t be selecte...

Page 19: ...Digital Media Adapter User Guide 16 SETP 7 2 If connection is failed the screen will show NO USB DISK on the top then you better check if you plug the USB Disk properly...

Page 20: ...r The PC and the Digital Media Adapter must be directly connected using the LAN port on the Digital Media Adapter or on the same LAN segment That is the PC must be configured to an IP address and subn...

Page 21: ...Digital Media Adapter User Guide 18 SETP 2 The Welcome screen will follow this opening screen SETP 3 Click on the Next button to continue SETP 4...

Page 22: ...ation location if not click on the Next button to continue SETP 6 On this screen you may change the name of the program folder If you do not want to change this name click on the Next button to begin...

Page 23: ...top TCP IP settings of DMA Media Server Follow the steps below in order to configure the TCP IP settings of Media server SETP 1 In the Control Panel double click Network Connections then double click...

Page 24: ...21 SETP 2 Select Internet Protocol TCP IP and then click on the Properties button This will allow you to configure the IP address of your PC You will then see the following window...

Page 25: ...ed on the same subnet as the DMA 100 Setup the DMA Media Server After installation completed you will see the icon of DMA Media Server in the Win dows Programs and on the desktop To run the DMA Media...

Page 26: ...have only one then change this number to one However leaving this at 10 will not make a difference Video Directory This is the folder where the video content is located Click on the Browse button to s...

Page 27: ...der where the new firmware is located Click on the Browse button to select the appropriate folder and then click on the OK button Message This value is the number of lines that will be displayed on th...

Page 28: ...to your living space When powering on the DMA 100 the DMA 100 home page will be displayed approxi mately 2 seconds on your television then boot into the OSD menu for easy navigation Listen to your fav...

Page 29: ...nd menu You will then see four options And the screen will show Waiting for DMA Media server to sense If the media connection is failed there will be message Can t Link to DMA Media Server Please Chec...

Page 30: ...roperly connected the screen will show CONNECTION then you can choose to surf Audio Photo or view Playlist SETP 4 Select Audio and press ENTER on the remote control The available music files will be l...

Page 31: ...o the next page PLAY Press this button to play all the tracks starting with the selected track RETURN Press this button to return to the previous menu Watch your favorite Videos SETP 1 Switch the TV i...

Page 32: ...l up and down the list and then press the ENTER button to play the selected video The other buttons are as follows PREV Press this button to scroll to the previous page NEXT Press this button to scrol...

Page 33: ...o AV1 or AV2 mode depending on how you have connected the composite audio video cable SETP 2 You will then see the main menu with three options The image below depicts the main menu SETP 3 Using your...

Page 34: ...REV Press this button to scroll to the previous page NEXT Press this button to scroll to the next page PLAY Press this button to play all the tracks starting with the selected track RETURN Press this...

Page 35: ...Guide 32 SETP 3 Using your remote control press 1 to enter the VOD Video on Demand menu You will then see four options SETP 4 Select Playlist and press ENTER on the remote control You will then see y...

Page 36: ...y button on the screen You will then see the selected media listed on the screen PREV Press this button to scroll to the previous page NEXT Press this button to scroll to the next page PLAY Press this...

Page 37: ...s supplied in this package If you are using the coax cable for your audio devices then you may want to change this setting to Encoded Digital SETP 1 Switch the TV into AV1 or AV2 mode depending on how...

Page 38: ...edia If you are having problems with viewing the media then you may want to change this setting to PAL C S SETP 1 Switch the TV into AV1 or AV2 mode depending on how you have connected the composite a...

Page 39: ...ide of the screen Press the DOWN arrow once to change the TV out setting to PAL C S Video and then press the Enter but ton Firmware Version SETP 1 Switch the TV into AV1 or AV2 mode depending on how y...

Page 40: ...utton After entering the Firmware version menu you may now verify the current installed firmware version in DMA 100 Firmware Upgrade In most circumstances it is not required to perform firmware upgrad...

Page 41: ...utton SETP 2 Switch the TV into AV1 or AV2 mode depending on how you have connected the composite audio video cable SETP 3 You will then see the main menu with three options The image below depicts th...

Page 42: ...ess the RIGHT button once and then the DOWN button four times to select Upgrade Firmware and then press the ENTER button SETP 6 If you are sure that you would like to upgrade the firmware click on the...

Page 43: ...graded Do not power off the de vice during this process The DMA 100 will reboot automatically after the firmware upgrade M Note Please be sure to have a stable power supply before upgrading the DMA 10...

Page 44: ...that you have setup the media folders audio video and images correctly 2 Start the DMA Media Server Refer to Chapter 3 for details Q The media plays fine for a while and then all of a sudden it freez...

Page 45: ...3 AAC AC 3 Supported video format MPEG 1 MPG DAT decoding MPEG 2 MPG VOB decoding MPEG 4 DivX AVI decoding Media server requirement Network connection Ethernet OS Microsoft Windows 2000 or XP Home Pro...

Reviews: