background image


Planar VM Series User Manual 

020-1357-01D 

Page | 4 

15.


Pairing the Remote Control to the Display


16.


Basic Remote Functions


16.1


Turning the Display On .....................................................................................33


16.2


Turning the Display Off .....................................................................................33


16.3


Adjusting the Volume .......................................................................................33


16.4


Selecting the Input Source ...............................................................................33


16.5


Navigating Through the Menus .........................................................................33


17.


OSD Main Menu


17.1


Picture ..............................................................................................................34


17.2


Screen ..............................................................................................................38


17.3


Audio ................................................................................................................40


17.4


Configuration 1 .................................................................................................42


17.5


Configuration 2 .................................................................................................45


17.6


Advanced Option ..............................................................................................48


18.


Tiling Configuration


18.1


Layout ..............................................................................................................55


18.2


Color Balance ...................................................................................................56


18.3


Frame Compensation .......................................................................................58


Summary of Contents for VM Series

Page 1: ...User Manual Planar VM Series User Manual 020 1357 01D Page 1 Planar VM Series VM49LX U VM49MX X VM55LX M VM55LX U VM55LX X VM55MX M VM55MX X ...

Page 2: ...is manual the Company shall not be liable for errors or omissions contained herein or for incidental or consequential damages in connection with the furnishing performance or use of this material Warranty and Service Plans Planar warranty and service plans will help you maximize your investment by providing great support display uptime and performance optimization From post sale technical support ...

Page 3: ...1 Installing the Alignment Brackets 11 5 Cleaning the Display 6 Installing the Cable Clips 7 Planar VM Series Standard Inputs 8 Before You Begin 8 1 Tools Equipment List 20 8 2 Other Things You May Need 20 8 3 Plan Your Installation 20 8 4 Prepare Your Installation Location 21 8 5 Cable Length Recommendations 21 8 6 Unpacking 22 8 7 Thermal Expansion 23 8 8 Connecting External Equipment 24 9 Insta...

Page 4: ...6 2 Turning the Display Off 33 16 3 Adjusting the Volume 33 16 4 Selecting the Input Source 33 16 5 Navigating Through the Menus 33 17 OSD Main Menu 17 1 Picture 34 17 2 Screen 38 17 3 Audio 40 17 4 Configuration 1 42 17 5 Configuration 2 45 17 6 Advanced Option 48 18 Tiling Configuration 18 1 Layout 55 18 2 Color Balance 56 18 3 Frame Compensation 58 ...

Page 5: ...vers high reliability to meet the demands of digital signage applications including retail hospitality universities sports bars corporate lobbies casinos and museums Designed for commercial installations Planar VM Series comes standard with a full array of inputs and connectivity for external control systems including support for native 4K resolution at up to 60Hz video loop through via DisplayPor...

Page 6: ...our dealer for inspection WARNING Wall mounts must be secure If the display is hung on a wall the wall must be strong enough to hold it Simply mounting it to wallboard or wall paneling won t be adequate or safe Caution The screen could be damaged by heavy pressure Slight pressure on the LCD will cause distortion of the image Heavier pressure will cause permanent damage Displays should be mounted w...

Page 7: ... has an image the display power will need to be reset 13 You must follow all National Electrical Code regulations In addition be aware of local codes and ordinances when installing your system 14 Refer all servicing to qualified service personnel Servicing is required when any of the displays have been damaged in any way such as the AC power cord or plug is damaged liquid has been spilled or objec...

Page 8: ... charge differential may build up between the electrodes of the liquid crystal which causes a negative color video image color inverted and brightness inverted version of the previous image to be retained when a new image is displayed This behavior is true for any LCD device from any LCD manufacturer TIR is not covered under warranty See standard warranty terms and conditions for details Here are ...

Page 9: ...M55MX M 370792 3 5 Normal Usage Guidelines Normal use of the LCD is defined as operating in the open air to prevent heat buildup and without direct or indirect heat sources such as lighting fixtures heating ducts or direct sunlight that can cause the modules to experience high operating temperatures For all modules do not block fans or ventilation openings If the LCD module will be installed in a ...

Page 10: ...motes energy efficiency This product qualifies for ENERGY STAR in the factory default settings and this is the setting in which power savings will be achieved Changing the factory default picture settings or enabling other features will increase power consumption that could exceed the limits necessary to qualify for ENERGY STAR rating For more information on the ENERGY STAR program refer to energy...

Page 11: ...n Shorter screws will result in insufficient mounting strength and longer screws could puncture parts inside the display The device may fall causing serious personal injury or death To prevent injury this device must be securely attached to the wall in accordance with the installation instructions supplied with the mount The mount must be secured to the VM Series display using the four M6x1 0 VESA...

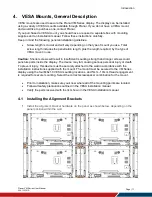
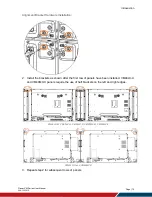
Page 12: ...tallation 2 Install the brackets as shown after the first row of panels have been installed VM49LX U and VM49MX X panels require the use of half brackets on the left and right edges VM55LX M VM55LX U VM55LX X VM55MX M VM55MX X VM49LX U and VM49MX X 3 Repeat step 2 for subsequent rows of panels ...

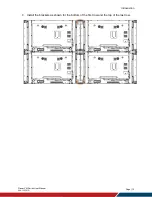
Page 13: ...Introduction Planar VM Series User Manual 020 1357 01D Page 13 4 Install the brackets as shown for the bottom of the first row and the top of the last row ...

Page 14: ...ing Failure to do so may result in electrical shock or damage Keep the following points in mind when cleaning the surface of the display When the surface of the display becomes dirty wipe the surface lightly with a soft clean cloth If the surface requires additional cleaning use LCD screen cleaner or LCD wipes which are available at most electronics stores Do not let cleaner seep into the display ...

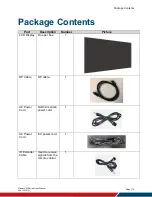
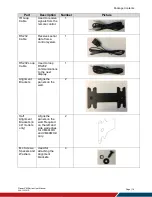
Page 15: ...1357 01D Page 15 Package Contents Part Description Number Picture LCD Display One per box 1 DP Cable DP cable 1 AC Power Cord North American power cord 1 AC Power Cord EU power cord 1 IR Extender Cable Used to receive signals from the remote control 1 ...

Page 16: ...es serial data from a control system 1 RS232 Loop Cable Used to loop RS232 communications to the next display 1 Alignment Brackets Aligns the panels on the wall 2 Half Alignment Brackets in 49 models only Aligns the panels on the wall Required on the left and side wall edges for VM49LX U and VM49MX X only 2 M4 Screws Spacers and Washers Used for attaching the alignment brackets 4 ...

Page 17: ...al 020 1357 01D Page 17 Part Description Number Picture Remote Control Used to control the display AAA batteries included 1 Cable Clips Used to clamp and organize the cables 2 Quick Start Guide Quick start guide 1 Handling Guide Handling guide 1 ...

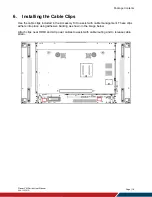
Page 18: ...g the Cable Clips Use the cable clips included in the Accessory Kit to assist with cable management These clips adhere into place using adhesive backing as shown in the image below Attach clips near HDMI and AC power cables to assist with cable routing and to release cable strain ...

Page 19: ...Package Contents Planar VM Series User Manual 020 1357 01D Page 19 7 Planar VM Series Standard Inputs ...

Page 20: ...D screen cleaner or LCD wipes available at most electronics stores At least two very strong people to help lift unit into place 8 3 Plan Your Installation You should have a detailed plan of how the units are to be configured The plan should include calculations for the following Power maximums reference below by display size o VM49LX U 5 units max per 20A circuit o VM49MX X 5 units max per 20A cir...

Page 21: ... and configuration are complete Please note Panel temperatures can increase 3 5 C with each vertically stacked unit Accommodate cooling as necessary to meet panel ambient specifications It is recommended that for inset walls 3 tall or less a minimum of 13mm 0 5 gap be left at the sides and a minimum of 25mm 1 0 gap be left at the bottom Ensure the LCD mounts are mounted flat level and plumb 8 5 Ca...

Page 22: ...d to evaluate for transit damage Leave the display in the box until you are ready to install to prevent damage from excess handling Remove 4 plastic latches two on each side from the carton by pinching together the two vertical bars and pulling out Remove carton lid Remove white foam from top of the display Remove accessories box Lower plastic bag so handles can be seen Remove cardboard Using two ...

Page 23: ...sily and will not support the weight of the display 2 Do NOT apply force to the front of the LCD CAUTION If the display must be temporarily stored out of its original packaging do not let it stand at an angle of more than 10 8 7 Thermal Expansion Thermal expansion occurs as the LCD displays become warmer during operation If the distance between the LCD displays is insufficient the displays may pus...

Page 24: ...ries displays are designed to be installed in a daisy chain configuration for video walls The displays can be connected in the daisy chain in any order and any displays can be selected as the first and last displays in the chain Note For larger video wall configurations a distribution amp is recommended 8 8 1 1 Display control connection RS232 8 8 1 2 Digital video connection DisplayPort ...

Page 25: ...Installing the Display Planar VM Series User Manual 020 1357 01D Page 25 8 8 2 IR Connection Note This display s remote control sensor will stop working if the IR IN is connected ...

Page 26: ...Intel Open Pluggable Specification OPS The slot supports OPS devices including PCs SDI modules etc To install an OPS device remove the protective cover on the display and slide the device firmly into position When installed the OPS device connects internally to the display No external video or power cables are required Note The Planar VM Series was tested with the Philips CRD50 OPS module ...

Page 27: ... piece to the edge of the display using the included screws Note In some models the cosmetic trim pieces are different for each edge and for some models the cosmetic trim pieces are the same for each edge Also in some cases the screw length may vary for some trim pieces Take care to ensure that the proper trim piece is connected to the correct edge of the display and that the correct screw is used...

Page 28: ... the Display 11 OSD Keypad The OSD keypad is located on the rear of the display OSD Keypad Buttons Key Descriptions Power Power on Power off Mute Audio Mute Input Source Selection Menu Right Increase value Volume Menu Left Decrease value Volume Menu Up Menu Down Menu Menu open close ...

Page 29: ...cators The LED indicator light is located on the rear of the display near the keypad The following table explains what the different colors and blink patterns mean LED On Power Status Condition Green Power on Red Standby Power save mode Red Green Blinking IR codes received Off AC off ...

Page 30: ...for tabletop floor or ceiling installations LCD panels of this size are at risk of panel deflection which can cause cosmetic sagging brightness uniformity issues and a shortened life span Installations where the display is tilted downward or upward at an angle may also be prone to these issues and are not recommended Note Failure to follow these instructions will void the warranty ...

Page 31: ...0 0x30 Source 0x00 0x38 Home 0x00 0x54 Format 0x00 0xF5 Back 0x00 0x0A List 0x00 0xCC Info 0x00 0x0F Up 0x00 0x58 Down 0x00 0x59 Left 0x00 0x5A Right 0x00 0x5B OK 0x00 0x5C Adjust 0x00 0x90 Options 0x00 0x40 Vol 0x00 0x10 Vol 0x00 0x11 Mute 0x00 0x0D Red 0x00 0x6D Green 0x00 0x6E Yellow 0x00 0x6F Blue 0x00 0x70 1 0x00 0x01 2 0x00 0x02 3 0x00 0x03 4 0x00 0x04 5 0x00 0x05 6 0x00 0x06 7 0x00 0x07 8 0...

Page 32: ...ed LED above the ID button will blink when any key on the remote control is pressed For initial setup of ID mode perform the following steps 1 In the OSD change the Monitor ID setting to a unique value see page 46 2 On the remote control hold down the ID SET button until the red LED above the ID button turns on 3 Use the 0 9 keys to enter the same value selected for the Monitor ID setting Press th...

Page 33: ...ndby mode 16 3 Adjusting the Volume 1 Using the remote press the VOL or VOL to increase or decrease the volume 2 Pressing the MUTE button temporarily turns off all sound To restore the sound press the MUTE button again Note The analog audio out is variable S PDIF is fixed 16 4 Selecting the Input Source Press the SOURCE button on the remote or press the INPUT button on the keypad Use the arrow but...

Page 34: ...Operating the Display Planar VM Series User Manual 020 1357 01D Page 34 17 OSD Main Menu 17 1 Picture ...

Page 35: ...re Press or to select the desired level Range 0 100 Default 50 Brightness Increase or decrease the brightness of the picture Press or to select the desired level Range 0 100 Default 50 Tint Increase or decrease the green hue Press or to select the desired level Range 0 100 Default 50 Color Adjust the brilliance and brightness Press or to select the desired level Range 0 100 Default 50 Gamma Select...

Page 36: ...ng User 1 o Red Gain Adjust the amount of red in bright content Press or to select the desired level Range 0 255 Default 255 o Green Gain Adjust the amount of green in bright content Press or to select the desired level Range 0 255 Default 255 o Blue Gain Adjust the amount of blue in bright content Press or to select the desired level Range 0 255 Default 255 ...

Page 37: ... Default Standard Color Space Select the input color space encoding for HDMI and DisplayPort inputs Options RGB PC RGB Video REC601 REC709 Auto Default Auto Local Dimming Enable local dimming of the LCD backlight This improves black levels and contrast however for some content it may introduce artifacts Options Off On Default Off Overscan Adjust the zoom overscan of the image Options Off On Defaul...

Page 38: ...ge 0 100 Default 50 V Position Adjust the vertical position of the image VGA source only Press or to select the desired level Range 0 100 Default 50 Tracking Adjust the clock of the displayed signal VGA source only Press or to select the desired level Range 0 100 Default 50 Phase Adjust the phase of the displayed signal VGA source only Press or to select the desired level Range 0 100 Default 50 ...

Page 39: ...Options Fill 4 3 Native 16 9 Letterbox Default Fill Auto Adjust Force the display to reacquire and lock to the input signal VGA source only This is useful when the signal quality is marginal Note This feature does not continually reacquire the signal Screen Reset Reset all settings in the Screen menu to their default values ...

Page 40: ...esired level Range 0 100 Default 50 Treble Adjust the sound in high tones Press or to select the desired level Range 0 100 Default 50 Bass Adjust the sound in low tones Press or to select the desired level Range 0 100 Default 50 Audio Out Line Out Adjust the volume for the Line Out connector on the display Press or to select the desired level Range 0 100 Default 30 ...

Page 41: ...the display s internal speakers and audio outputs Options Analog DisplayPort Digital Default Analog for VGA Digital for all other sources Note The Digital option cannot be selected for DisplayPort and the DisplayPort option cannot be selected for Digital Audio Reset Reset all settings in the Audio menu to their default values ...

Page 42: ...uration 1 Switch On State Select the behavior of the display when AC power is turned on Options Power Off Force On Last Status Default Last Status Panel Saving Brightness o Automatically limit the backlight intensity in order to reduce power consumption o Options Off On o Default Off ...

Page 43: ...ay on power up Options Last Input DisplayPort HDMI 1 HDMI 2 OPS VGA Default Last Input Network DHCP o Enable dynamic IP mode or configure the static IP settings of the display s Ethernet port o Options On Off o Default On IP Address o The IP address used by the display s network interface Configurable if DHCP is set to Off Subnet Mask o The subnet mask used by the display s network interface Confi...

Page 44: ...terface Configurable if DHCP is set to Off MAC Address o The MAC address of the display s network interface Power LED Light Enable or disable the power LED Options Off On Default On Configuration 1 Reset Reset all settings in the Configuration 1 menu to their default values Factory Reset Reset all settings in all menus to their default values ...

Page 45: ...play Planar VM Series User Manual 020 1357 01D Page 45 17 5 Configuration 2 OSD Turn Off Adjust the time in seconds before the OSD menu disappears Press or to select the desired level Range Off 5 120 seconds Default 45 ...

Page 46: ... transparency of the OSD menu Press or to select the desired level Options Off 1 4 Default Off Information OSD Apply to all pop ups and menus that are not the main OSD for example mute status volume and timing information Press or to select the desired level Options Off 1 60 seconds Default 10 Monitor ID Set the ID to use with both the IR remote control in ID mode and RS232 serial commands See pag...

Page 47: ... is the more modern standard and supports 3840x2160 60Hz resolution However sometimes HDMI 1 4 is needed for compatibility with older devices Rotation Rotate the OSD for use in either landscape or portrait orientation Note This rotates only the OSD not the image Options Landscape Portrait Splash Screen Select whether a splash screen appears when the monitor powers up Options Off On Default On Lang...

Page 48: ... Input Resolution Select the VGA input timing Some video formats look too similar to other formats preventing automatic detection and requiring manual format selection In most cases this setting will not need to be changed from Auto Options Auto 1024x768 1280x768 1360x768 1366x768 Default Auto ...

Page 49: ...ary Secondary Lock All Lock all but Volume Lock All but Power Default Normal Keypad Control Lock or unlock the keypad controls Options Unlock Lock All Lock all but Volume Lock All but Power Default Unlock Tiling H Monitors o Indicate the number of displays horizontally in the tiled wall o Options 1 15 o Default 1 V Monitors o Indicate the number of displays vertically in the tiled wall o Options 1...

Page 50: ... On o Default Off Switch On Delay o Select the amount of time to delay before turning on the display Depending on the electrical capabilities at the installation site it can be necessary to adjust the power on sequence of the displays Use this control to ensure that each display will power on at a different time avoiding such problems o Options Off Auto 0 1 25 0 seconds in 0 1 second increments o ...

Page 51: ...357 01D Page 51 Date and Time Year Month Day Hour Minute o Set the current date and time Daylight Saving Time o Enable or disable Daylight Saving Time and select the effective dates Date and Time o Displays the current date and time configured in the display ...

Page 52: ...le o Make the selected schedule active Available when On Off Input and Days of the Week are configured o Options Off On o Default Off On o Set the time when the display will power on Off o Set the time when the display will enter standby mode Days of the Week o Select which days of the week the selected schedule is active o Options Sun Mon Tue Wed Thu Fri Sat o Default None Every Week o Indicate w...

Page 53: ...e source are implemented Supported HDMI CEC Commands Command Value Notes Text View On 0x0D Standby 0x36 User Control Pressed 0x44 Power key only Data value 0x40 Active Source 0x82 Give Device Power Status 0x8F Options Off On Default Off Auto Scan Sources Select to scan inputs in order until a valid signal is detected Continue scanning when the signal on the selected input is lost Options Off On De...

Page 54: ...detected Options Low Power Wake on Signal Fast Wake On Signal Disabled Default Disabled Firmware Update Update the display s firmware from a USB flash drive See the firmware upgrade instructions within the firmware package for more information Advanced Settings Reset Resets all settings in the Advanced Settings menu to their default values ...

Page 55: ...e parameters differently for different subsections of the wall 18 1 Layout Configure the following parameters in the Tiling menu see page 49 These values will be the same on all displays H Monitors The number of displays in the horizontal direction on the tiled wall V Monitors The number of displays in the vertical direction on the tiled wall Additionally the Position parameter in the Tiling menu ...

Page 56: ...me range for luminance adjustment in the brighter direction Otherwise the displays will have a limited adjustment range 3 In each display set the Color Temperature value to User 1 This allows for adjustment of the red green and blue gain settings in later steps 4 Connect a source to the wall and send a full white test pattern 5 When all displays are white find the least bright display in the array...

Page 57: ...splays have the same appearance when white Note White balance may be an iterative process where displays will need to be adjusted multiple times as other surrounding panels are adjusted 10 If there is a need to start over use the Picture Reset or Factory Reset features in the OSD Refer to section 17 page 34 for more information ...

Page 58: ...e One way to fix this is to adjust the image Imagine looking out a window made up of many panes of glass The image seen is partially obscured by the frames but the mind will assemble the image and ignores the frames Note Frame Compensation is also known as mullion or bezel compensation Frame compensation basically mimics the mind s function by hiding portions of the picture as if the mullions were...

Page 59: ... displays The Tiling menu in the OSD contains the frame compensation controls see page 50 To adjust frame compensation first set Frame Comp to On For each of the top bottom left and right edges of the display adjust the Frame Comp Top Frame Comp Bottom Frame Comp Left and Frame Comp Right settings respectively until the image looks correct Note Start with the same settings for top and bottom and t...

Page 60: ...are other methods of controlling the Planar VM Series display externally Using a serial link to send binary commands and to receive responses to those commands The same set of commands can be sent over RS 232 USB TCP or UDP See the Planar VM Series RS232 User Manual for more information Using discrete infrared IR codes to program a third party remote control ...

Page 61: ... 000 x x x VESA DMT 1280x960 85 002 85 938 148 500 x x x VESA DMT 1280x1024 60 020 63 981 108 000 x x x VESA DMT 1280x1024 75 025 79 976 135 000 x x x VESA DMT 1280x1024 85 024 91 146 157 500 x x x VESA DMT 1366x768 59 790 47 712 85 500 x x x VESA DMT 1400x1050 49 965 54 113 100 000 x x x VESA CVT 1400x1050 59 948 64 744 101 000 x x x VESA CVT R 1400x1050 59 978 65 317 121 750 x x x VESA CVT 1400x...

Page 62: ...750 74 250 x x x SMPTE 274M CEA 861 F Format 34 1080p 50 56 250 148 500 x x x SMPTE 274M CEA 861 F Format 31 1080p 60 67 500 148 500 x x x SMPTE 274M CEA 861 F Format 16 UHDTV 3840x2160 24 54 000 297 000 x x CEA 861 F Format 93 HDMI 1 4b VIC 1 3840x2160 25 56 250 297 000 x x CEA 861 F Format 94 HDMI 1 4b VIC 2 3840x2160 30 67 500 297 000 x x CEA 861 F Format 95 HDMI 1 4b VIC 3 3840x2160 50 56 250 ...

Page 63: ...al 020 1357 01D Page 63 Color Subsampling Support Video Timing Input RGB 4 4 4 Supported YUV 4 4 4 Supported YUV 4 2 2 Supported YUV 4 2 0 Supported 4K 50 60Hz HDMI 1 2 OPS x x x x 4K 50 60Hz DisplayPort x x x All Other Supported Timings All Inputs x x x ...

Page 64: ... Monitoring LAN RJ45 RS232 In Out IR In Out Keypad Mechanical Display Dimensions with Handles 47 7 x 26 8 x 3 9 1210 5mm x 681 2mm x 98 9mm 47 8 x 26 9 x 4 2 1213 4mm x 684 2mm x 107 7mm 47 7 x 26 9 x 4 2 1211 4mm x 682 2mm x 106 8mm 47 7 x 26 8 x 3 9 1210 5mm x 681 2mm x 98 9mm 47 7 x 26 9 x 4 2 1211 4mm x 682 2mm x 106 8mm Display Dimensions without Handles 47 7 x 26 8 x 3 7 1210 5mm x 681 2mm x...

Page 65: ...hr Standby Power Consumption 0 5W Input Voltage Frequency AC 100 240V 50 60 Hz AC Inlet Type C14 OPS Power 16V 4A Environment Storage Temperature Min 4 F Max 140 F 20 C 60 C Operating Temperature Min 32 F Max 104 F 0 40 C at up to 3000 m Humidity 20 85 RH Approvals FCC Class A cTUVus CE ENERGY STAR Certified Yes Item VM49LX U VM49MX X LCD Panel Display Technology Commercial Grade IPS LCD Resolutio...

Page 66: ... 3 x 23 9 x 3 6 1075 6mm x 605 8mm x 91 7mm Bezel Width 2 3mm left top 1 2mm right bottom 0 9mm even Tiled Bezel Width 3 5mm 1 8mm Display Weight 47 lbs 22 kg 51 lbs 23 kg Mounting VESA 400 mm x 400 mm Fanless Yes Speakers 10W x 2 built in Usage Recommended Usage 24x7 Backlight D LED with Local Dimming Backlight Life 50 000 hours min Power Source Power Consumption Typ 60W 70W BTU hr Typ 60W x 3 42...

Page 67: ...Specifications Planar VM Series User Manual 020 1357 01D Page 67 Dimensions VM49LX U ...

Page 68: ...Specifications Planar VM Series User Manual 020 1357 01D Page 68 VM49MX X ...

Page 69: ...Specifications Planar VM Series User Manual 020 1357 01D Page 69 VM55LX M and VM55MX M ...

Page 70: ...Specifications Planar VM Series User Manual 020 1357 01D Page 70 VM55LX U ...

Page 71: ...Specifications Planar VM Series User Manual 020 1357 01D Page 71 VM55LX X and VM55MX X ...

Page 72: ...ort Website on page 73 Issue Check for the following No image is displayed Make sure the correct source is selected Make sure the main power switch is ON Check that the source equipment is operating correctly Make sure the input signal is compatible with this display The image is not centered Make sure the input signal is compatible with this display The remote control doesn t work Make sure the b...

Page 73: ...ies User Manual 020 1357 01D Page 73 Accessing the Planar Technical Support Website Go to http www planar com support to locate the following support documents and resources User Guide RS232 User Manual Standard Warranties Planar support hotline number and email ...

Page 74: ...stalling the Display 20 I inputs 18 installation cable clips 17 cosmetic trim 26 location 20 mounts 10 of display on a wall 19 OPS 25 planning 19 IR remote key codes 30 L LED indicators 28 M menus advanced option 47 audio 39 configuration 1 41 configuration 2 44 navigating 32 picture 33 screen 37 mounts 10 N navigating menus 32 normal usage guidelines 9 O OPS 25 OSD keypad 27 OSD main menu 33 54 P...

Page 75: ...Index Planar VM Series User Manual 020 1357 01D Page 75 VM55LX X dimensions 70 VM55MX X dimensions 70 volume 32 W warranty 2 8 waste disposal 9 ...

Reviews: