background image

19

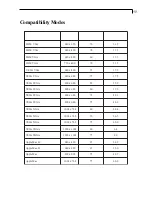
Compatibility Modes

A

G

V

M

B

I

0

5

3

x

0

4

6

0

7

5

.

1

3

A

G

V

M

B

I

0

0

4

x

0

4

6

0

7

5

.

1

3

A

G

V

M

B

I

0

8

4

x

0

4

6

0

6

5

.

1

3

A

G

V

M

B

I

0

0

4

x

0

2

7

0

7

5

.

1

3

A

G

V

A

S

E

V

0

8

4

x

0

4

6

2

7

9

.

7

3

A

G

V

A

S

E

V

0

8

4

x

0

4

6

5

7

5

.

7

3

A

G

V

S

A

S

E

V

0

0

6

x

0

0

8

6

5

2

.

5

3

A

G

V

S

A

S

E

V

0

0

6

x

0

0

8

0

6

9

.

7

3

A

G

V

S

A

S

E

V

0

0

6

x

0

0

8

2

7

1

.

8

4

A

G

V

S

A

S

E

V

0

0

6

x

0

0

8

5

7

9

.

6

4

A

G

X

A

S

E

V

8

6

7

x

4

2

0

1

0

6

4

.

8

4

A

G

X

A

S

E

V

8

6

7

x

4

2

0

1

0

7

5

.

6

5

A

G

X

A

S

E

V

8

6

7

x

4

2

0

1

5

7

0

.

0

6

A

G

X

S

A

S

E

V

4

2

0

1

x

0

8

2

1

0

6

4

6

A

G

X

S

A

S

E

V

4

2

0

1

x

0

8

2

1

5

7

0

8

C

L

c

a

M

el

p

p

A

0

8

4

x

0

4

6

7

6

9

.

4

3

II

c

a

M

el

p

p

A

0

8

4

x

0

4

6

7

6

0

.

5

3

c

a

M

el

p

p

A

4

2

6

x

2

3

8

5

7

7

.

9

4

c

a

M

el

p

p

A

8

6

7

x

4

2

0

1

5

7

2

.

0

6

Summary of Contents for PT170MU

Page 1: ...PLANAR LCD MONITOR PT170MUMANUAL www planar com...

Page 2: ...ation Product Overview 5 Start Your Installation 8 User Controls Front Panel Controls 10 How to Use the OSD Menus 11 On Screen Display Menus 12 Appendix Troubleshooting 16 Warning Signal 17 Product Di...

Page 3: ...cleaning the LCDpanel surface q Use a soft cloth moistened with mild detergent to clean the display housing q Use only high quality and safety approved AC DC power adapter q Disconnect the power plug...

Page 4: ...ing features q Analog signal input q Active matrix TFT LCD technology q 1280 x 1024 addressable pixels q 17 diagonal screen size q 31 5 80 kHz horizontal scan q 56 75 Hz refresh rate q VESA wall mount...

Page 5: ...LCDDisplay VGA Signal Cable PowerAdapter Power Cord User s Manual Quick Start Guide Audio In Cable Notice One end of the VGA Signal cable already connected to the LCD display Family Product CD USB Cab...

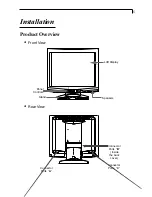
Page 6: ...5 Installation Product Overview u Front View LCDDisplay Stand Panel Controls Speakers u Rear View Connector Ports A Connector Ports C Connector Ports B Inside the back cover...

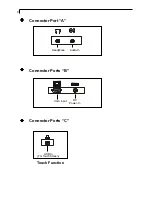
Page 7: ...6 u u u u u Connector Port A VGA input u u u u u Connector Ports B u u u u u Connector Ports C Touch Function DC Power In USB In For Touch Screen Headphone Audio In...

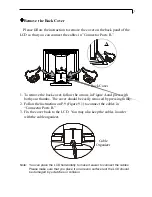
Page 8: ...The cover should be easily removed by pressing firmly 2 Follow the instruction on P 9 Figure 9 1 to connect the cables in Connector Ports B 3 Fix the cover back to the LCD You may also keep the cable...

Page 9: ...ighten the screws 4 Connect the Audio In cable from audio input port of your display to the Audio out port of your computer 5 Connect your headphone to Headphone port 6 Connect the USB cable from USB...

Page 10: ...9 C A B Figure 9 1 VGA Cable Power Adapter Power Cord Audio In Cable USB cable Headphone...

Page 11: ...ction to obtain an optimum image 3 Brightness Minus Minus 1 Decreases the brightness of the display image 2 Decreases value of the adjustment items 4 Brightness Plus Plus 1 Increases the brightness of...

Page 12: ...nd to select between the four Main Menus 2 Choose the adjustment items by pressing the Select Auto button 3 Adjust the value of the adjustment items by pressing the 3 or 4 button 4 Once you don t oper...

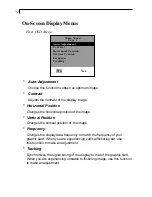
Page 13: ...requency Changes the display data frequency to match the frequency of your graphic card When you are experiencing vertical flickering bar use this function to make an adjustment 4 Tracking Synchronize...

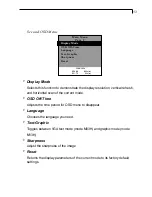
Page 14: ...OSD menu to disappear 4 Language Chooses the language you need 4 Text Graphic Toggles between VGA text mode mode M03H and graphic mode mode M13H 4 Sharpness Adjust the sharpness of the image 4 Reset...

Page 15: ...14 Volume Mute Main Menu Page 3 0 20 40 Third OSD Menu 4 Volume It allows you to control the volume sound 4 Mute It allows you to disable the sound immediately...

Page 16: ...the red color of the display 4 Color Adjustment Green It allows you to adjust the green color of the display 4 Color Adjustment Blue It allows you to adjust the blue color of the display Color Settin...

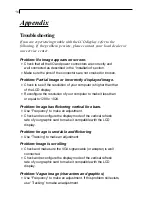
Page 17: ...solution of your computer to make it less than or equal to 1280 x 1024 Problem Image has flickering vertical line bars 4 Use Frequency to make an adjustment 4 Check and reconfigure the display mode of...

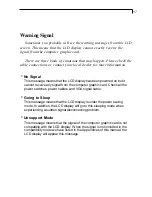
Page 18: ...but it cannot receive any signal from the computer graphic card Check all the power switches power cables and VGA signal cable 4Going to Sleep This message means that the LCD display is under the pow...

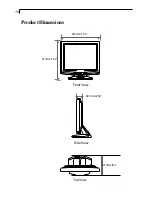
Page 19: ...18 ProductDimensions 414mm 16 3 210mm 8 3 Front View Top View 412mm 16 2 Side View 64 6mm 2 54...

Page 20: ...S A S E V 0 0 6 x 0 0 8 0 6 9 7 3 A G V S A S E V 0 0 6 x 0 0 8 2 7 1 8 4 A G V S A S E V 0 0 6 x 0 0 8 5 7 9 6 4 A G X A S E V 8 6 7 x 4 2 0 1 0 6 4 8 4 A G X A S E V 8 6 7 x 4 2 0 1 0 7 5 6 5 A G X...

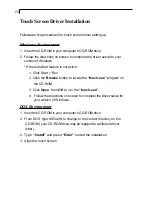
Page 21: ...ick Start Run 2 Click the Browse button to locate the touch exe program on the CD ROM 3 Click Open then OK to run the touch exe 4 Follow the directions on screen to complete the driver setup for your...

Page 22: ...3 2003 03 03 M F 8am 9pm Eastern Time...

Reviews: