background image

25

LCD Monitor Instructions

Adjustment Procedure (Pip Menu)

Change the input signal

3

3.

Use the [

] and/or [

] button to adjust.

When pressing the [

] button, the source of the input signal type on pip can be

selected according to the order [

auto

[

comp

[

s-video

[

auto

] in

sequence.

When pressing the [

] button, the source of the input signal type on pip order is

scrolled in opposite to the above order.

[

auto

]

/

Search and switch to the input signal automatically.

[

comp

]

/

Switch to the composite signal.

[

s-video

]

/

Switch to the s-video signal.
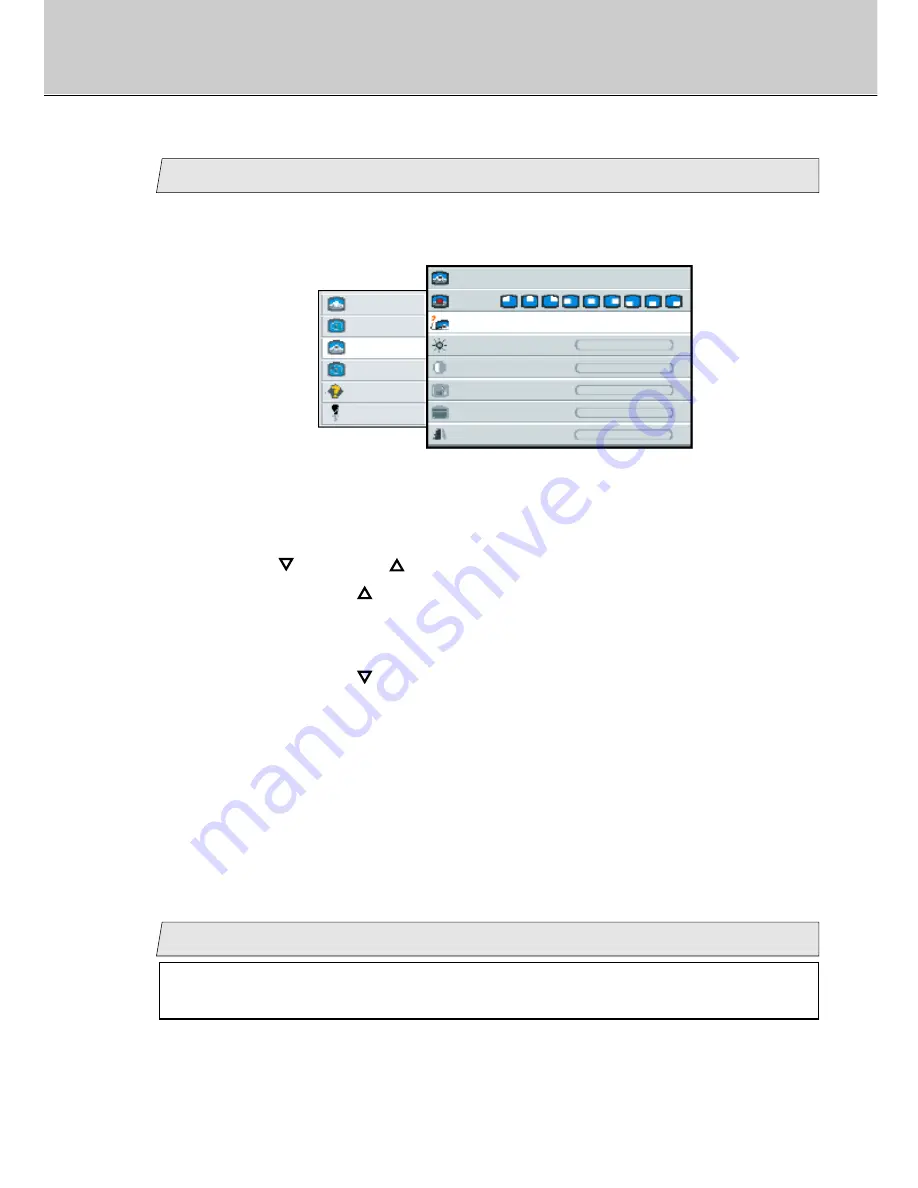
picture

advanced

pip

adv pip

options

utilities

Main menu

(Ex.)

Sub menu

size

off     small      medium    large

pos

source

auto     comp      s-video

brightness

-

+

contrast

-

+

color

-

+

tint

-

+

-

+

sharpness

1.

Select [

pip

] on the Main menu and press the [ENTER] button.

You can see the cursor moving to the Sub menu.

2.

Select [

source

] on the Sub menu and press the [ENTER] button.

The selected item of [

source

] turns blue.

Adjust the brightness (Video signal only)

4

1.

Select [

pip

] on the Main menu and press the [ENTER] button.

You can see the cursor moving to the Sub menu.

You can adjust this item when selecting [

small

] or [

medium

] or

[

large

] in [

size

] menu (see page 23).

Summary of Contents for 40"

Page 1: ...PLANAR 40 LCD MANUAL www planar com ...

Page 2: ... picture Menu 23 28 D Advanced picture in picture Menu 29 30 E Options Menu 31 33 F Utilities Menu 34 35 Adjustment for Composite Video S Video Component Video screen A Picture Menu 36 41 B Advanced Menu 42 44 C Video Menu 44 D Options Menu 45 46 E Utilities Menu 47 48 Additional Functions Shortcut Menu 49 50 Power Management System 51 Plug and Play 51 Maintenance 52 Troubleshooting Fault Finding ...

Page 3: ...he power cord with wet hands Also be sure to hold cord by the plug when removing it from the outlet Do not remove any parts that are held in place with screws The unit does not contain any user serviceable items Maintain standard room temperature 5 C to 35 C or 41 F to 95 F during use Do not subject the unit to shock or vibration Do not move the unit while it is in use A rapid increase in room tem...

Page 4: ...al OSD Control Box x 1 AC Power Cord x 1 User s Guide x 1 RGB Cable x 1 When you move the LCD monitor please unplug AC cables connected to AC IN and or AC OUT and disconnect the cables connected to the external equipments When you carry the LCD monitor please be careful not to shock it and touch the LCD panel to avoid damaging the LCD panel NOTE ...

Page 5: ... Switch Turns the power to the monitor on and off EXTERNAL CONTROL DVI Connector RGB Connector OSD Connector Ventilators Fans Ventilators AC IN Composite Video Connector S Video Connector G Y HD C SYNC B Cb VD R Cr Component Video terminal and BNC terminal AC OUT Rear View ...

Page 6: ...g Use the M6 screws only for installation The maximum length of the screw put through a hole is 20mm on the surface of a metal chassis as shown right Use the screw with effective length 12 20mm if not it may damage to the LCD monitor When you install the LCD monitor please check the strength of material to be secured ...

Page 7: ...6 EXTERNAL CONTROL ...

Page 8: ...ything make sure the Power Switch on the monitor and a computer are turned off 1 Plug the cable s into the connector on the monitor securely and fix them in place with two screws each 2 Plug the other end of the cable s into the connector on a computer 3 Plug the AC Power Cord into the AC IN on the monitor 4 Plug the Power Plug into an outlet 5 Plug the External OSD Control Box if necessary 6 Swit...

Page 9: ...nect OSD Control Box to switch display signal see page 11 Caution Connect the Video deck DVD player etc Turn off the power for the monitor and AV equipment before the connection 1 Plug the cable s into the connector on the monitor securely 2 Plug the other end of the cable s into the connector on AV equipment 3 Plug the AC Power Cord into the AC IN on the monitor 4 Plug the Power Plug into an outl...

Page 10: ...G Y B Cb HD CSYNC VD R Cr Component Video Cable not included etc For S Video Cable Video Cable and Component Video Cable please use the cables on the market or ones come with AV equipments For clearer picture using S Video Cable is recommended compared with Composite Video When an equipment has S Video output please use S Video Cable When several input cables are connected at once it is necessary ...

Page 11: ... only recommended Never cover the rear ventilators with cloth or something Secure enough space more than 30mm from the rear part of the monitor M6 bolt 12 places Side view of the monitor Rear view of the monitor Bracket not included Depth Min 12mm Max 20mm UP b Caution ...

Page 12: ...the screen H POSITION Adjust the horizontal position for the screen V POSITION Adjust the vertical position for the screen PHASE Adjust the phase for the screen FREQUENCY Adjust the horizontal width for the screen SCALING Scale the screen Note H position v position phase and frequency for the screen can be adjusted in Analog mode only Name Function of Buttons for Adjustment MENU Button To display ...

Page 13: ... picture in picture Menu refer to page 29 30 H POSITION Select the horizontal position of pip V POSITION Select the vertical position of pip VIDEO FORMAT Select the video format ntsc pal secam Options Menu refer to page 31 33 OSD Select the osd position LANGUAGE Select language used in osd AUTO ADJUST Adjust the screen automatically RESOLUTION Display the resolution of the screen INTERNAL FIRMWARE...

Page 14: ...e 42 44 COLOR Adjust the color temperature for video screen USER RED Adjust the level of red for video screen USER GREEN Adjust the level of green for video screen USER BLUE Adjust the level of blue for video screen Adjustment Items for Composite Video S Video and Component Video screen Options Menu refer to page 45 46 OSD Select the osd position LANGUAGE Select language used in osd INTERNAL FIRMW...

Page 15: ...to the signal from RGB terminal Analog RGB2 Switch to the signal from R G B HD VD terminal Digital RGB Switch to the signal from DVI terminal CompositeVideo Switch to the signal from Composite Video terminal S Video Switch to the signal from S Video terminal ComponentVideo Switch to the signal from Cr Y Cb terminal RGB C Sync Switch to the signal from R G B C SYNC terminal Every time the input sig...

Page 16: ...dit etc to adjust screen Before Adjustment picture advanced pip adv pip options utilities Main menu Ex Sub menu brightness 50 contrast 50 H position 50 V position 50 phase 15 1056 frequency scaling Wide The signal timing for a computer which this LCD monitor supports is listed in Table of Preset Data on Page 55 the recommended value of Vertical Frequency for this model is 60Hz Unlike CRT Monitors ...

Page 17: ...V position 50 phase 15 1056 frequency scaling Wide Select the item to be adjusted on the Main Menu Select the item to be adjusted by moving the cursor on the Main menu with the and or button and then press the ENTER button You can see the cursor moving to the Sub menu Select the item to be adjusted on the Sub Menu Select the item to be adjusted by moving the cursor on the Sub menu with the and or ...

Page 18: ... Sub menu brightness 25 contrast 50 H position 50 V position 50 phase 15 1056 frequency scaling Wide 2 Select brightness on the Sub menu and press the ENTER button The selected item of brightness turns blue 3 Use the and or button to adjust Interval 0 100 By pressing the button the whole screen is brighter By pressing the button the whole screen is darker Adjust the contrast 2 1 Select picture on ...

Page 19: ...g mode only 3 1 Select picture on the Main menu and press the ENTER button You can see the cursor moving to the Sub menu 2 Select H position on the Sub menu and press the ENTER button The selected item of H position turns blue 3 Use the and or button to adjust Interval 0 100 Press the button to shift the screen to the right Press the button to shift the screen to the left picture advanced pip adv ...

Page 20: ...the Sub menu picture advanced pip adv pip options utilities Main menu Ex Sub menu brightness 25 contrast 50 H position 50 V position 50 phase 15 1056 frequency scaling Wide Adjust the phase Analog mode only 5 3 Use the and or button to be able to display the small characters clearly Interval 0 31 1 Select picture on the Main menu and press the ENTER button You can see the cursor moving to the Sub ...

Page 21: ...e picture advanced pip adv pip options utilities Main menu Ex Sub menu brightness 25 contrast 50 H position 50 V position 50 phase 15 1056 frequency scaling Wide Adjust the scaling 7 1 Select picture on the Main menu and press the ENTER button You can see the cursor moving to the Sub menu 2 Select scaling on the Sub menu and press the ENTER button The selected item of scaling turns blue picture ad...

Page 22: ...f connected PC system Adjust the color temperature Preset picture advanced pip adv pip options utilities Main menu Sub menu Ex user red color Warm Neutral Cold user user green user blue 1 1 Select advanced on the Main menu and press the ENTER button You can see the cursor moving to the Sub menu 2 Select color on the Sub menu and press the ENTER button The selected item of color turns blue B Advanc...

Page 23: ...follow the steps Ex In case adjusting the user red user green and user blue in sequence picture advanced pip adv pip options utilities Main menu Sub menu Ex user red color Warm Neutral Cold user user green user blue 1 Select advanced on the Main menu and press the ENTER button You can see the cursor moving to the Sub menu 2 Select color on the Sub menu and press the ENTER button The selected item ...

Page 24: ...cursor moving to user blue 8 Press the ENTER button The selected item of user blue turns blue Adjust the blue level with the and or button Interval 0 100 C Picture in picture Menu If you wish to adjust a pip picture in picture you can adjust the size position source brightness contrast color tint and sharpness manually Adjust the size picture advanced pip adv pip options utilities Main menu Ex Sub...

Page 25: ... options utilities Main menu Ex Sub menu size off small medium large pos source auto comp s video brightness contrast color tint sharpness 2 1 Select pip on the Main menu and press the ENTER button You can see the cursor moving to the Sub menu 2 Select pos on the Sub menu and press the ENTER button The selected item of pos turns blue 3 Use the and or button to select the position When pressing the...

Page 26: ...omposite signal s video Switch to the s video signal picture advanced pip adv pip options utilities Main menu Ex Sub menu size off small medium large pos source auto comp s video brightness contrast color tint sharpness 1 Select pip on the Main menu and press the ENTER button You can see the cursor moving to the Sub menu 2 Select source on the Sub menu and press the ENTER button The selected item ...

Page 27: ...ress the ENTER button The selected item of brightness turns blue Adjust the contrast Video signal only 5 picture advanced pip adv pip options utilities Main menu Ex Sub menu size off small medium large pos source auto comp s video brightness 50 contrast 50 color 50 tint 50 50 sharpness 1 Select pip on the Main menu and press the ENTER button You can see the cursor moving to the Sub menu You can ad...

Page 28: ...n see the cursor moving to the Sub menu 2 Select color on the Sub menu and press the ENTER button The selected item of color turns blue You can adjust this item when selecting small or medium or large in size menu see page 23 Adjust the tint NTSC signal only 7 1 Select pip on the Main menu and press the ENTER button You can see the cursor moving to the Sub menu You can adjust this item when select...

Page 29: ...ess 1 Select pip on the Main menu and press the ENTER button You can see the cursor moving to the Sub menu picture advanced pip adv pip options utilities Main menu Ex Sub menu size off small medium large pos source auto comp s video brightness 50 contrast 50 color 50 tint 50 50 sharpness You can adjust this item when selecting small or medium or large in size menu see page 23 3 Use the and or butt...

Page 30: ...ect h position on the Sub menu and press the ENTER button The selected item of h position turns blue This menu can be used when inputting Composite Video or S Video signal and also selecting small or medium or large in size menu see page 23 You can adjust the horizontal vertical position for pip and select the video format if you select this menu 2 Select v position on the Sub menu and press the E...

Page 31: ...he cursor moving to the Sub menu 2 Select video format on the Sub menu and press the ENTER button The selected item of video format turns blue 3 Use the and or button to select the video format When pressing the button the video format can be selected according to the order Auto NTSC PAL secam Auto in sequence When pressing the button the video format order is scrolled in opposite to the above ord...

Page 32: ...n see the cursor moving to the Sub menu 2 Select osd on the Sub menu and press the ENTER button The selected item of osd turns blue 3 Use the and or button to select the position When pressing the button the position of pip picture in picture can be selected according to the order in sequence When pressing the button the position of pip order is scrolled in opposite to the above order Select langu...

Page 33: ...Adjustment Analog mode only 3 picture advanced pip adv pip options utilities Main menu Sub menu 1024 x 768 60 Hz Mode 88 OSD language Auto Adjust press right to select Internal Firmware Rom Version Ex 1 Select options on the Main menu and press the ENTER button You can see the cursor moving to the Sub menu 2 Select Auto Adjust on the Sub menu and press the ENTER button The selected item of Auto Ad...

Page 34: ...Select options on the Main menu the osd version is always displayed in Internal Firmware on the Sub menu Display the resolution 4 Select options on the Main menu Display the current resolution below Auto Adjust on the Sub menu Each time changing the resolution its information is displayed picture advanced pip adv pip options utilities Main menu Sub menu 1024 x 768 60 Hz Mode 88 OSD language Auto A...

Page 35: ...o the Sub menu 3 Use the and or button to adjust Interval 5 60 Press the button to set the osd timeout longer Press the button to set the osd timeout shorter Change the osd background 2 picture advanced pip adv pip options utilities Main menu Sub menu osd background opaque translucent reset press right to select Ex osd timeout 10 seconds 1 Select utilities on the Main menu and press the ENTER butt...

Page 36: ...loaded Delete the data saved at the current display mode 3 picture advanced pip adv pip options utilities Main menu Sub menu osd background opaque translucent reset press right to select Ex osd timeout 10 seconds 1 Select utilities on the Main menu and press the ENTER button You can see the cursor moving to the Sub menu 2 Select osd background on the Sub menu and press the ENTER button The selecte...

Page 37: ...t 50 sharpness 1 2 3 4 5 6 7 8 scaling Wide picture advanced video options utilities Main menu Ex Sub menu brightness 50 contrast 50 H position 50 V position 50 color 50 tint 50 sharpness 1 2 3 4 5 6 7 8 scaling Wide 1 2 1 Select picture on the Main menu and press the ENTER button You can see the cursor moving to the Sub menu 1 Select picture on the Main menu and press the ENTER button You can see...

Page 38: ...mes darker Adjust the horizontal position 2 Select H position on the Sub menu and press the ENTER button The selected item of H position turns blue 3 Use the and or button to adjust Interval 0 100 Press the button to shift the screen to the right Press the button to shift the screen to the left picture advanced video options utilities Main menu Ex Sub menu brightness 50 contrast 50 H position 50 V...

Page 39: ...can see the cursor moving to the Sub menu 2 Select V position on the Sub menu and press the ENTER button The selected item of V position turns blue Adjust the color picture advanced video options utilities Main menu Ex Sub menu brightness 50 contrast 50 H position 50 V position 50 color 50 tint 50 sharpness 1 2 3 4 5 6 7 8 scaling Wide 5 1 Select picture on the Main menu and press the ENTER button...

Page 40: ...utton You can see the cursor moving to the Sub menu 3 Use the and or button to adjust Interval 0 100 By pressing the button the skin color becomes more greenish By pressing the button the skin color becomes more purplish 2 Select tint on the Sub menu and press the ENTER button The selected item of tint turns blue picture advanced video options utilities Main menu Ex Sub menu brightness 50 contrast...

Page 41: ...on The selected item of sharpness turns blue 3 Use the and or button to adjust Interval 1 8 selected value outline of the picture 1 2 3 4 5 6 7 8 clearly darkly picture advanced video options utilities Main menu Ex Sub menu brightness 50 contrast 50 H position 50 V position 50 color 50 tint 50 sharpness 1 2 3 4 5 6 7 8 scaling Wide Adjustment for Composite Video S Video Component Video screen ...

Page 42: ...When pressing the button the scaling can be selected according to the order Wide Normal LB to 16 9 Panorama Gamemode Auto Wide in sequence When pressing the button the scaling order is scrolled in opposite to the above order Wide Display the input picture converted the wide Normal Display the standard input picture of an aspect ratio of 4 3 LB to 16 9 Display the input picture of LB with an aspect...

Page 43: ...s by user red user green and user blue see following step 2 Ex Sub menu Main menu picture advanced video options utilities user red color Warm Neutral Cold user user green user blue 1 1 Select advanced on the Main menu and press the ENTER button You can see the cursor moving to the Sub menu 2 Select color on the Sub menu and press the ENTER button The selected item of color turns blue B Advanced M...

Page 44: ... button and press the ENTER button The selected item of user red turns blue 5 Adjust the red level with the and or button Interval 0 100 6 Press the ENTER button and then press the button You can see the cursor moving to user green Press the ENTER button The selected item of user green turns blue 7 Adjust the green level with the and or button Interval 0 100 Press the ENTER button and then press t...

Page 45: ...secam Auto in sequence When pressing the button the video format order is scrolled in opposite to the above order Auto Search and switch to the input signal automatically NTSC Switch to the NTSC signal PAL Switch to the PAL signal secam Switch to the SECAM signal 1 Select video on the Main menu and press the ENTER button You can see the cursor moving to the Sub menu 2 Select video format on the Su...

Page 46: ...1 Select options on the Main menu and press the ENTER button You can see the cursor moving to the Sub menu 3 Use the and or button to select the position When pressing the button the position of pip picture in picture can be selected according to the order in sequence When pressing the button the position of pip order is scrolled in opposite to the above order D Options Menu Select the osd positio...

Page 47: ...ion Select options on the Main menu the osd version is always displayed in Internal Firmware on the Sub menu Adjustment for Composite Video S Video Component Video screen 3 Use the and or button to select the language When pressing the button the language can be selected according to the order English German Japanese French Spanish English in sequence When pressing the button the language is scrol...

Page 48: ...s blue 3 Use the and or button to adjust Interval 5 60 Press the button to set the osd timeout longer Press the button to set the osd timeout shorter E Utilities Menu You can change the osd timeout and background and also reset the osd setting if you select this menu Change the osd timeout 1 Main menu Ex Sub menu picture advanced video options utilities osd background opaque translucent reset pres...

Page 49: ... press right to select 1 Select utilities on the Main menu and press the ENTER button You can see the cursor moving to the Sub menu 2 Select reset on the Sub menu and press the ENTER button The selected item of reset turns blue 3 Press the button to reset the osd setting All data adjusted saved are deleted and then the default settings programmed by manufacturer is reloaded Adjustment for Composit...

Page 50: ...R button The shortcut menu is displayed brightness 50 Ex 2 Use the ENTER button to select the shortcut menu When pressing the ENTER button the shortcut menu can be selected according to the order brightness contrast pip enable brightness in sequence Every time the ENTER button is pressed the shortcut menu changes The shortcut menu disappears according to the setting in osd timeout menu see page 47...

Page 51: ...quence When pressing the button the size of pip is scrolled in opposite to the above order When off is selected pip menu and pip disappear In case selecting small or medium or large pip menu appears Adjust the contrast 3 1 Use the ENTER button to select contrast menu contrast 50 Ex 2 Use the and or button to adjust Interval 0 100 By pressing the button the contrast difference between bright and da...

Page 52: ... with a computer that conforms to DPMS Display Power Management Signaling Standard of the VESA Video Electronics Standards Association This monitor conforms to DDC2B Display Data Channel 2B standard of VESA DDC stands for display data channel and is a registered trademark of VESA Plug and Play Power Management System This monitor does not correspond to DDC1 so that Plug and Play function will not ...

Page 53: ...int thinner or benzene as they will damage the surface of the cabinet Follow the manufacturer s directions when using chemically treated cloths Gently blow away any dust that has adhered to the display screen Apply a small amount of water to a soft cloth wring well and then wipe gently Do not use organic solvents such as ethyl alcohol thinner or benzine etc Do not rub with pointy objects such as a...

Page 54: ...h the monitor s specifications specifications Not change to Is the cable connected Check the RGB or DVI 7 another input signal exactly cable connection Fault Finding Please check the following items before requesting repair When this LCD monitor still does not work properly after checking in following way stop using it turn off the power switch unplug the power plug from the AC Outlet and contact ...

Page 55: ...dicate a broken or defective display The display will return to normal after the power is turned off and the unit stands for a while Use of a screen saver is recommended Bright dots dots that remain lit or black dots unlit dots on the LCD monitor s display are normal they do not indicate a broken or defective display When the LCD monitor shows the Composite Video S Video etc it is displayed on a l...

Page 56: ...o 14 and No 15 in the list below are only recommended No Resolution Vertical Frequency Horizontal Frequency 1 640 x 350 dots 70 Hz 31 4 kHz 2 640 x 400 dots 70 Hz 31 4 kHz 3 640 x 480 dots 60 Hz 31 5 kHz 4 640 x 480 dots 72 Hz 37 8 kHz 5 640 x 480 dots 75 Hz 37 5 kHz 6 800 x 600 dots 56 Hz 35 1 kHz 7 800 x 600 dots 60 Hz 37 9 kHz 8 800 x 600 dots 72 Hz 48 1 kHz 9 800 x 600 dots 75 Hz 46 9 kHz 10 8...

Page 57: ... DDC Data 15 Ground for 5V 23 T M D S Clock 8 No Connect 16 Hot Plug Detect 24 T M D S Clock Digital Video Input DVI D 24pin 1 9 8 16 24 17 Cable Pin Arrangement female No Signal name No Signal name No Signal name 1 R 6 R GND 11 2 G 7 G GND 12 DDC data line 3 B 8 B GND 13 Hor Sync 4 9 14 Vert Sync 5 DDC GND 10 GND 15 DDC clock line Analog Video Input mini D Sub 15pin DDC Standard VESA 1 5 6 10 11 ...

Page 58: ...ital DVI Standard Version 1 0 No of Colors 16 77 million OSD Language English German Japanese French Spanish Plug Play VESA DDC2B Power Management VESA DPMS Video Input Composite Video Signal 75 Ω 1Vp p NTSC PAL SECAM Connector BNC x 1 S Video Signal Luminance 75 Ω 1Vp p Chrominance 75 Ω 0 286Vp p NTSC PAL SECAM Connector Mini DIN 4pin X1 Component Video Signal Y Cb Cr Analog RGB C SYNC Analog RGB...

Page 59: ...ion If this equipment does cause interference to radio and television reception which can be determined by turning the equipment off and on the user is encouraged to try to correct the interference by one or more of the following measures reorient or relocate the receiving antenna increase the separation between the equipment and receiver connect the equipment into an outlet on a circuit different...

Page 60: ...ern Time 2003 Planar Systems Inc 04 03 Planar is a registered trademark of Planar Systems Inc Other brands and names are the property of their respective owners Technical information in this document is subject to change without notice Online Support http planar custhelp com 2RS6P10A00300A Planar Systems Inc ...

Reviews: