


12
GIR1165E-001_v01
It may be necessary to press the Steam Burst
Button a few times to engage this function.
For optimum steam quality, do not press the
Steam Burst Button more than three times after
the heater light goes off.
STEAM BURST IN VERTICAL POSITION
This function provides extra amount of steam for removing
creases from delicate fabrics in hanging position (hanging
curtains or other hanging fabrics).
The steam generated by the iron has very
high temperature. Never use the appliance for
ironing clothes or fabrics while they are being
worn by people or pets. Never aim the steam at
people or pets.
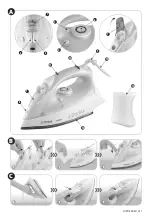
1
Proceed as described in the “Before First Use” section.
2
Turn the
Temperature Dial
to “●●●”.
3
The
Heater Light
will come on.
The light will go off once the required
temperature is reached.
●
The iron is ready for use.
4
Hold the iron between 15 and 30 centimetres away from
the garment.
5
Press the
Steam Burst Button
- steam will shoot from
the holes of the soleplate.
6
For Stubborn wrinkles, wait a few seconds before
pressing the
Steam Burst Button
again.
Most wrinkles can be removed within three
presses.
It may be necessary to press the Steam Burst
Button several times to start this function.
For optimum steam quality, do not press the
Steam Burst Button more than three times in
a row.
When ironing delicate fabrics (synthetics, silk,
velvet etc.), keep the iron a few centimetres
away from the garment to prevent damage.
ENDING THE IRONING
1
Turn the
Temperature Dial
counter-clockwise to “
MIN
”
position. The will turn off.
2
Set the steam control to position.
3
Unplug the unit.
4
Empty the water tank. See “Emptying The Water Tank”.
5
When the iron has cooled completely, store it vertically in
a safe place.
Emptying The Water Tank
●
Set the
Steam Control
to position.
●
Unplug the unit.
1
Hold the iron upside down and shake it gently to remove
the remaining water.
2
When the soleplate is still hot, press the
Steam Burst
Button
to drain the water tank.
3
Press the
Spray Button
to release any remaining water.
●
Before storing the iron, make sure the
Steam Control
is
set to position.
Additional Functions
ANTI SCALE SYSTEM
The appliance has a build-in anti-limescale container.
It is designed to reduce the build-up of limescale which
occurs during steam ironing.
The build-in anti-scale cartridge prolongs
the service life of the iron. However, it will
not completely stop the natural process of
limescale build-up.
SELF CLEANING
This function provides for removal of scale and mineral
built-up in the Steam Chamber. The performance of the iron
largely depends on the water hardness and the frequency
of performing the self-cleaning process. It is recommended
to perform self-cleaning at least once a month or more
regularly.
1
Proceed as described in the “Before First Use” section.
2
Turn the
Temperature Dial
to “●●●“.
3
The
Heater Light
will come on.
The light will go off once the required
temperature is reached.
●
The iron is ready for use.
4
Wait for one more cycle. The light will go on and off.
5
Turn the
Temperature Dial
counter-clockwise to “
MIN
”
position.
6
Unplug the unit.
7
Hold the iron horizontally over a sink.
8
Press and hold the
Self-Cleaning Button
.
9
Steam and boiling water will flow out of the holes
on the soleplate, washing away the scales and minerals
accumulated inside the steam chamber.
10
Sway the iron gently until the water tank is empty.
11
Release the
Self-Cleaning Button
when self cleaning is
complete.
12
Place the iron on a flat and level surface and allow it to
cool down completely.
C