PITSOS GIR1135G User Manual Download Page 10

10

GIR1165E-001_v01

Hints for ironing

1

 Sort out the articles to be ironed according to the type 

of  fabric.  This  will  minimize  the  frequency  of  temperature 

adjustment for different garments.

2

 Test ironing a small area on the backside or inside the 

garment if you are unsure about the type of fabric. Start with 

a low temperature and increase gradually.

3

 Wait for about three minutes before ironing heat sensitive 

fabrics. Temperature adjustment needs certain time to reach 

the required level no matter it is higher or lower.

4

 Delicate fabrics such as silk, wool, velour, etc. are best 

ironed with an ironing cloth to prevent shine marks.

5

 You may need a few times of press to activate the spray, 

burst and vertically burst function.

6

 Read the garment labels and follow the manufacturer’s 

ironing  instructions  which  are  often  shown  by  symbols 

similar to the following:

Temperature settings


Acetate


Elastics


Polyamide


Polypropylene


Cupro


Polyester


Proteins


Silk


Triacetate


Viscose


Wool


Cotton


Linen

Technical data

The iron technical parameters are included at the name plate.

The iron is I class appliance, equipped with supplying cord 

and plug with grounding. 

PITSOS iron meets the requirements of effective standards.

This  device  complies  with  Commission  Regulation  (EC) 

no. 1275/2008 on eco-design requirements.

The  appliance  meets  the  requirements  of  the  following 

directives:


Electrical  equipment  designed  for  use  within  specific 

voltage limits (LVD) – 2006/95/EC.


Electro-Magnetic Compatibility (EMC) – 2004/108/EC.

The product is marked with CE symbol on the name plate.
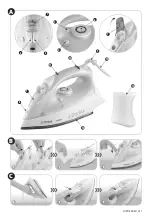
Features

1

 Steam Control

2

 Steam Burst Button

3

 Spray Button

4

 Self-Clean Button

5

 Temperature Indicator

6

 Temperature Dial

A


Never direct the steam to human or 

pets.


The iron must not be left unattended 

while  it  is  connected  to  the  supply 

mains.


CAUTION!

Not observance can result in 

damage to possessions


Remove any protective films or stickers from the sole 

plate and the cabinet.


Unwind and straighten the power cord before usage.


Fill the water using included vessel for water.


Keep the power cord away from the soleplate.


Make  sure  that  the  voltage  on  the  rating  plate 

corresponds to that of your power grid.


Always  connect  the  iron  to  a  suitable  mains  supply 

outletm  (AC  only),  with  grounding,  which  voltage 

complies with the voltage indicated on the appliance 

nameplate.


Do  not  use  an  extension  power  cord  set  without 

grounding!


Do not add perfume, vinegar or other chemical liquids 

into  the  water  tank;  they  can  damage  the  appliance 

seriously.


Do  not  immerse  the  appliance  in  water  or  any  other 

liquid.


Do not wrap the power cord around the unit for storage 

until it has cooled down completely.


Do not attempt to open the cabinet or dismantle any 

parts from the appliance.


The appliance is not intended to be operated by means 

of an external timer or separate remote-control system.


If you do not use the iron, even for short time, switch it 

off, turning Temperature Dial in anti-clockwise direction 

to 

“MIN”

.


If you are not going to use the iron even for a short 

period of time, turn off the steam function by setting the 
steam control to   position.


Use “SELF CLEANING” function at least once a month.


SUGGESTION

Information on the product and 

suggestions for its use


The iron is intended for domestic usage only and you 

can use it solely according to herewith manual.

Summary of Contents for GIR1135G

Page 1: ...GIR1135G GIR1165E ΟΔΗΓΙΕΣ ΧΡΗΣΗΣ ΑΤΜΟΣΙΔΕΡΟ USER MANUAL STEAM IRON 3 8 9 13 EL EN steam iron ΑΤΜΟΣΙΔΕΡΟ ...

Page 2: ...A GIR1165E 001_v01 C B 1 2 3 1 2 3 1 6 5 7 4 2 3 12 9 10 13 14 11 7 8 ...

Page 3: ...ό το σίδερο Εάν οποιοδήποτε μέρος του σιδήρου έχει υποστεί βλάβη για να αποφευχθούν οι κίνδυνοι πρέπει να αντικατασταθεί από τον κατασκευαστή ή τον αντιπρόσωπό του ή από εξειδικευμένο και εξουσιοδοτημένο προσωπικό Οι επισκευές μπορούν να εκτελεστούν μόνο από εξειδικευμένο και εξουσιοδοτημένο προσωπικό Εσφαλμένη επισκευή μπορεί να οδηγήσει σε σοβαρό κίνδυνο για τον χρήστη Σε περίπτωση βλάβης επικοι...

Page 4: ...από εξωτερικούς χρονοδιακόπτες ή άλλο σύστημα μέσω τηλεχειριστηρίου Εάν δεν χρησιμοποιήσετε το σίδερο ακόμη και για ένα μικρό χρονικό διάστημα απενεργοποιήστε περιστρέφοντας τον επιλογέα θερμοκρασίας αντίθετα με την φορά των δεικτών του ρολογιού Ρυθμίστε στη θέση MIN Εάν δεν χρησιμοποιήσετε το σίδερο ακόμη και για μικρό χρονικό διάστημα απενεργοποιήστε τη ρύθμιση ατμού από τον διακόπτη ατμού στη θ...

Page 5: ...ά Μην υπερβαίνετε την ένδειξη MAX που έχει σημειωθεί στην πλευρά της δεξαμενής νερού 3 Κλείστε το καπάκι της δεξαμενής νερού B 5 Για να ενεργοποιήσετε το σπρέι ή τον ατμό κάθετης εκτόξευσης είναι απαραίτητο να πατήσετε το κουμπί 6 Ακολουθήστε τις οδηγίες του κατασκευαστή στα ενδύματα Διαβάστε τις ετικέτες που παρουσιάζονται συχνά υπό τη μορφή συμβόλων για παράδειγμα Ρυθμίσεις θερμοκρασίας Πλαστικέ...

Page 6: ...τσαλάκωμα των υφασμάτων μετά από τρία πατήματα του πλήκτρου Η ρίψη ατμού μπορεί να γίνει ακόμη και μετά από μερικές πιέσεις του πλήκτρου Για να διατηρηθεί η υψηλή ποιότητα ατμού μην πατήσετε το κουμπί ατμού πάνω από τρεις φορές στη σειρά ΣΙΔΕΡΩΜΑ ΧΩΡΙΣ ΑΤΜΟ 1 Ακολουθήστε την ενότητα Προετοιμασία για τη λειτουργία του σιδέρου 2 Ρυθμίστε τον διακόπτη ατμού στη θέση 3 Στρέψτε τον ρυθμιστή θερμοκρασία...

Page 7: ...για να υποδείξει ότι το ατμοσίδερο βρίσκεται σε κατάσταση αυτόματης απενεργοποίησης 3 Μετακινήστε το σίδερο για να συνεχίσετε το σιδέρωμα Η συσκευή θα επιστρεψει στις προηγούμενες ρυθμίσεις θα ζεσταθεί ξανά Κατά το σιδέρωμα κρατάτε σε απόσταση τουλάχιστον αρκετά εκατοστά από τα μαλακά υφάσματα συνθετικό υλικό μετάξι βελούδο κ λπ διαφορετικά το ύφασμα μπορεί να καταστραφεί ΤΕΛΟΣ ΤΟΥ ΣΙΔΕΡΩΜΑΤΟΣ 1 Σ...

Page 8: ...ηρά και οξέα καθαριστικά όπως και ουσίες αφαλάτωσης Οικολογία Προστασία Περιβάλλοντος Κάθε χρήστης μπορεί να συμβάλει στην προστασία του περιβάλλοντος Δεν είναι ούτε δύσκολο ούτε δαπανηρό Για να το κάνετε αυτό συσκευασίες από χαρτόνι στον κάδο ανακύκλωσης χαρτιού σακούλες από πολυαιθυλένιο ΡΕ σε κάδο ανακύκλωσης πλαστικού Φθαρμένες συσκευές απορρίπτοναι μόνο στα κατά τόπους ειδικά σημεία περισυλλο...

Page 9: ...st after ironing It is hot Please refer to the following figure 1 and figure 2 Caution Hot surface Figure 1 Right side Figure 2 Left side The appliance generates high temperature Use it carefully and warn other users against possible hazard Keep special care when ironing in presence of children Do not allow to touch the iron during ironing Do not allow children to perform cleaning and user mainten...

Page 10: ...e Features 1 Steam Control 2 Steam Burst Button 3 Spray Button 4 Self Clean Button 5 Temperature Indicator 6 Temperature Dial A Never direct the steam to human or pets The iron must not be left unattended while it is connected to the supply mains CAUTION Not observance can result in damage to possessions Remove any protective films or stickers from the sole plate and the cabinet Unwind and straigh...

Page 11: ... Water Tank Cover B DRY IRONING 1 Proceed as described in the Before First Use section 2 Set the Steam Control to position 3 Turn the Temperature Dial to or 4 The Heater Light will come on The light will go off once the required temperature is reached The iron is ready for use STEAM IRONING 1 Proceed as described in the Before first use section 2 Turn the Temperature Dial to or For optimum steam q...

Page 12: ... cooled completely store it vertically in a safe place Emptying The Water Tank Set the Steam Control to position Unplug the unit 1 Hold the iron upside down and shake it gently to remove the remaining water 2 When the soleplate is still hot press the Steam Burst Button to drain the water tank 3 Press the Spray Button to release any remaining water Before storing the iron make sure the Steam Contro...

Page 13: ... 8 minutes in vertical position 2 The Auto Off Light will pulse flash which indicates that the iron is in the automatic shot off mode 3 Move the unit to continue ironing The iron will go back to the previous settings and will heat up again The iron will revert to the previous settings each time it is used moved The iron will heat up for about 60 seconds up to the temperature set with the temperatu...

Page 14: ...ν αναγράφεται ο αριθμός σειράς ή η ημερομηνία αγοράς 8 Η εγγύηση δεν καλύπτει Επισκευές μετατροπές ή καθαρισμούς που έλαβαν χώρα σε κέντρο service μη εξουσιοδοτημένο από την BSH Ελλάς ΑΒΕ Λάθος χρήση υπερβολική χρήση χειρισμό ή λειτουργία του προϊόντος κατά τρόπο μη σύμφωνο με τις οδηγίες που περιέχονται στα εγχειρίδια χρήσης και ή στα σχετικά έγγραφα χρήσης συμπεριλαμβανομένων της πλημμελούς φύλα...

Page 15: ...Σημειώσεις Notes GIR1165E 001_v01 ...

Page 16: ...cale σύστημα που εμποδίζει τη συσσώρευση των αλάτων 3 Κάθετη απελευθέρωση ατμού 4 Anti drip δεν στάζει σε χαμηλές θερμοκρασίες 1 Self clean function 2 Anti calcium system preventing the build up of limescale 3 Vertical steam release 4 Anti drip system at low temperatures 3 2 ...

Reviews: