request you add an owner name for this remote. Input a name for this remote and then press SAVE. You will see
Record owner Name
, then press Enter and record a voice for this remote keychain.
Note: Each time you press Add, follow steps above. You can add one remote and a maximum of 8 Keychain Remotes.
Edit
select Edit press Enter to find the name of remote then press Enter you can edit the remote keychain name or record a
voice for the remote keychain.
Delete
select Delete and press Enter, you can find all your remote names to delete one or all remote keychains if you want to
remove the remote keychain from console panel.
Delayed Arm
If you select
Delayed Arm
and press Enter, then set Yes, it will give you 60 seconds to leave the house. Default
is set Delay as Yes. It gives you 60 seconds to leave the house when you do arm system by remote keychains. (You
can change this time using
System Settings
menu
,
under Arm delay time)
Program and Mount Bracket Door/Window Sensors
If you received a pre-Programed system kit, please ignore this step and do not program it again.
All new Door/Window sensors you need should be programmed to your console.
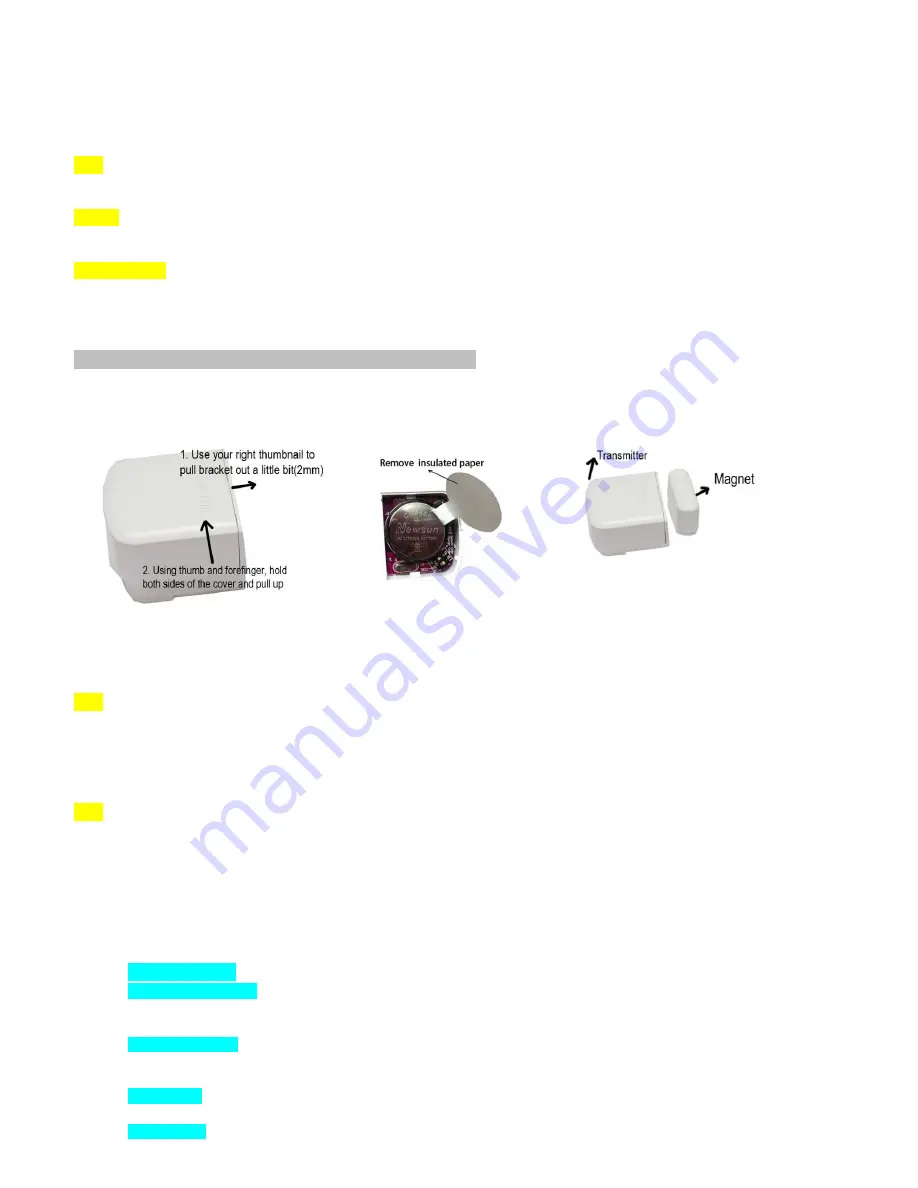
Open the cover and remove the insulated paper then close the cover.
Put small magnet next to sensor
Press
PROGRAM
button on console, enter the default password
888 888.
Use
Scroll key
to choose
Sensor
then press
Enter
on Console.
Add
press
Enter
again, then you will see
Trigger Sensor / Code.
Trigger your sensor by moving the small magnet away from
the large transmitter. Then console will request you to add a Zone Name for this sensor. Input a name for this sensor,
then press
SAVE.
You will see
Record Sensor Name,
press Enter record your own voice for this sensor. You will
hear this voice when you get alarming calls.
Note: Each time you press Add, follow above steps.You can add from one up to fifty sensors.
Edit
select it then press Enter, you can use Auto search or Manual search to find your target sensor and high light it then
press Enter
to Edit Sensor Functions as below list
Note: if you don’t know sensor name then choose
Auto Search
, when you
trigger an individual sensor and its name will
be displayed on the console panel. Select the sensor name and press
Enter,
then you will see the menu displays as
below: (
MAKE SURE ONLY ONE SENSOR IS TRIGGERED EACHTIME TO AVOID ANY ACCIDENTAL TRIGGERING
OF A DIFFERENT SENSOR. PLEASE KEEP ALL YOUR MOTION SENSORS IN DIFFERENT ROOMS, AND MAKE
SURE THAT ALL WINDOW/DOOR SENSORS MAGNET PARTS ARE ATTACHED TO LARGER PARTS AS CLOSE
STATUS
.)
Edit
Zone
Name
:
Highlight
Edit Zone name,
press
Enter
and you will be able to rename the sensor.
Record
Zone
Name:
Highlight it press Enter, select
“Record”, you are able to record 5 seconds of your own voice
accordingly. If recording a sensor name in your own voice to identify a sensor, when you receive an alarming call on
your cell phone or any other phones, you will hear the sensor name.
Emergency
Zone
Highlight it press Enter, Default is NO, (
If you set YES, the zone will be on 24hours, regardless of your
system’s Arm or Disarm status. This is recommended to be used for smoke detector, panic button, water leak sensor and temperature
sensors only. DONOT set any door sensor or motion sensor as Emergency zone
).
Home Zone
Highlight it press Enter, Default is YES, (
if you select NO, the zone will disable during home alarm status,
recommended for motion sensor NO, and all Window/door sensor YES
)
Chime
Zone
Highlight it press Enter, Default is NO,(
if you set as YES, the zone will alert you as a bell during disarm and home


