background image

No Diving or Jumping.  Observe all Safety Rules

1-3

GENERAL INSTRUCTIONS - BRACELESS OVAL POOLS

GROUND PREPARATION

Section

1

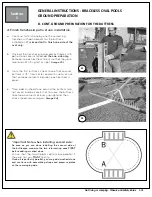
A. CONT. DETERMINE THE LOCATION OF YOUR POOL

4. Tools Needed

List of required materials

• Straight wood plank
• Material that provides a permanent base (ex. Crushed stone)
• Fine sand (void of debris)
• Cement blocks (5cm x 20cm x 40cm / 2”x 8”x16”) (optional)
• 2x Plywood (60cm x 120cm /2ft x 4ft)
• Wood board (30cm x 20cm / 1ft x 1ft)
• Vinyl covered hooks (to hold wall steady)
• String and stakes & wooden pegs
• Prefabricated cove sections (optional) 
• Pool carpeting (optional)
• Rope
• Polyethlyne Plastic Sheeting


• Optical Level
Can be useful for precise 
measurements

Summary of Contents for V35026

Page 1: ...G RnD 01 Projets Discovery Discovery 15x22light 2D 3dm DISCOVERY POOL MODEL INSTALLATION MANUAL OVAL POOLS 11 13 V35026 ...

Page 2: ......

Page 3: ...afety labels may subject you to substantial liability in case of injury These warning are not to be removed under any circumstances If they become discolored or fall off please request replacements which will be sent at no charge Follow all Safety Instructions Read and follow all safety instructions packaged with pool ladder deck or any other accessory Additional pool safety publications can be ob...

Page 4: ......

Page 5: ... type of grass may grow up through your pool liner Your dealer will be able to advise how best to treat the site Sloped areas will need to be made level by digging away high spots not by filling low spots be prepared to hire earth moving equipment if necessary Images 2a 2b Ensure the earth is well compacted and a wall is placed to prevent the earth from seeping out Image 2a If you need to install ...

Page 6: ...d roots will damage the pool liner Areas recently treated with oil based weed killers chemicals or fertilizers 3 Plan Ahead Will you be adding an adjacent deck later Be sure to leave room Will you be using pool accessories or other applianc es that need electricity or gas Locate your pool near these services or plan to have them installed later by a licensed contractor 3b 3c 3a Important Note When...

Page 7: ...lank Material that provides a permanent base ex Crushed stone Fine sand void of debris Cement blocks 5cm x 20cm x 40cm 2 x 8 x16 optional 2x Plywood 60cm x 120cm 2ft x 4ft Wood board 30cm x 20cm 1ft x 1ft Vinyl covered hooks to hold wall steady String and stakes wooden pegs Prefabricated cove sections optional Pool carpeting optional Rope Polyethlyne Plastic Sheeting Optical Level Can be useful fo...

Page 8: ...es 1 4 GENERAL INSTRUCTIONS BRACELESS OVAL POOLS GROUND PREPARATION Section 1 PARTS LISTING EXPLODED VIEW Discovery RRR PDSC YE52RRBXRXX01 Yard Extender Oval Important Note Make sure you have all the parts necessary before you start installation ...

Page 9: ...bottom rail straight sections 1314215 42 000 4 6 4 6 8 8 J Stabilizer bottom rail round sections 1525515 55 250 8 8 10 10 10 12 K Steel bars 11823 52 000 2 2 2 2 2 2 L Horizontal sleeve with pen 20810 17 000 6 8 6 8 10 10 M Horizontal sleeve without pen 20802 17 000 6 8 6 8 10 10 N Extruded polystyrene piece 1000100 6 4 6 4 10 10 Q Steel strap 60 20560 59 750 6 8 9 12 15 15 Q Steel strap 26 20526 ...

Page 10: ... into the ground at the centre point Image 1 c Once the center has been established you must now determine the outer limits of the perimeter of your pool Add 12 30 cm inside this measurement to determine pool perimeter Image 2 d Now you must make the round ends that will be the oval part In order to do so you will have to determine the center of the radius on each side and drive a peg into the gro...

Page 11: ...a guide for the can of spray paint to mark straight lines Image 5 g You now have the space marked out that is needed for your oval pool Image 6 2 Remove the sod a Remove the sod from the area you have just outlined Image 7 b Remove all debris rocks roots etc using a rake Then compact the ground to achieve a firm base 5 6 7 Important Note Your pool must be perfectly level Take the time you need to ...

Page 12: ...use your pool s footprint for your pool size on the last pages of this Section1 Perimeter 1043 hole to hole Track length measured in track slot All dimensions are in inches Gap between tracks 1 42 4 11 3 4 2 2 1 8 10 places 2 3 4 1 1 1 6 2 3 4 1 1 1 6 17 11 3 8 15 2 3 4 21 4 15 places 8x Ø17 6 straight track 12x Ø15 55 1 4 track Pool Limit 12 30cm Outer Limit 1 7 4 1 2 4 8 3 8 12 9 1 4 1 5 7 1 4 9...

Page 13: ...cked with a tamping tool c Take material such as rock dust or fine mortar that can conform a solid permanent base and deposit this material around the rim of the basin Image 9 d The material used should be spread around the perimeter of the pool to a width of 24 60cm and a thickness of 2 5cm image 10 e Recheck the outer perimeter of the oval shape where the pool wall will be placed Compact the gro...

Page 14: ...t two or three depending on the side 6 35 cm 2 5 mechanical screws with nuts Note that the sleeve with the anchor holes should be installed facing into the pool Images 11 12 b Insert the vertical sleeve Image 13 11 12 Important Note The opening of the vertical sleeve must be facing the outside of the pool Important Note Do not throw away the extruded polystyrene sections Inside of Pool Outside of ...

Page 15: ...e vertical sleeve with screws You will need to remove the sleeve again in order to fit the bottom plate over the T more easily before replacing and attaching the vertical sleeve c Insert the extruded polystyrene pieces into the opening of the horizontal sleeves with pen nuts located inside the pool Image 15 14 15 Important Note The opening of the vertical sleeve must be facing the outside of the p...

Page 16: ...to ensure that your line is perpendicular measure from each radius center to the top of your line The measurement should be exactly the same on each side If not adjust until both are the same and you will now have a perfect perpendicular line therfore creating a perfect 90 degree angle Images 17 18 c Repeat the first two steps to create a perpendicular line in order to create a perfect 90 degree a...

Page 17: ...p of the buttress joint is level with the ground Image 20 Even number of trenches c If your oval pool contains an even number of buttresses measure from the center line out 22 1 2 Position the buttress temporarily off the straight center line from the middle Image 21 d Trace around the buttress and dig a trench Depending on the size of block that you will place underneath dig a hole so that the bu...

Page 18: ...ld measure about 20 cm x 40 cm x 10cm 8 x 16 x 2 allowing one of the slabs to extend past the inside end of the T b Add approximately 2cm 3 4 of compacted stone dust under the concrete block patio stone etc which is at the exterior of the pool to raise the vertical sleeve slightly toward the interior of the pool in order to counterbalance the weight of the water Image 22 22 A B B C A Vertical Slee...

Page 19: ...ht Image 23 d From the first buttress check to see that second buttress is 45 from center and continue to ensure that all measurements between each buttress is equal e Now add crushed stone around the buttress do not cover and be careful not to move the buttress Take measurements at every upright and then check measurement again Image 24 Important Note when installing second side As soon as you ar...

Page 20: ...first Image 26 c Continue to install the remaining steel straps and pressure plates one the one side only as described in the previous step Do spot checks to ensure everything is equal Image 27 d Once you have finished installing straps and pressures plates on the one side Ensure that they have all been remeasured and that measurements are perfect and square Permanently affix the pressure plates t...

Page 21: ...er straps Make sure the screw heads are facing upward Remeausre and tighten screws Recheck measurement again Image 29 h Measure the two intersecting axes to ensure that the two straight sections are parallel Image 30 2 Proceed to Section 2 Assembling the Pool Base 28 29 30 Important Note Ensure that the straps raise higher in the middle therefore you may need to put a little more stone dust undern...

Page 22: ... 19 4x Ø17 6 straight track 8x Ø15 55 1 4 track 12 30cm Outer Limit Pool Limit Perimeter 631 hole to hole Track length measured in track slot All dimensions are in inches 15 5 15 16 4 11 3 4 14 2 15 16 1 4 2 1 5 1 6 12 1 5 16 2 2 1 8 3 places Gap between tracks 0 65 6 places R6 0 11 16 19 4 1 8 7 2 11 16 4 7 3 1 6 1 1 1 3 1 6 8 5 5 8 Upright ...

Page 23: ...12 x 23 Gap between tracks 0 92 1 6 6 5 1 6 Perimeter 723 hole to hole Track length measured in track slot All dimensions are in inches 16 6 5 16 15 5 15 16 2 2 1 8 4 places 4 11 3 4 11 0 1 2 12 1 5 16 8 places 6xØ17 6 straight track 8x Ø15 55 1 4 track 12 30cm Pool Limit Outer Limit R6 0 11 16 23 2 8 5 7 8 4 7 5 1 6 1 1 1 7 1 6 Upright ...

Page 24: ...5 x 26 Gap between tracks 1 10 1 8 8 3 1 6 18 8 3 16 11 5 18 3 9 16 4 11 3 4 Perimeter 837 hole to hole Track length measured in track slot All dimensions are in inches 14 10 15 16 9 places 6x Ø17 6 straight track 10x Ø15 55 1 4 track Pool Limit 12 30cm Outer Limit 4 7 1 5 1 6 1 2 1 5 1 6 1 4 2 1 2 8 9 1 3 1 6 26 3 11 16 R7 5 1 2 Upright ...

Page 25: ...0 Gap between tracks 1 08 Perimeter 927 hole to hole Track length measured in track slot All dimensions are in inches 30 0 5 8 2 1 1 1 3 1 6 2 1 1 1 3 1 6 14 10 15 16 18 3 9 16 15 1 15 16 4 11 3 4 16 places 8x Ø17 6 straight track 10x Ø15 55 1 4 track Pool Limit 12 30cm Outer Limit 1 2 1 5 1 6 4 7 1 5 1 6 R7 5 1 2 1 4 2 1 2 8 9 1 3 1 6 Upright ...

Page 26: ...imeter 1043 hole to hole Track length measured in track slot All dimensions are in inches Gap between tracks 1 42 4 11 3 4 2 2 1 8 10 places 2 3 4 1 1 1 6 23 4 11 16 17 11 3 8 15 2 3 4 21 4 15 places 8x Ø17 6 straight track 12x Ø15 55 1 4 track Pool Limit 12 30cm Outer Limit 1 7 4 1 2 4 8 3 8 1 2 9 1 4 1 5 7 1 4 9 0 1 2 R8 11 11 16 33 1 7 8 Upright ...

Page 27: ...ottom rails Image 1 NOTE the bottom rails of the straight section are shorter compared to the other bottom rails 2 Bottom plates round section a Continue the installation of the bottom plates of the round sections Insert the end of each bottom rail into the bottom plate Leave a gap between the ends of the bottom rails Images 2 3 A INSTALLATION OF BOTTOM PLATES AND BOTTOM RAILS See Diagrams Please ...

Page 28: ...ion End of the Straight Section To differentiate which bottom rail is which The Straight Section will measure the shortest in length The Transition Section will measure will measure longer than the straight section but shorter than the round section The Round Section will be the longest measurement Straight Section Round Section Transition Section ...

Page 29: ... and flush with the ground Use either the carpenter s level and a 2 by 4 5cm x 10cm wood plank or the optical level between patio stones to make sure the stones are level with each other Image 5 e Do not install blocks or rails on loose sifted soil or sand There must be no space between the ground and the bottom of the rails All patio blocks must be flush with the ground solid and level with each ...

Page 30: ...ter of your pool and hammer nails into the ground to keep the bottom rails into place These nails are to be removed only at the last step when filling up the pool Images 5 6 b Verify the height of each bottom plate with an optical level Ensure that they are the same height Important Note Use a soft measuring tape to meaure around the perimeter of the pool Measure from the inside of the bottom rail...

Page 31: ...de the pool area a Fill sand under the pressure plates first make sure it is well compacted b Pour sifted sand in the centre of your pool Ensure that you will have enough to spread approximately 2 2 5cm around the inside pool area Image 8 c Spread the sand inside the pool area Make sure not to spread the sand onto or beyond the bottom rails Compact the sand manually or mechanically Image 9 8 9 ...

Page 32: ......

Page 33: ...nd water return holes w ill be placed at the section just before where you started the wall installation b Start uncoiling the wall guiding the bottom edge into the curved bottom rail The starting end of the wall must be positioned in the centre of a bottom plate and the skimmer and return holes should be positioned where the pump and filter will be Image 2 c As you erect the wall install the stab...

Page 34: ...e desired direction Image 5 You MUST recheck the gaps at each and every one of the bottom rails so that they are all equal in gap size 3 Your wall appears too long It is not However the space between the bottom rails must be increased by tapping the bottom plates lightly towards the outside of the pool or by tapping the wall with both hands in the desired direction Image 6 You MUST recheck the gap...

Page 35: ...nment a little Recheck all of the bottom plates to make sure each one is centred where the bottom rails meet f Cover the seam and bolt heads on the inside interior of the pool wall completely with 2 50mm duct tape Image 8 A CONT SETTING UP THE POOL WALL 7 Important Note Stick a screwdriver through two of the holes to help line up the ends of the wall When tightening the screws start from either th...

Page 36: ...and use a trowel to spread it evenly Image 10 c Since earth containing chemicals can cause discoloration or corrosion it is suggested that you place polyethylene plastic sheeting under the cove around the perimeter of the wall so no earth comes in contact with the metal Since the presence of such chemicals is beyond the control of the manufacturer such damage is not covered under warranty Image 11...

Page 37: ... not use an industrial vacuum cleaner which could be too powerful Tape the end of the vacuum hose before inserting it into the wall so as not to damage the liner Insert the nozzle until it is about 4 10cm above the cove insert through the water return outlet or the skimmer depending on the diameter of your hose Make sure you will be able to remove the hose later on Tape the hose to the wall f Clos...

Page 38: ...ht sections and to the imaginaryl ine which links points A and B in the illustration Image 15 It is recommended that you begin installing the liner in a round section f Use the liner s vertical seam as a guide and make sure the seam is vertical and perpendicular to the wall and bottom g Make sure the seam between the wall and bottom is centred on the cove Image 16 h Smooth out all the wrinkles in ...

Page 39: ...ng Let the liner hang slack for now Do not pull the liner tight Image 18 NOTE Some liners may fit very tightly it is better to install uprights top plate and rail before going onto next step See Section 4 d Turn the vacuum cleaner on and push the liner outward with your feet to iron out any wrinkles Once finished turn off vacuum cleaner e Start filling the pool with water As the pool fills work ou...

Page 40: ...age 19 g Roll up any excess liner hanging below the plastic coping and tape it in place near the top of the pool wall Important Do not trim off the excess liner Image 20 C CONT INSTALL THE POOL LINER OVERLAP Important Note Do not trim off the excess liner If the liner ever needs to be removed trimming the liner will make re installation very difficult Instead roll up any excess liner and tape it i...

Page 41: ...ally going over the top of the wall to the outside of the wall Image 21 c Make sure the bead is on evenly around the entire pool and that the liner is hanging straight down from the top of the wall The liner should not have creases in it because it is twisting around the pool If the liner is twisting it is because it is not sitting properly in the pool Make necessary adjustments before proceeding ...

Page 42: ...t four random points around the pool After that is done and you are satisfied with how the liner is situated within the pool you can continue snapping the remainder of the liner into place around the pool d Go around the entire pool again making certain that the liner is securely snapped into the track This is important to confirm so that the liner does not pull out while under the pressure of bei...

Page 43: ...upright from the base a base crown Image 1 b Insert the straight section upright into the vertical sleeve Image 2 c The upright is properly positioned when the bottom plate is inserted into the notch at the lower end of the upright Images 3 4 d Once the upright is installed slide the base crown all the way to the bottom of the upright See Images 7 on page 2 of this Section e Proceed with the insta...

Page 44: ...he notch at the lower end of the upright Slant the upright slightly towards the interior of the pool while inserting it Ensure that the upright is correctly inserted into the bottom plate Image 6 c Once the upright is installed slide the base crown all the way to the bottom of the upright Images 7 8 d Proceed with the installation of all the uprights Important Note Use the ridges in the pool wall ...

Page 45: ...6m B 15 x 26 4 57m x 8 00m B 15 x 30 4 57m x 9 14m C 18 x 33 5 49m x 10 16m IMPORTANT Make sure to insert the pin the correct way do not insert upside down Image 8 N B THE PINS ANCHORING SLOTS ON THE TOP LEDGES OF THE STRAIGHT SECTION ARE DIFFERENT THAN THE ONES FOR THE ROUND SECTION PLEASE REFER TO THE NEXT PAGES FOR THE APPROPRIATE ANCHORING SLOTS DEPENDING ON YOUR POOL SIZE NOTE This pool has a...

Page 46: ...No Diving or Jumping Observe all Safety Rules 4 4 GENERAL INSTRUCTIONS BRACELESS OVAL POOLS ASSEMBLING THE POOL FRAME Section 4 C CONT INSTALLATION OF ANCHOR PINS ON TOP LEDGE ...

Page 47: ...No Diving or Jumping Observe all Safety Rules 4 5 GENERAL INSTRUCTIONS BRACELESS OVAL POOLS ASSEMBLING THE POOL FRAME Section 4 C CONT INSTALLATION OF ANCHOR PINS ON TOP LEDGE ...

Page 48: ...No Diving or Jumping Observe all Safety Rules 4 6 GENERAL INSTRUCTIONS BRACELESS OVAL POOLS ASSEMBLING THE POOL FRAME Section 4 C CONT INSTALLATION OF ANCHOR PINS ON TOP LEDGE ...

Page 49: ...No Diving or Jumping Observe all Safety Rules 4 7 GENERAL INSTRUCTIONS BRACELESS OVAL POOLS ASSEMBLING THE POOL FRAME Section 4 C CONT INSTALLATION OF ANCHOR PINS ON TOP LEDGE ...

Page 50: ...No Diving or Jumping Observe all Safety Rules 4 8 GENERAL INSTRUCTIONS BRACELESS OVAL POOLS ASSEMBLING THE POOL FRAME Section 4 C CONT INSTALLATION OF ANCHOR PINS ON TOP LEDGE ...

Page 51: ...ledges a Install the first top ledge on the wall making sure the upright is levelled and situated in the middle of the top ledge hole Image 9 b In a clockwise direction install the second top ledge on the first one Images 10 11 c To make it easier for you to locate the interior alignment slots while you are installing the top ledges please follow instructions carefully on next page 9 10 11 ...

Page 52: ...otches have been added close to each pin male part of the top ledge Image 12 e These notches will help you locate the central alignment slot corresponding to each pool size f Simply move the arrow on the interior of the ledge cover towards the appropriate notch Image 13 NOTCHES A 12 x 19 3 66m x 5 93m A 12 x 23 3 66m x 7 11m A 15 x 22 4 57 x 6 86m A 15 x 26 4 57m x 8 00m A 15 x 30 4 57m x 9 14m B ...

Page 53: ...together you may have to use the adjustment points provided for this purpose and move the top ledge to the left or right Image 14 h Insert and EZ Lock Key into the top ledge Place the extra EZ Lock key on top of the already inserted EZ Lock Image 15 i Turn the key clockwise to tighten Images 16 17 Important Note We suggest that you install all the top ledges on the wall before attaching them 14 16...

Page 54: ...lease follow the installation instructions that come with these products Important Note Before making any openings in the liner fill the pool with 60cm 24 of water to stretch the liner fully When filling your pool begin with a garden hose until there is about 30cm 12 of water in the pool This will allow the liner to stretch gradually You can then use a heavier flow to finish filling it up IMPORTAN...

Page 55: ... a coat of color matching paint Pool water is full of various caustic chemicals which will corrode metal parts If any corrosion is allowed to continue failure of the pool structure may occur which could result in excessive property damage as well as bodily harm The skimmer return area and below it are particular areas that must be carefully and regularly inspected If this area is wet and remains w...

Page 56: ...hours Properly winterizing your pool will protect it from damage and make it easier for you to reopen it when spring arrives The key to fast and easy winterization lies in regular treatment of the water until the start of the cold season even if you haven t been using the pool Routine maintenance becomes easier and less frequent as the water gets cooler In order to keep the water clean and clear a...

Page 57: ...int Depending on how great the deep freeze in your area we suggest you consult with your local dealer about procedures on lowering the water level throughout the winter We also suggest throughout the autumn season to continually check this level before freezing season starts as it must not reach the skimmer holes at any time during the winter Remove any snow which may accumulate on the top ledge d...

Page 58: ...n extension Pass the extension over the wall of the pool making sure it remains well attached Pour antifreeze into the extension and thread a winterizing plug through the hose tie a knot at the end of the tube that is to be inserted into the hose Leave the valve open so that water can drain from the skimmer At the start of winter and spring inspect the base of your pool for leaks IMPORTANT Never l...

Page 59: ...rn inlet and skimmer to the filter Bring the water level up to the middle of the skimmer Get your filter working Clean the bottom of the pool with the vacuum taking care to place the filter in the waste drain position In this way you will eliminate particles of dirt without disturbing the sand in the filter and will considerably reduce the need for backwash rinsing of the filter c Now that you hav...

Page 60: ...itioner stabilizer by carefully following the manufacturer s instructions This will stop the chlorine from evaporating quickly in sunlight Add the quantity of algicide required to prevent algae f You may now begin regular maintenance of your pool Don t forget to obtain a new set of solutions for your water analysis kit every spring The old solutions may give false results g Make sure that the skim...

Reviews: