background image

Using Other Functions

86

En

Clearing Remote Control Settings You Have Input

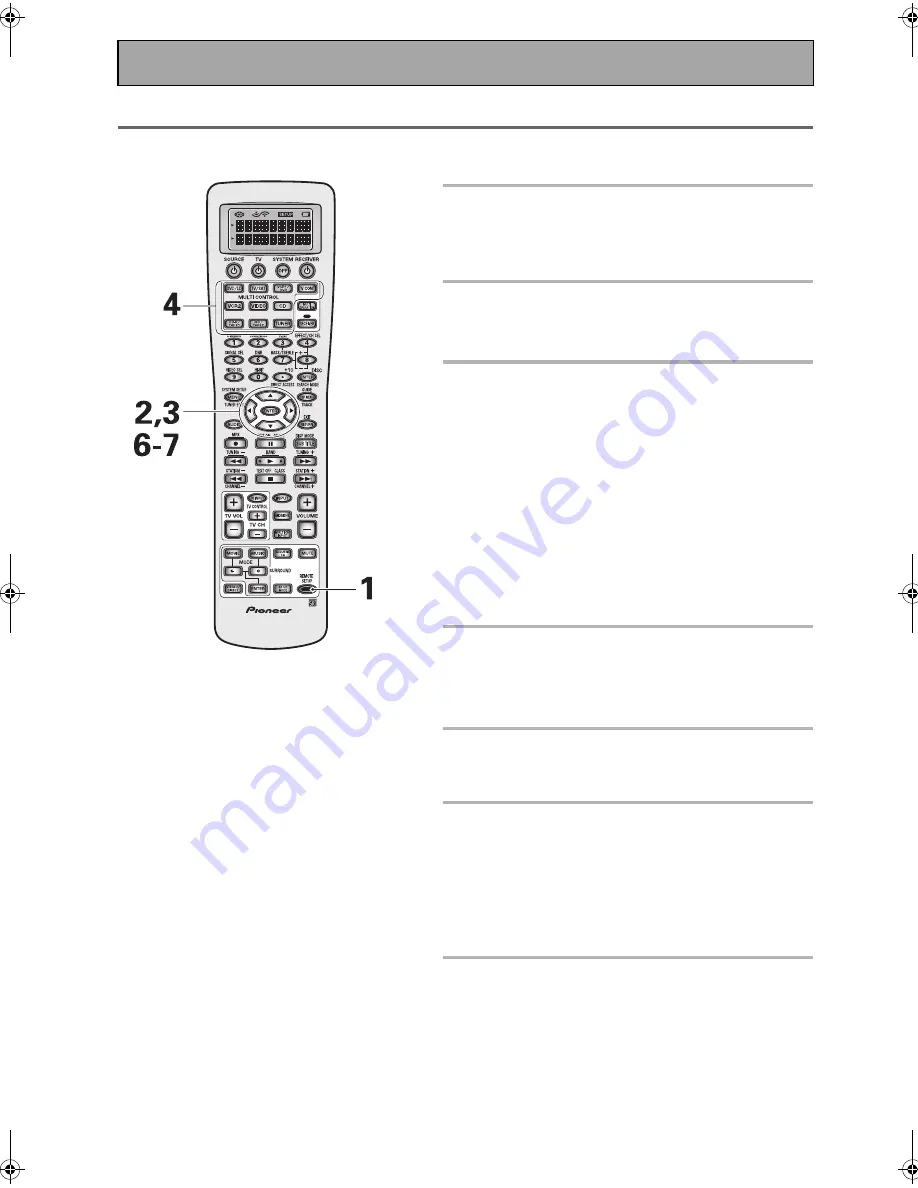
This feature allows you to clear a particular setting, or all of the settings from a function in the REMOTE SETUP 
menu.

1 Press the REMOTE SETUP button for 

three seconds.

The REMOTE SETUP menu appears on the remote 
display.

2 Use the 



 buttons to select CLEAR 

and press ENTER.

CLEAR appears in the display.

3 Use the 



 buttons to select one 

setting, or all of the settings, and 
press ENTER.

The choices in this feature include:

LEARNING CLEAR:

 Allows you to clear one command you 

have set in the LEARNING function. After pressing ENTER 
SELECT FUNCTION flashes in the display. Go to step 4.

KEYLABEL CLEAR:

 Allows you to clear one button name 

you have set in the KEYLABEL function. After pressing 
ENTER SELECT FUNCTION flashes in the display. Go to 
step 4.

ALL CLEAR:

 Allows you to clear all the REMOTE SETUP 

settings. After pressing ENTER, CLEAR? appears in the 
display. Go to step 6.

EXIT:

 Returns you to the REMOTE SETUP menu.

4 Press the MULTI CONTROL button for 

the component whose command or 
key label you want to clear.

SELECT KEY flashes in the display.

5 Press the button you want to clear.

The button chosen will appear in the display. CLEAR? will 
appear in the display.

6 Use the 



 buttons to select YES, NO 

or EXIT and press ENTER.

YES:

 clears the setting.

NO

 and 

EXIT:

 leaves the setting as is and returns you to 

the REMOTE SETUP menu.
If you select YES and press ENTER then COMPLETE 
appears in the display and you are returned to the 
REMOTE SETUP menu.

7 Select EXIT and press ENTER.

You will exit the REMOTE SETUP menu and return to 
normal operation.

Memo:

To exit from the REMOTE SETUP mode at 
anytime press the REMOTE SETUP button.

The display will disappear after one minute or 
so if no new commands are entered. Press 
any button to wake up the remote and 
continue the process.

VSX-AX5i.book  Page 86  Friday, May 23, 2003  6:33 PM

Summary of Contents for VSX-AX5i-G

Page 1: ...1 En ...

Page 2: ...tilation to improve heat radiation at least 60 cm at top 10 cm at rear and 30 cm at each side WARNING Slot and openings in the cabinet are provided for ventilation and to ensure reliable operation of the product and to protect it from overheating to prevent fire hazard the openings should never be blocked and covered with items such as newspapers tablecloths curtains etc Also do not put the appara...

Page 3: ... outlet 1 Disconnect the power cord 2 Use a small sized screwdriver 3 Insert the screwdriver into the groove of the smaller voltage selector and adjust until the voltage is the same as at the larger one Operating Environment Operating environment temperature and humidity 5 C 35 C 41 F 95 F less than 85 RH cooling vents not blocked Do not install in the following locations Location exposed to direc...

Page 4: ...ecting i LINK equipped Components 28 Creating an i LINK Network 29 Displays and Controls 30 Front Panel 30 Remote Control 32 Display 35 Back Panel 36 Setting Up for Surround Sound 38 Surround Back System 39 NORMAL Setup 40 Speaker Setting 41 Channel Level 43 Speaker Distance 44 Basic Operation 45 Stereo and Multichannel Playback 45 Selecting the Input Signal 46 Listening Modes 47 Stereo modes 47 M...

Page 5: ...R components 79 Multi Operations 80 Performing Multi Operations 81 System Off 82 Using SYSTEM OFF 82 Editing Remote Control Display Names 83 Editing Button Names KEY LABEL 84 Adjusting the Light on the Remote Control 85 Clearing Remote Control Settings You Have Input 86 Resetting the Main Unit 87 Fine Tuning Your System 88 THX CINEMA Setup 88 Assigning the Digital Inputs 89 Assigning the Component...

Page 6: ...arameters to establish excellent surround sound effects and offers you studio quality home theater sound with minimum effort Dolby Digital EX DTS ES DTS 96 24 and the Latest Audio and Video Formats The VSX AX5i is equipped with Dolby Digital EX decoding the very latest Dolby Digital contribution to home theater with surround back speakers in addition to surround speakers These additional speakers ...

Page 7: ...must be done within five minutes or all your remote control settings will be cleared AM Loop Antenna FM Wire Antenna AA IEC LR6 batteries x 4 Operating Instructions Remote Control Unit Microphone for Auto Microphone Stand for Auto Surround Sound Setup Surround Sound Setup AC Power Cord x 1 European model x 2 multi voltage model 1 2 3 AA IEC LR6 batteries x 4 CAUTION Incorrect use of batteries may ...

Page 8: ... the panel with your finger Switching video system between PAL and NTSC This receiver is able to use two types of video systems for its OSD on screen display either PAL or NTSC If you don t match the system on the amplifier with your home system no OSD will appear on your TV The default setting is PAL If you use this system you don t need to make any settings here People with multi system TVs don ...

Page 9: ... The Source Material DVDs have become the basic source material for home theater because they are convenient to use and offer excellent sound and picture quality as well as allow users to enjoy home theater soundtracks with more than two channels of audio For example Dolby Pro Logic plays back four channels front left front right center and a single channel for both surround speakers Dolby Digital...

Page 10: ...so hook up your DVD player with analog audio connections Use regular RCA stereo cords for these connections Also hook up the video connection on your DVD player and your TV to this receiver For your TV it s easiest to use a regular composite RCA video cord as shown below Digital Connections Some DVD players have both coaxial and optical terminals but there is no need to connect both If your DVD pl...

Page 11: ...Ds The diagram below also explains how to hook up a subwoofer which provides realistic bass sounds For the subwoofer use a mono single plug RCA cord and for the other speakers use regular speaker cords Make sure you connect the speaker on the right to the R terminal and the speaker on the left to the L terminal Also make sure the positive and negative terminals on the receiver match those on the s...

Page 12: ...e DIGITAL IN 2 jack to DVD 1 Turn on the receiver and your TV press the RECEIVER button on the remote control 2 Press the SYSTEM SETUP button The SYSTEM SETUP menu appears on your TV if it doesn t refer to page 10 to make sure you have prop erly connected the receiver to your TV 3 Looking at the on screen display on your TV use the buttons to select INPUT ASSIGN Press the ENTER button 4 DIGITAL IN...

Page 13: ...ge 38 and EXPERT Setup starting on page 96 Make sure all the components you need especially speakers have been properly connected before you do the steps described here 1 Hook up the microphone to the SETUP MIC jack on the Front Panel 2 Place the microphone at your normal listening position Use a table chair or something else to put the microphone at the same height as you usually lis ten to your ...

Page 14: ...tones and establish ambient noise levels the microphone status and what speakers you hooked up 11 Check the speaker settings on the OSD If they match your speaker configuration make sure OK is selected and press ENTER The test tones will be output loudly again The test tones may take up to 5 minutes this time After they have finished you see the SPEAKER SYS TEMS CHECK screen If you want to view th...

Page 15: ...put or the Dolby Digital DTS output settings are not correct Set the DVD player to output a digital signal and set the Dolby Digital and DTS output properly If you are unsure how to do this check the DVD initial setup in the manual that came with your DVD player Q2 There is no sound from the subwoofer or it is very low A2 There is a good possibility you haven t reached a part of the DVD that has a...

Page 16: ...the receiver and from the receiver to your TV or monitor If you don t follow the default settings below you must assign the inputs you used with the Assigning the Component Video Inputs procedure see page 90 The default settings are COMPONENT VIDEO IN 1 DVD LD COMPONENT VIDEO IN 2 TV SAT S400 S400 AUDIO CAUTION In order to set up the receiver use MONITOR OUT 1 so that you can see the on screen dis...

Page 17: ...onnections and analog audio connections are necessary Connecting a DVD player Before making or changing the connections switch off the power and disconnect the power cord from the AC outlet Hook up your audio signal with either a coaxial or optical digital cords you don t need to do both If you hook up your DVD LD player using component video cable connections you might need to setup your DVD play...

Page 18: ...our VCR DVR Note that to record video from a source component the video connection from the source to the receiver and from the receiver to the recorder must be the same type Connecting a Video Component to the Front Panel Connect a portable DVD player video game console or any video component to the front panel as show here Front video connections are accessed via the front panel input selector a...

Page 19: ...eceiver to your TV see page 16 For the audio signal in order to use digital soundtracks broadcast you must hook up a digital input Use either a coaxial or optical cable it doesn t matter which see page 23 We recommend hooking up your audio with analog cables as well see below The arrows indicate the direction of the TV signal Memo If your digital connections are different than the default settings...

Page 20: ...ipment with these analog connections The arrows indicate the direction of the audio signal Memo If you want to hook up any equipment other than a turntable to the PHONO LINE jack please go to the PHONO LINE Setup see page 95 and choose the LINE setting If your turntable has a phono pre amplifier most do not please choose the LINE setting as well Depending on where the cassette deck is placed noise...

Page 21: ...er and disconnect the power cord from the AC outlet If you have a DVD Audio or Super Audio CD SACD compatible player or are using an external Dolby Digital DTS decoder connect it to the multichannel analog inputs as shown below Memo If you use only one surround back input be sure to hook up to the SURROUND BACK L jack S400 S400 AUDIO Single Components equipped with 5 1 7 1 channel analog output ja...

Page 22: ... on the receiver Hook up your audio signal with either a coaxial or optical digital cords you don t need to do both If you hook up your DVD LD player using component video cable connections you might need to setup your DVD player for component video output as well See your DVD manual for details If you have i LINK compatible components see page 28 There are two optical digital out jacks the CD rec...

Page 23: ...AL IN 1 optical TV SAT DIGITAL IN 2 optical CD R TAPE1 DIGITAL IN 3 coaxial DVD LD DIGITAL IN 4 coaxial CD See Assigning the Digital Inputs on page 89 if the way you hook up your equipment is different from the default settings listed here Coaxial cords Optical cables Commercially available digital audio coaxial cords standard video cords can also be used or optical cables not supplied are used to...

Page 24: ...00 S400 AUDIO Single AM loop antenna 1 Assemble the antenna 2 Twist exposed wire strands together and insert 3 Attach to a wall etc if desired and face toward the direction providing the best reception AM loop antenna FM wire antenna 5 6 m To improve AM reception Connect a 5 6 meter length of vinyl coated wire to the AM LOOP ANTENNA terminal in addition to the supplied AM loop antenna For best pos...

Page 25: ...t to the R terminal and the speaker on the left to the L terminal Also make sure the positive and negative terminals on the receiver match those on the speakers Memo We recommend speakers with a nominal impedance rated 8 Ω 16 Ω but you can change the speaker impedance setting of the receiver see page 26 If you only have one surround back speaker hook it up to the left surround back terminal If you...

Page 26: ...eakers you need to change the impedance setting Use any speaker rated between 6 Ω 16 Ω First put the receiver in STANDBY mode then press the power button while holding down the SPEAKERS button The receiver will reset to the new impedance setting With this method you can choose the 8 Ω 16 Ω setting or the 6 Ω 8 Ω setting This display indicates a 6Ω less than 8Ω impedance setting This display indica...

Page 27: ...r consumption of connected equipment should not exceed 100 W CAUTION When installing the center speaker on top of the TV be sure to secure it with suitable means Memo When installing speakers near the TV we recommend using magnetically shielded speakers to prevent distortion in the color of the TV screen If you do not have magnetically shielded speakers and notice discoloration of the TV screen pl...

Page 28: ...r with an i LINK connector you can connect it to the i LINK connectors on the rear of your receiver as shown below The i LINK interface does not transmit video signals So when you connect video components with i LINK cable the video signal must be connected with other cables Hook up the video signal with either component video S video or composite video cords see page 16 to available VIDEO IN term...

Page 29: ...omputer Check the operating instructions supplied with your other i LINK components for capability information Receivers need to be DTCP Digital Transmission Content Protection compliant to be able to play DVD A DVD Video and SACD i LINK audio This receiver is DTCP compliant so you can use them When setting up an i LINK network it s important that the components form an open ended chain fig 1 or a...

Page 30: ...to switch the receiver between OFF and STANDBY mode or ON 4 Listening mode buttons page 47 There are two types of SURROUND modes MOVIE Press to put the receiver into MOVIE mode see page 48 MUSIC Press to put the receiver into MUSIC mode see page 49 STEREO DIRECT see page 47 Switches the receiver into STEREO mode if it was in a different sound mode or toggles between DIRECT and STEREO mode 5 ENTER ...

Page 31: ... and frequency select modes Selects station memories or frequencies when using the tuner TUNER EDIT Press to memorize and name a station for recall using the MULTI JOG and ENTER buttons 19 CHARACTER SEARCH button see page 64 Use to search for different program types in RDS mode 20 EON MODE button see pages 65 66 Use to search for different programs that are transmitting traffic or news information...

Page 32: ...other components TV CONT Press so that the remote control can operate the TV control commands 4 Number buttons These can be used for many purposes depending on the mode of the remote control When in receiver mode the buttons operate as below DIMMER button see page 57 Use to adjust the brightness of the receiver s display LOUDNESS button see page 52 Switches the LOUDNESS mode on or off TONE button ...

Page 33: ...button for other components see page 71 Use these buttons to control other components you selected with the MULTI CONTROL buttons You must input the preset code in order use this function see page 67 9 TV CONTROL buttons The following buttons are used to control the TV only and can be used once they are preset to control your TV TV INPUT Press to select the input source for the TV TV CH Use these ...

Page 34: ...8 INPUT button Press to select an input source The button will cycle through all the possible sources including USB PHONO and i LINK components 19 VOLUME buttons Use to raise or lower the volume of the receiver 20 MIDNIGHT button see page 52 Switches the MIDNIGHT listening mode on or off 21 MUTE button Press to mute or restore the volume 22 MULTI CH INPUT button see page 54 Use this button to sele...

Page 35: ... RDS broadcast is received EON European model only EON lights when it has been set The dot indicator next to it lights when the station you are currently tuned to carries the EON data service 8 Volume level indicator 9 Hi BIT SAMPLING indicator Lights when the AUDIO SCALER mode is on 10 DSP indicators MOVIE Lights when a MOVIE mode is selected When a DSP MOVIE mode is selected DSP will light with ...

Page 36: ...r any other kind of digital player To be able to play Dolby Digital and other surround soundtracks you need to make digital connections To do this use the digital terminals here If you don t connect as per the default settings see page 23 you need to complete Assigning the Digital Inputs on page 89 5 MONITOR OUT 1 2 terminals connect a TV or monitor here see page 16 Use either of these terminals t...

Page 37: ...n this system and never hook up heavy equipment like TVs heaters air conditioners refrigerators etc to this receiver 13 USB AUDIO terminal Use this terminal to connect a PC to this receiver see page 77 14 Audio input output terminals connect analog components here see page 20 Use these terminals to input output the audio signal from analog components like a cassette deck or turntable These are ana...

Page 38: ...d be selected If it isn t use the buttons to select it Press the ENTER button 4 Use the buttons to navigate through the menus When you have the setting you want in a particular menu press ENTER In each mode the current settings are displayed We sug gest you do a basic system setup for surround sound when you first hook up the receiver That gets it out of the way and you won t need to do it again u...

Page 39: ...TER button Choose from NORMAL SYSTEM if you want to use these speaker terminals for your surround back speakers in your main speaker system referred to as the A speaker system SECOND ZONE if you want to use the these speaker terminals for an independent speaker system referred to as speaker system B FRONT BI AMP Choose this setting if you want to deliver more power to your front speakers This sett...

Page 40: ...ess ENTER In each mode the current settings are displayed We sug gest you adjust all these settings when you first hook up the receiver That gets them out of the way and you won t need to return to this setting mode unless you change your home set up by adding new speakers etc SPEAKER SETTING page 41 Use to specify the type and number of speakers you con nected CHANNEL LEVEL page 43 Use to balance...

Page 41: ...ult setting is SMALL Select LARGE if your speakers will reproduce bass frequencies effectively Select SMALL to send bass frequencies to the other speakers or subwoofer If you did not connect surround speakers choose NO In this case the sound of the surround channels is output from the front and center speakers If the front speakers are set to SMALL the surround speakers will automatically be set t...

Page 42: ...EXIT and press ENTER Next proceed to CHANNEL LEVEL below If you want to change a setting before proceeding start over from step 1 Memo If you have a subwoofer and like lots of bass it may seem logical to select LARGE for your front speakers and leave the subwoofer selected This may not however yield the best bass results Depending on the size and shape of your room you may actually experience a de...

Page 43: ... ENTER Adjust the level of each speaker using the buttons and ENTER When done go to step 4 In AUTO automatic test tone mode This mode switches the test tone between each speaker automatically The test tone output cycles through the speak ers in the following order Adjust the level of each speaker using the buttons as the test tone is emitted and wait for it to move to the next speaker When done go...

Page 44: ...lly If continuing from CHANNEL LEVEL go to step 1 If starting fresh complete steps 1 2 on page 40 1 The SPEAKER DISTANCE should be selected If it isn t use the buttons to select it Press the ENTER button The setup possibilities appear on your TV 2 Select each speaker channel with the buttons and press ENTER 3 Use the buttons to add or subtract the distance in feet that the speaker is from your nor...

Page 45: ...NAL SELECT button See the next page for more details if necessary 4 Choose a LISTENING MODE one of two ways For SURROUND modes press MOVIE or MUSIC use the buttons to select the mode you want and press ENTER For STEREO DIRECT press the button for that mode On the front panel use the MOVIE or MUSIC buttons and the MULTI JOG dial Press the button of the mode type you want and then use the dial to cy...

Page 46: ...IGITAL signal is selected 2DIGITAL lights when a Dolby Digital signal is input DTS lights when a DTS signal is input If no digital inputs are assigned see page 89 you can only choose ANALOG in the SIGNAL SELECT Because the audio signal from a karaoke microphone and LDs are recorded with analog audio only they are not output from the digital outputs Set SIGNAL SELECT to ANALOG to listen to these fo...

Page 47: ...ith these modes to see which suit your home system and personal tastes The MUSIC and STEREO modes are designed to be used with music sources but some MUSIC modes are also suitable for film soundtracks Again try different modes with various soundtracks to see which you like but you must choose one of the MOVIE and MUSIC listening modes in order to get surround sound Depending on your setup in STERE...

Page 48: ...und and is suitable for movies The NEO 6 CINEMA mode delivers good channel separation for movie soundtracks With sources other than stereo 5 1 etc the display will automatically show the type of decoding being employed Dolby Digital DTS ES etc ACTION This mode is designed for action movies which generally use lots of sound effects The mode enriches the sound to make it more realistic and extends t...

Page 49: ...ient surround and center sound With sources other than stereo 5 1 etc the display will automatically show the type of decoding being employed Dolby Digital DTS ES etc CLASSICAL Simulates the acoustic effects of a large concert hall Suitable for classical music A long delay time of reflected sounds coupled with reverb effects let the listener experience the dynamic and rich sounds characteristic of...

Page 50: ...re explained here To start this setup select Dolby Pro Logic ll if necessary with the MUSIC button 1 Press RECEIVER 2 Press the EFFECT CH SEL button repeatedly and select the setting you want They appear in the receiver s display CENTER WIDTH With Pro Logic decoding center chan nel signals can come only from the center speaker If no center speaker is present this channel is split between the two f...

Page 51: ...DIGITAL NR This feature is effective with sources containing a lot of background noise like cassette and video tape 1 Press RECEIVER 2 Press the DNR button on the remote control Each press switches DIGITAL NR on or off When on DNR lights in the display Memo In cases described below noise may not be reduced even if DIGITAL NR is on Sudden noise Extremely loud noise Signals that contain too many hig...

Page 52: ...X CIN EMA MULTI CH IN SACD DIRECT or LOUDNESS modes If you set MIDNIGHT on when in DIRECT mode the receiver switches to STEREO mode When playing DVD Audio 192 176 kHz discs over an i LINK connection this feature cannot be used Listening in LOUDNESS Mode The LOUDNESS mode boosts the bass and treble in a signal It is useful for listening to music at low volumes This feature is applicable only when t...

Page 53: ... control can be adjusted in a range of 6 dB The tone control cannot be set on in THX CINEMA MULTI CH IN or SACD DIRECT modes If you set TONE control on in DIRECT mode the receiver will switch to STEREO mode When playing DVD Audio 192 176 kHz discs over an i LINK connection this feature cannot be used Listening with Sound Delay Some video displays have a slight delay in presentation of the video Us...

Page 54: ...an external decoder to enjoy certain multichannel discs To use MULTI CH IN playback follow the instructions below 1 Press the MULTI CH INPUT button on the remote control or the MULTI CH IN button on the front panel Each press switches the input between the previous mode and MULTI CH IN ON This is a true playback of the signal from the MULTI CH IN terminals output without digital processing You can...

Page 55: ...rs set to something other than NO and have chosen NO for the SURROUND BACK speakers in SPEAKER SETTING see page 41 to use this mode To accomplish the same settings you could have had the AUTO SURROUND SETUP automatically set the SURROUND speakers on and the SURROUND BACK speakers off see page 13 to use this mode 1 Press the SB CH MODE button on the remote control Each press switches between VIRTL ...

Page 56: ...d R CH2 indica tors in the display light to indicate the playback channel The different settings are DUAL CH1 where you only hear channel 1 DUAL CH2 where you only hear channel 2 and DUAL CH1 CH2 where you hear both channels but independently from different speakers Memo The default setting is DUAL CH1 You can only use this function with Dolby Digital sources that have this encoding Using Headphon...

Page 57: ... you chose until you change the audio input If you change audio functions the receiver will reset itself to make the video and audio inputs correspond Also if you switch the power of the receiver off when you turn it back on the video and audio inputs will reset so that they correspond Adjusting the Brightness of the Display DIMMER Use the display DIMMER button to adjust the brightness of the fluo...

Page 58: ...utomatically at the first station it locates Repeat to locate other stations For Manual Tuning To change frequencies one step at a time press TUN ING repeatedly To change frequencies quickly hold down TUNING and release when you reach the frequency you want MPX Mode If the TUNED or STEREO indicators do not light when tuning an FM station because the station is too far away or the broadcast signal ...

Page 59: ... your area consult your dealer for correct information To Change Channel Steps 1 Turn the power off standby mode 2 While holding down the TONE button press the STANDBY ON button You will see STEP 9K 50K or STEP 10K 100K appear in the display Direct Access Tuning The following steps show you how to tune directly to a specific frequency using the remote control 1 Press the TUNER button This selects ...

Page 60: ...n you want See Automatic and Manual Tuning on page 58 or Direct Access Tuning on page 59 2 Press the TUNER EDIT button to activate the memory function 3 Press the CLASS button repeatedly to select a class number Each press switches the display 4 Press the STATION buttons repeatedly or use the MULTI JOG to select a channel 0 9 within the respective class 5 Press the ENTER button to input your choic...

Page 61: ...eset channel 4 Press TUNER EDIT to select the station name mode 5 Enter the station name you want Names can be up to four characters long Use the MULTI JOG dial front panel or the but tons remote to select characters Press ENTER to confirm a character If no character is input a space is input To erase a station name simply repeat steps 1 4 and input four spaces instead of a name The possible selec...

Page 62: ...utton repeatedly to select a class number Each press switches the display 3 Use the number buttons to select the channel you want To select channel 7 press 7 To select channel 0 press 0 For example If 99 50 MHz FM was memorized in class B at channel 7 To step through each channel in order Press the STATION buttons repeatedly 2 3 European model multi voltage model 2 3 CLASS A CLASS B CLASS C ...

Page 63: ...ges the display as follows Memo If any noise is picked up while displaying the RT scroll some characters may be displayed incorrectly If you see NO RADIO TEXT DATA in the RT display it means no RT data is being transmitted from the broad cast station If you have entered a name for the station it is displayed instead of RT data If you haven t the display will automatically switch to the PS data dis...

Page 64: ... display 4 Press the buttons or use the MULTI JOG dial to select the program type you want to hear 5 Press ENTER to search for the program type The system starts searching through the station presets for a match When it finds one the search stops and the station plays for five seconds 6 If you want to keep listening to the station press ENTER within the 5 seconds If you don t press ENTER searching...

Page 65: ...uner returns to the original frequency or function There are two types of EON you can set 1 TA Traffic Announcement This mode will set the tuner to pick up traffic information when it s broadcast 2 NEWS This mode will set the tuner to pick up news when it is broadcast Memo EON does not work when the tuner is in the AM band Using EON European model only Use the front panel controls to do this 1 Pre...

Page 66: ...ny station you input into the memory classes which can receive RDS or EON data If you want to remove the currently memorized stations from RDS and EON searches you can do it by erasing the PI codes 1 Press and hold EON MODE front panel for about two seconds ERASE PI will be displayed 2 Press ENTER ERASE PI flashes for two seconds to indicate the PI codes have been erased 2 1 ...

Page 67: ...EMOTE SETUP See Using Remote Control with Other Components on page 71 to operate your other components The display will disappear after one minute or so if no new commands are entered Press any button to wake up the remote and continue the process 1 Press the REMOTE SETUP button for three seconds The REMOTE SETUP menu appears on the remote dis play 2 PRESET should be selected if it isn t use the b...

Page 68: ...and most logical to assign the button that has the same name as the component you are set ting up for example choose the DVD LD button for your DVD player You may find you have components which do not corre spond to the name on any MULTI CONTROL button for example a cable TV tuner or you have two components where only one button is provided for example CD R TAPE 1 In this case use step 3 to assign...

Page 69: ...ute or so if no new commands are entered Press any button to wake up the remote and continue the process 1 Press the REMOTE SETUP button for three seconds The REMOTE SETUP menu appears on the remote dis play 2 Use the buttons to select LEARNING and press ENTER SELECT FUNCTION flashes on the remote control display 3 Press the MULTI CONTROL button for the component you want to control SELECT KEY fla...

Page 70: ...from the other remote con trol 7 If you want to program in commands for another MULTI CONTROL button use the buttons to select NO Press ENTER 8 Repeat the process from step 2 for all of your components Start again to program other components in this manner 9 When you re done use the buttons to select EXIT You will return to the REMOTE SETUP menu 10Use to select EXIT and press ENTER Memo If FULL ap...

Page 71: ...VCR DVD LD DVD recorder Cassette deck Starts recording MD CD R VCR DVD recorder Cassette deck SUBTITLE DISP MODE button Displays changes the subtitles on multilingual DVDs DVD DVD recorder Change the display mode CD MD CD R VCR LD Directly access tracks on a program source CD MD CD R LD Number buttons Directly access chapter on a program source DVD DVD recorder Directly select a channel VCR DVD re...

Page 72: ...ptions DVD LD DVD recorder VCR Basic playback options Double cassette 2nd deck Button s Function Components TV Press to switch the TV Satellite TV or Cable TV between STANDBY and ON Cable TV Satellite TV TV TV INPUT Press to switch the TV input TV TV CH Select channels Cable TV Satellite TV TV TV VOL Adjust the TV volume TV MENU Takes you to the TV menu of that system Cable TV Satellite TV TV GUID...

Page 73: ... go into VCR 2 mode 1 Press the REMOTE SETUP button for three seconds The REMOTE SETUP menu appears on the remote display 2 Use the buttons to select DIRCTFNC and press ENTER SELECT FUNCTION will flash in the remote control display 3 Press the MULTI CONTROL button of the component whose direct function you want to turn on or off DIRECTFUNC appears on the remote control display The TUNER button can...

Page 74: ... with the source digital audio format See page 20 for more on analog audio connections and page 22 for digital audio connections Memo The receiver s volume channel level balance TONE DIGITAL NR MIDNIGHT LOUDNESS ACOUSTIC EQ and surround effects have no effect on the recorded signal except in PHONO Thus when recording in PHONO function DIRECT is best used In some cases digital recordings have copy ...

Page 75: ...nnect a pair of speakers to the surround back speaker terminals 2 Select SECOND ZONE in the SURRBACK SYSTEM setup see page 39 Memo Please use speakers with a nominal impedance rated 8 Ω 16 Ω Bi amping the front speakers FRONT BI AMP For bi amp playback you can connect both the A and B speaker terminals to your front speakers To do this your speakers must be bi wireable that is they must have separ...

Page 76: ...tput from speaker system A and the same signal is output from the pre out terminals B SP B Sound is output from the two speakers in speaker system B the surround back speakers Multichannel sources will be downmixed to two channels A B SP AB Sound is output from speaker system A and the B speakers Also use for FRONT BI AMP playback OFF SP No sound is output from the speakers Depending on the input ...

Page 77: ...SB cable while installing the drivers Also do not disconnect the USB cable while the your PC is recognizing the receiver which takes a few seconds every time you turn on your PC and it is hooked up the receiver If your PC does not recognize the receiver try disconnecting the USB cable and connecting it again If it still does not recognize it restart the computer Do not disconnect the USB cable whi...

Page 78: ...e power and disconnect the power cord from the AC outlet The arrows indicate the direction of the signal Memo You can use the additional amplifier on the surround back channels for a single speaker as well In this case plug the amplifier into the L SINGLE terminal only The sound from the surround back terminals will depend on how you have set up the SURRBACK SYSTEM see page 39 S400 S400 AUDIO Sing...

Page 79: ... and those made by other manufacturers by pointing the receiver s remote control directly at the respective component This type of operation does not require control cords All you have to do is recall the appropriate stored settings see page 67 If you use a remote control hooked up via the CONTROL IN jack with a control cord you won t be able to use this unit s remote control If you use this featu...

Page 80: ...tons to select MULTI OPE and press ENTER SELECT FUNCTION flashes in the remote display 3 Press the MULTI CONTROL button for the component you want to start the multi operations with MULTI OPE appears in the display For example DVD LD 4 Use the buttons to select first command 1st Cmmnd appears in the display Press ENTER This tells the receiver this will be the first command To erase a command Selec...

Page 81: ...it the REMOTE SETUP menu and return to normal operation Performing Multi Operations Do the following to use the multi operations 1 Press the MULTI OPERATION button SELECT FUNCTION flashes in the display 2 Press the MULTI CONTROL button for the component that has been set up with multi operations The power of the receiver and any Pioneer components use in the program goes on and the programmed mult...

Page 82: ...one step Select EXIT and press ENTER 4 To setup a command select CHANGE and press ENTER FUNCTION flashes in the display 5 Select the component whose command you want to input and press the MULTI CONTROL button for it KEY will flash in the display 6 Select a button for the command you want to input COMPLETE appears in the display 7 Repeat steps 3 6 to program up to five commands You can assign SYST...

Page 83: ...nt you want to rename For example TV 4 Use the buttons to select the letters and or numbers you want to enter and use the buttons to move the cursor to the next position Here are the possible letters numbers You can input up to eight letter numbers 5 When you re finished press ENTER END will flash press ENTER again The COMPLETE appears in the display 6 Go back to step 2 to input as many function n...

Page 84: ...example The name changing screen appears in the display 5 Use the buttons to select the letters and or numbers you want to enter and use the buttons to move the cursor to the next position Here are the possible letters numbers You can input up to eight letter numbers 6 When you re finished press ENTER END will flash press ENTER again COMPLETE appears in the display 7 Go back to step 2 to input as ...

Page 85: ...setting LOW A dimmer setting OFF Turns the remote control light off EXIT Leaves the LIGHT setting and returns you to the REMOTE SETUP menu After pressing ENTER in the first three cases COMPLETE will appear in the display and you will be returned to the REMOTE SETUP menu 4 Select EXIT and press ENTER You will exit the REMOTE SETUP menu and return to normal operation Memo To exit from the REMOTE SET...

Page 86: ... ALL CLEAR Allows you to clear all the REMOTE SETUP settings After pressing ENTER CLEAR appears in the display Go to step 6 EXIT Returns you to the REMOTE SETUP menu 4 Press the MULTI CONTROL button for the component whose command or key label you want to clear SELECT KEY flashes in the display 5 Press the button you want to clear The button chosen will appear in the display CLEAR will appear in t...

Page 87: ...ON button for about three seconds 2 When you see RESET appear in the display press the TONE button OK appears in the display press TONE When OK appears in the display all the settings including the speaker surround sound settings and tuner settings will be reset in the unit to the default settings Memo If the receiver is disconnected from a power source for about a month or longer it will reset to...

Page 88: ...ss the SYSTEM SETUP button 3 Looking at the on screen display on your TV use the buttons to select THX CINEMA SETUP Press the ENTER button 4 Use the buttons to choose either PRO LOGIC ll MOVIE PRO LOGIC or NEO 6 CINEMA as the decoding method Press the ENTER button The default is PRO LOGIC ll MOVIE 5 EXIT should be selected if not use the buttons to select it Press ENTER 6 Use the buttons to select...

Page 89: ...ttons to move through the different digital inputs and press the ENTER button 6 Use the buttons select the component that you hooked up to that digital in Press the ENTER button If you re not sure which component is connected to which digital in look on the back of the receiver and check the cables you connected 7 When you re finished use the buttons to select EXIT and press ENTER This exits the D...

Page 90: ... the buttons to select INPUT ASSIGN Press the ENTER button 4 Use the buttons to select COMPONENT IN SELECT then press ENTER 5 Use the buttons to select the component video input you want to reassign Press the ENTER button 6 Use the buttons to assign a receiver function Choose between DVD LD TV SAT VCR1 and VCR2 7 When you re finished use the buttons to select EXIT and press ENTER You will leave th...

Page 91: ...o i LINK equipped components are connected i LINK Input cannot be selected 1 Turn on the receiver and your TV press the RECEIVER on the remote control 2 Turn on your i LINK compatible com ponents i e DVD player 3 Press the SYSTEM SETUP button 4 Looking at the on screen display on your TV use the buttons to select INPUT ASSIGN Press the ENTER button 5 Use the buttons to select i LINK INPUT Press th...

Page 92: ...oose or the power is cut to the device a appears before the device name i e DV 47Ai CD If you assign an i LINK input to a certain function for example DVD LD then any digital inputs previously assigned to that function will automatically be set to i LINK not assigned This is because one function cannot be assigned to two different places 8 When you re finished use the buttons to select EXIT and pr...

Page 93: ...nction name is set 8 Repeat steps 4 7 to change other function names Use the MULTI JOG to select EXIT and press ENTER 9 Use the MULTI JOG to select EXIT and press ENTER This exits the SYSTEM SETUP mode and returns to normal operation Memo Use the RETURN button to move the cursor back one character when entering a name 1 Turn on the receiver and your TV If you want to use the remote control for thi...

Page 94: ...tton 4 Select SACD DIRECT and press ENTER 5 Use the buttons to select the ON or OFF Press ENTER ON Use to playback SACD sources without any digital processing OFF Use to playback SACD sources with DSP processing 6 EXIT should be selected if not use the buttons to select it Press ENTER 7 Use the buttons to select EXIT and press ENTER again This exits the SYSTEM SETUP mode and returns to normal oper...

Page 95: ...our TV use the buttons to select PHONO LINE SETUP Press the ENTER button 4 Use the buttons to select the PHONO or LINE Press ENTER PHONO Use this setting for turntables without a built in equalizer or pre amplifier LINE Use this setting for all audio components other than a turntable and for turntables with a built in phono equalizer 5 EXIT should be selected if not use the buttons to select it Pr...

Page 96: ...ton 4 Select EXPERT with the buttons Press the ENTER button 5 Follow the order below to make expert settings Use the buttons to navigate through the menus When you have the setting you want in particular menu press ENTER In each mode the current settings are displayed on the screen CROSSOVER NETWORK page 97 This feature determines which frequencies will be sent to the subwoofer or large speakers F...

Page 97: ... used If all speakers are set to LARGE see page 41 this setup is unnecessary Follow steps 1 5 on page 96 if necessary to get to the starting point mentioned here 1 CROSSOVER NETWORK should be selected if it isn t use the buttons to select and press ENTER 2 Use the buttons to select frequency cut off point Press ENTER Frequencies below the cut off point will be sent to the subwoofer or large speake...

Page 98: ...VOLUME rotates to the reference position 0 dB and after a few seconds the test tone is output 3 Use the buttons to select the subsequent channel Press ENTER 4 Adjust the level of the channel using the buttons Adjust the channel level from 10 dB to 10 dB in 0 5 dB increments The default setting is 0 dB Try to get the volume level of the target speaker to match that of the front left speaker which i...

Page 99: ...the channel you want to adjust and a reference channel Listen to the reference channel and use it to measure the target channel 4 Adjust the distance of each channel using the buttons Listen to the reference channel and use it to measure the target channel Stand facing the two speakers with your arms outstretched pointing at each speaker Try to make the two tones sound as if they are arriving simu...

Page 100: ...ary to get to the starting point mentioned here Memo If you have already performed AUTO SETTING page 13 this setting is not necessary 1 ACOUSTIC CAL EQ should be selected If it isn t use the buttons to select and press ENTER 2 EQ AUTO SETTING should be selected If it isn t use the buttons to select and press ENTER 3 Select START and then press ENTER to start EQ AUTO SETTING Make sure you have hook...

Page 101: ...ons to select DATA COPY Press ENTER 3 Use the buttons to select CUSTOM 1 or CUSTOM 2 as the destination you want to copy the data to Press ENTER 4 Use the buttons to select ALL CH ADJUST or FRONT ALIGN as the type of curve you want to copy Press ENTER When you press ENTER the data is copied to the destination you chose After you have done this process once you can also copy data in CUSTOM 1 or CUS...

Page 102: ...NT speakers The settings that were input when you did the AUTO SURROUND SETUP see page 13 will be present but you can adjust each speaker individually to suit your taste This setting allows the listener to enjoy a sound balance defined by the front speakers The front left speaker will serve as the reference tone The front left tone and the target speaker the one you are trying to adjust will sound...

Page 103: ...go to DATA CHECK or leave the ACOUSTIC CAL EQ setting by using the buttons to select EXIT and pressing ENTER To use the DATA CHECK feature follow the steps here 1 Use the buttons to select DATA CHECK Press ENTER 2 Select either ALL CH ADJUST or FRONT ALIGN as the data you want to check Press ENTER 3 Use the buttons to select the channel that you want to check Press ENTER That channel appears so yo...

Page 104: ...g won t limit the peak level of the LFE channel If you selected SETTING CANCEL go to step 4 3 Use the buttons to adjust the test tone and specify the bass peak level 1 Raise the level gradually 2 Set the bass peak level at the point just before the tone starts to distort Be careful Test tones play back at loud volumes Make sure there are no infants or small children in the room You can leave this ...

Page 105: ...necessary to get to the starting point mentioned here 1 D RANGE CONTROL should be selected if it isn t use the buttons to select and press ENTER 2 Use the buttons to choose either OFF MID or MAX Press ENTER Dynamic Range Control is set OFF No Dynamic Range Control MID A moderate amount of Dynamic Range Control is applied MAX The most Dynamic Range Control available is applied 3 EXIT should be sele...

Page 106: ...erefore when listening to typical two channel sources like CD the listener can enjoy a richer spatial effect When using software encoded with Dolby Surround this decoding system affords the listener an improved surround experience with greater sound detail Chart Comparing Dolby Pro Logic and Dolby Pro Logic II Dolby Digital Surround EX This new recording technology is able to play 6 1 channel soun...

Page 107: ...on In a theater the room is very large and dead sounding you sit a long way back from the speakers and the speakers themselves are very specialized Because a sound track recorded in this dead sounding space when it is played at home it sounds overbright THX Re Equalization adjusts for this difference in a very precise way Adaptive Decorrelation When a sound track sends mono sound to the surround s...

Page 108: ...nterface between them CANNOT LINK 2 The receiver can t identify the selected i LINKequipped component For example the receiver may not be able to identify an i LINK equipped personal computer LINK CHECK The receiver is checking the i LINK network It does this for example when components are added or removed from the network The sound may be inter rupted if this happens during playback LOOP CONNECT...

Page 109: ...an 3 5m long Refer to the manual for the selected component When the source player is turned off or in the standby mode the output signal is not produced Refer to the manual for the selected component The program format indicators don t disappear when SACD DVD A playback stops The program format indicators remain lit until another format source is input PQLS OFF or PQLS ON is displayed temporarily...

Page 110: ...credited repair center to look at the problem OVERHEAT blinks in the display and no sound is output The receiver has gotten too hot Turn the receiver off and allow it to cool down with good ventilation It is very likely that you have a heat dispersal and ventilation problem so please fol low the instructions in Installing the Receiver on page 2 carefully THDCT NG blinks in the display and the unit...

Page 111: ...ound output from the front speakers The front speakers aren t connected properly Check all connections see page 25 No sound output from surround or center speakers Speaker settings are incorrect The surround or center speakers aren t connected properly The listening mode is STEREO See SPEAKER SETTING on page 41 to check the speaker settings Check all connections see page 25 Choose a surround liste...

Page 112: ...orrect The MULTI CH IN mode has been selected The digital output level has been turned down on a CD player or other compo nent equipped with digital output level adjustment capability Set SIGNAL SELECT to AUTO or according to the type of connections made see page 46 Set the digital input settings correctly see pages 12 23 and especially 89 Check all connections Choose a compatible source or check ...

Page 113: ...rding have not been connected properly You can only record analog to analog or digital to digital Make sure the play back and recording components are hooked up with the same kind of con nections You can t record digital sources that have been copy protected Check connections see pages 20 and 22 No image is output when a function is selected Improper connections The input source is not properly se...

Page 114: ...mat 5 1 6 1 or 7 1 channel There is no problem The indicator won t light when the track is not a com pressed digital source During playback of a compressed digital source the PRO LOGIC II or NEO 6 indicators show in the display The digital signal is not being sent with the source The audio is in two channel format It has already been Dolby surround encoded Choose DIGITAL or AUTO with the sig nal s...

Page 115: ... Input the correct preset code Reset the proper system settings The SR cable is connected but the connected components can t be operated with the remote The SR cable hasn t been connected properly The rest of the component connection have not been made The component you have hooked up is not SR compatible Reinsert the SR cable making sure it is the right jack see page 79 Make sure an analog connec...

Page 116: ...NIA Brand PIONEER PHILCO FIRST SYMPHONIC CD R PIONEER ADMIRAL PHILIPS FISHER TATUNG BLAUPUNKT AIWA PHONOLA FUJITSU TELEFUNKEN Brand GENERAL INSTRUMENT AKAI QUASAR FUNAI THOMSON PIONEER GOLDSTAR ALBA RCA PROSCAN GE THORN DENON GRUNDIG AUDIO DYNAMIC REALISTIC GOLDSTAR TOSHIBA JVC HAMLIN BELL HOWELL SABA GOODMANS UNIVERSUM KENWOOD HNS HUGHES BLAUPUNKT SAMSUNG GRANDIENTE VIDECH PHILIPS HITACHI BROCSON...

Page 117: ...emote Control Unit 1 Microphone for Auto Surround Sound Setup 1 Microphone Stand for Auto Surround Sound Setup 1 AC Power Cord 1 Operating Instructions 1 NOTE Specifications and the design are subject to possible modi fications without notice due to improvements Continuous Power Output DIN Front 100 W 100 W DIN 1 kHz THD 1 8 Ω Center 100 W DIN 1 kHz THD 1 8 Ω Surround 100 W 100 W DIN 1 kHz THD 1 8...

Page 118: ...er Cord 2 Operating Instructions 1 Flat bladed converter plug 1 Antenna Adaptor 1 NOTE Specifications and the design are subject to possible modi fications without notice due to improvements Maximum Output Power 130 W channel 1 kHz THD 10 0 8 Ω Continuous Power Output DIN Front 100 W 100 W DIN 1 kHz THD 1 8 Ω Center 100 W DIN 1 kHz THD 1 8 Ω Surround 100 W 100 W DIN 1 kHz THD 1 8 Ω Surround Back 1...

Page 119: ...119 En EXPERT ...

Page 120: ... TNMWF 03E00001 Printed in ARB7286 A Published by Pioneer Corporation Copyright 2003 Pioneer Corporation All rights reserved ...

Reviews: