4
Getting Started
32
En
• Dolby B NR reduces tape hiss on tapes recorded using Dolby B
NR (which includes almost all commercially recorded tapes).
• Auto tape select means that the deck automatically detects the
type of tape you’re playing/recording—normal (Type I), or
high-position/CrO
2
(Type II) (Type I only if you’re using the
XR-A390)—so there’s no need to check the tape type and
switch manually.
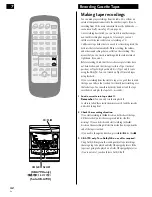
1 Press TAPE I/II to switch to tape mode.
If two tapes are already loaded, press repeatedly to switch between
tape decks I and II.
If there’s only one tape loaded, the player automatically selects
that deck.
2 Press EJECT on the front panel to open one of the
cassette doors.
Remember:
Both decks can play tapes, but only deck II
records.
3 Load a cassette tape then push the cassette door shut.
Use a tape that’s already recorded on so you can hear something
in the following steps
.
4 XR-A790 only: Press
2
NR ON/OFF to switch Dolby
NR on/off as required.
If the tape you loaded was recorded with Dolby NR on, then for the
best playback you should switch Dolby NR on.
5 Press
2 6
to start playback.
The side of the tape you’ll hear is whichever is forward-facing
when you load it. This is the ‘forward’ (
3
) direction, while the
other side is ‘reverse’ (
2
). The forward indicator is shown in the
display.
6 To play the other side of the tape, press
2 6
(XR-
A390: tape deck II only).
Each time you press
2 6
during playback, the other side of
the tape starts playing. Pressing
2 6
when the tape is stopped
starts playback on the side it was playing previously.
The current tape direction is indicated in the display.
7 To skip back or forward a track on the tape, press
–
4
or
¢
+.
On the front panel, press
– ·
1
/
4
or
¢
/
¡
· +
(the
tape should be playing when you do this).
¢
+
searches for the next blank space between tracks on the
side currently playing (in other words, to the start of the next
track), then resumes playback.
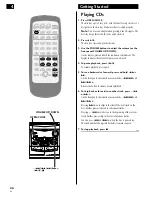
TAPE
EJECT
2
NR ON/OFF
TAPE I/II
(XR-A790 only)
(僅適用於 XR-A790 型)
(Sólo XR-A790)


