

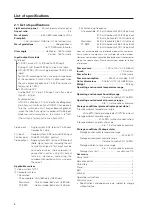


18
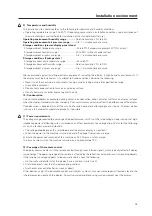
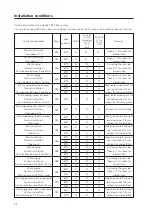
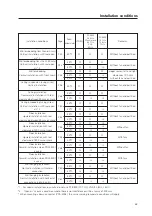
No.
Name
1.
Upper Pad A
2.
Upper Pad B
3.
Upper pad C
4.
Upper Pad
5.
Partition Box
6.
Upper Carton
7.
Under Carton
8.
Mirror Mat
9.
Literature Bag
10.
Operating Instructions
11.
Plasma Caution Sheet
12.
Plasma Caution Sheet
13.
Caution Sheet
14.
Remote Control Unit
15.
Battery Cover
16.
Batteries (R6P, AA)
17.
Vinyl Bag
18.
Display Stand V
19.
AC Power Cord
20.
Bolt (Hex)
21.
Washer
22.
Warranty Card
23.
Vinyl Pouch
24.
Vinyl envelope
25.
Label
26.
Caution Sheet
27.
Warranty Card
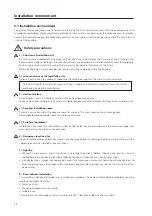
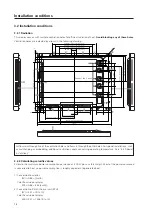
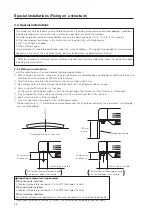
3.3 Installation procedure
3.3.1 Precautions for transportation
1
Use two workers to move packages. Do not grasp the PP band during transportation. The band may snap and
result in injury.
2
For transportation and storage, keep the package horizontal. Do not stack packages longitudinally or laterally. If
packages are transported or stored while longitudinally stacked or laterally stacked, the company is guarantee will
be invalidated.
3
For transportation and storage, never stack more than ten packages, as indicated on the upper carton.
4
For transportation and storage, observe the conditions detailed on the upper carton.
5
To protect the glass surface of the display, avoid stepping on the package, placing heavy items on top, or sticking
sharp objects into the top.
*
If the plasma display and fixture needs to be packed and transported again, follow the packing method and
precautions given below:
• Pack goods by reversing the procedure for unpacking given in “3.3.2 Unpacking”. Take care when replacing the
mirror mat to place the smooth face facing out, with the soft surface toward the product.
• Replace the remote control and the stand in the specified positions. If they are placed in the center of the upper
pad, the panel may be damaged during transportation.
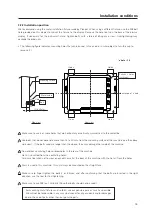
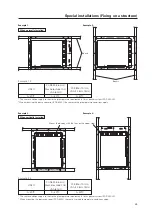
3.3.2 Unpacking
1) Packing specifications: 1130 (W)
×
295 (H)
×
852 (D) 39.5 kg
Installation procedure
25
9
10
24
11
13
12
22
26
27
23
4
18
6
25
15
14
21
17
16
5
19
24
20
2
1
3
8
1
2
7
Summary of Contents for PDK-5008
Page 5: ...5 Features ...
Page 11: ...11 Remote control ...
Page 21: ...21 Installation procedure ...
Page 57: ...57 Special installation Installation under the floor ...
Page 85: ...85 How to mount standard optional items PDK 4001 ...
Page 91: ...91 How to mount standard optional items PDK 4002 ...
Page 97: ...97 How to mount standard optional items PDK 4004 ...
Page 115: ...115 How to mount standard optional items PDK 5008 PDK 5008FT ...
Page 153: ...153 How to mount standard optional items Precautions for installing the optional speaker ...
Page 161: ...161 Before making adjustments ...


