background image


Playing discs

05


30


En


 Tip


• Use the following controls during program 

play:


Other functions available from the 
program menu


There are a number of other options in the 
program menu in addition to Create/Edit.


Playback Start


 – Starts playback of a 

saved program list


Playback Stop


 – Turns off program play, 

but does not erase the program list


Program Delete


 – Erases the program list 

and turns off program play


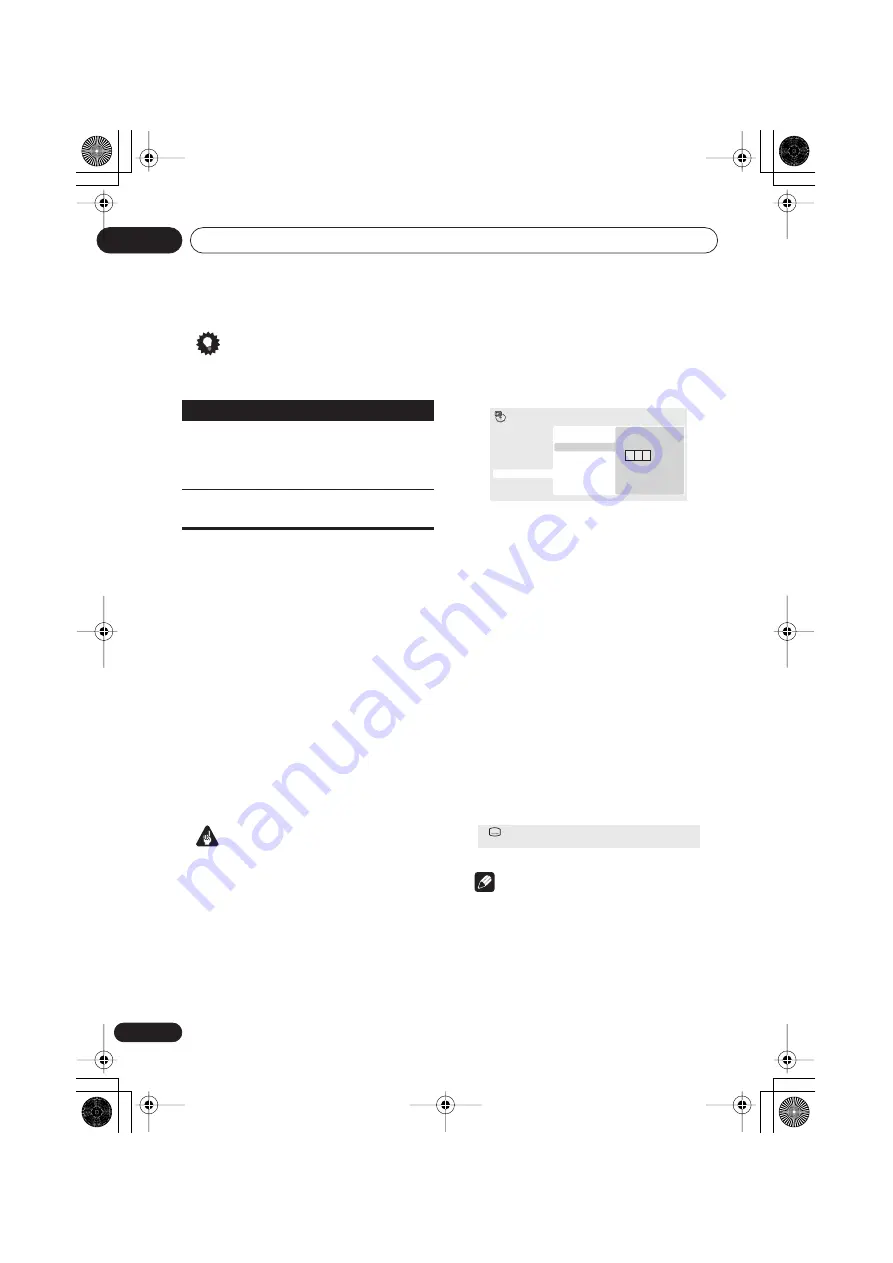
Searching a disc


You can search DVD discs by title or chapter 
number, or by time; CDs and Video CDs by 
track number or time; DivX video discs by time.


 Important


• Search functions are not available with 

Video CDs in PBC mode, or with WMA/
MP3 discs.


1

Press PLAY MODE and select ‘Search 

Mode’ from the list of functions on the left.

2

Select a search mode.


The search options available depend on the 
kind of disc loaded.

• The disc must be playing in order to use 

time search.


3

Use the number buttons to enter a title, 

chapter or track number, or a time.


• For a time search, enter the number of 

minutes and seconds into the currently 
playing title (DVD/ DivX video) or track (CD/
Video CD) you want playback to resume 
from. For example, press 


4


5


0


0


 to have 

playback start from 45 minutes into the 
disc. For 1 hour, 20 minutes and 30 
seconds, press 


8


0


3


0


.


4

Press ENTER to start playback.


Switching subtitles


Some DVD and DivX video discs have subtitles 
in one or more languages; the disc box will 
usually tell you which subtitle languages are 
available. You can switch subtitle language 
during playback.


1

Press SUBTITLE repeatedly to select a 

subtitle option.


 Note


• Some discs only allow you to change 

subtitle language from the disc menu. 
Press 


TOP MENU


 or 


MENU


 to access.

• To set subtitle preferences, see 


Subtitle 

Language


 on page 36.

• See 


Displaying DivX subtitle files


 on page 9 

for more on DivX subtitles.


Button

What it does

PLAY 
MODE


Save the program list and exit 
the program edit screen without 
starting playback (


HOME MENU


does the same).


Skip to the next step in the 
program list.

0   0   1

Title Search

Chapter Search

Time Search

Input Chapter

A-B Repeat

Repeat

Random

Program

Search Mode

Play Mode

Subtitle

English

1 / 2

Current / Total

DV393 KU.book Page 30 Thursday, March 16, 2006 1:17 PM

Summary of Contents for HTP-2750DV

Page 1: ...V s audio video input Receiver TV COAX OPT CD DIGITAL IN FRONT R S P E A K E R S DVR COAX DVD LD AM LOOP FM UNBAL 75 Ω PLAY IN IN OUT TV SAT CD R TAPE MD ANTENNA AUDIO R L REC AM loop antenna FM wire antenna 3 8 in 10mm 4 1 Connect the FM wire antenna and fully extend along a window frame or another suitable place that gives good reception 2 To connect the AM loop antenna twist the exposed wire st...

Page 2: ...ng diagram when making system connections for a full surround sound setup Note that the TV and some accessories are not included Refer to the reverse side of this sheet to check what s supplied with the HTP 2750DV Not supplied XRE3122 A UP DOWN MULTI JOG MASTER VOLUME ENTER AUDIO MULTI CHANNEL RECEIVER SX 316 STANDBY ON PHONES FRONT AUDIO INPUT DVD LD TV SAT DVR CD CD R TAPE MD FRONT AUDIO FM AM S...

Page 3: ...em extremely close to a television may result in color distortion on the screen If this happens move the speakers a little further away and switch off the television for 15 30 minutes The subwoofer is not magnetically shielded and so should not be placed near a TV or monitor Magnetic storage media such as floppy discs and tape or video cassettes should also not be kept close to the subwoofer The s...

Page 4: ...very low frequency range Human hearing cannot easily detect the source of very low frequencies Be sure to provide a space of at least 8 inches 20cm between the rear of the subwoofer and the nearest wall PLACEMENT AND FINE TUNING FRONT SPEAKERS For best results the loudspeaker should be positioned near ear level and the loudspeakers separated a distance approximately equal to the listening distance...

Page 5: ...x or cleaners Never use thinners benzine insecticide sprays and other chemicals on or near the cabinets since these will corrode the surfaces Wall mounting the front and surround speaker system Attaching the brackets Make sure to tighten the supplied screw as securely as possible when attaching the bracket to the back of the speaker Please do not attach the brackets to the center speaker Before mo...

Page 6: ...Bass reflex floor type System 16 cm 1 way system Speaker 16 cm cone type Nominal impedance 8 Ω Frequency range 30 Hz to 2 kHz Dimensions 190 mm W x 360 mm H x 317 mm D 7 1 2 in W x 14 3 16 in H x 12 1 2 in D Weight 4 2 kg 9 lb 4 oz SPECIFICATIONS FRONT SURROUND SPEAKERS CENTER SPEAKER SUBWOOFER Note Specifications and design subject to possible modification without notice due to improvements SYMPT...

Page 7: ...e dial and leave it there Taking a minute to do this now will help to prevent hearing damage or loss in the future After all we want you listening for alifetime We Want You Listening ForA Lifetime Usedwisely yournewsoundequipmentwillprovidealifetime of fun and enjoyment Since hearing damage from loud noise is often undetectable until it is too late this manufacturer and the ElectronicIndustriesAss...

Page 8: ...Player DV 290 K DV 393 S DV 490V S DV 490V K Operating Instructions RegisterYour Product at www pioneerelectronics com US www pioneerelectronics ca Canada DV393 KU book Page 1 Thursday March 16 2006 1 17 PM ...

Page 9: ...E HAZARD D6 8 2 1_En NOTE This equipment has been tested and found to comply with the limits for a Class B digital device pursuant to Part 15 of the FCC Rules These limits are designed to provide reasonable protection against harmful interference in a residential installation This equipment generates uses and can radiate radio frequency energy and if not installed and used in accordance with the i...

Page 10: ...ges Article 810 of the National Electrical Code ANSI NFPA 70 provides information with regard to proper grounding of the mast and supporting structure grounding of the lead in wire to an antenna discharge unit size of grounding conductors location of antenna discharge unit connection to grounding electrodes and requirements for the grounding electrode See Figure A LIGHTNING For added protection fo...

Page 11: ...osure to excessive noise This list of sound levels is included for your protection Decibel Level Example 30 Quiet library soft whispers 40 Living room refrigerator bedroom away from traffic 50 Light traffic normal conversation quiet office 60 Air conditioner at 20 feet sewing machine 70 Vacuum cleaner hair dryer noisy restaurant 80 Average city traffic garbage disposals alarm clock at two feet THE...

Page 12: ...in slow motion 24 Frame advance frame reverse 25 Viewing a JPEG slideshow 25 Browsing DVD or Video CD disc with the Disc Navigator 25 Browsing WMA MP3 DivX video and JPEG files with the Disc Navigator 26 Looping a section of a disc 27 Using repeat play 27 Using random play 28 Creating a program list 29 Searching a disc 30 Switching subtitles 30 Switching audio language channels 31 Zooming the scre...

Page 13: ... friendly connector HDMI is the first consumer electronics interface to support uncompressed standard enhanced or high definition video plus standard to multi channel surround sound audio 4 all using one interface You can easily connect to a HDMI equipped AV receiver or audiovisual device for high quality audio and video and communication between the video source and DTV players set top boxes and ...

Page 14: ... be used for a month or more When disposing of used batteries please comply with governmental regulations or environmental public instruction s rules that apply in your country or area Do not use or store batteries in direct sunlight or other excessively hot place such as inside a car or near a heater This can cause batteries to leak overheat explode or catch fire It can also reduce the life or pe...

Page 15: ...th KODAK Picture CD This player supports the IEC s Super VCD standard Compared to the Video CD standard Super VCD offers superior picture quality and allows two stereo soundtracks to be recorded Super VCD also supports the widescreen size About DualDisc playback A DualDisc is a new two sided disc one side of which contains DVD content video audio etc while the other side contains non DVD content s...

Page 16: ...e player to recognize MP3 and WMA files do not use for other file types About WMA The Windows Media logo printed on the box indicates that this player can playback Windows Media Audio content WMA is an acronym for Windows Media Audio andreferstoanaudiocompressiontechnology developed by Microsoft Corporation WMA content can be encoded by using Windows Media Player version 7 7 1 Windows Media Player...

Page 17: ...es which can be switched for the same movie file is limited to a maximum of 10 DivX video compatibility Official DivX Certified product Plays all versions of DivX video including DivX 6 with standard playback of DivX media files File extensions avi and divx these must be used for the player to recognize DivX video files Note that all files with the avi extension are recognized as MPEG4 but not all...

Page 18: ...cated Important This player is equipped with copy protection technology Do not connect this player to your TV via a VCR using audio video or S video cables as the picture from this player will not appear properly on your TV This player may also not be compatible with some combination TV VCRs for the same reason refer to the manufacturer for more information When connecting to your TV as shown abov...

Page 19: ... your TV or other equipment has an S video S1 input you can use the S video output on this player instead of the standard composite output for a better quality picture Use an S video cable not supplied to connect the S VIDEO OUT to an S video input on your TV or monitor or AV receiver Line up the small triangle above the jack with the same mark on the plug before plugging in Connecting using the c...

Page 20: ...tch everything off and reconnect using the supplied video cable see Easy connections on page 11 then switch back to Interlace see below Switching the video output to interlace using the front panel controls Switch the player to standby then using the front panel controls press STANDBY ON while pressing to switch the player back to Interlace DV 490V only If the player is connected using HDMI discon...

Page 21: ...e HDMI connector outputs uncompressed digital video as well as almost every kind of digital audio that the player is compatible with including DVD Video Video CD Super VCD CD and MP3 1 Use an HDMI cable to connect the HDMI OUT interconnect on this player to an HDMI interconnect on a HDMI compatible monitor S VIDEO OUT AUDIOOUT COAXIAL COMPONENTVIDEOOUT DIGITALAUDIOOUT VIDEOOUT PR PB Y L R S VIDEO ...

Page 22: ...ngle digital connection for use with DVD players DTV set top boxes and other AV devices HDMI was developed to provide the technologies of High Bandwidth Digital Content Protection HDCP as well as Digital Visual Interface DVI in one specification HDCP is used to protect digital content transmitted and received by DVI compliant displays HDMI has the capability to support standard enhanced or high de...

Page 23: ... 22 7 HOME MENU page 18 8 Display 9 OPEN CLOSE page 20 10 page 21 11 page 21 12 page 21 13 and page 21 14 HDMI indicator DV 490V only Lights when this player is recognized by another HDMl or DVI HDCP compatible component 15 RW Compatible page 8 DV 393 DV 290 DV 490V 2 3 4 5 6 7 8 10 15 9 11 12 13 1 2 3 4 5 6 7 8 10 15 14 9 11 12 13 1 DV393 KU book Page 16 Thursday March16 2006 1 17 PM ...

Page 24: ...e control Make sure that there are no obstacles between the remote and the remote sensor on the unit The remote has a range of about 7 m 23 ft Remote operation may become unreliable if strong sunlight or fluorescent light is shining on the unit s remote sensor Remote controllers for different devices can interfere with each other Avoid using remotes for other equipment located close to this unit R...

Page 25: ...ayer is stopped and no button is pressed for around five minutes the screen saver starts If the disc tray is closed but no disc is playing and no control is pressed for about 30 minutes the player automatically goes into standby Using the on screen displays For ease of use this player makes extensive use of graphical on screen displays OSDs All the screens are navigated in basically the same way u...

Page 26: ... Letter Box to 4 3 Pan Scan if you prefer See Video Output settings on page 35 for more details 4 Press HOME MENU to exit the menu screen Setting the language of this player s on screen displays This sets the language of the player s on screen displays 1 Press HOME MENU and select Initial Settings 2 Select OSD Language from the Display settings 3 Select a language The on screen language will chang...

Page 27: ...re loading a double sided DVD disc load it with the side you want to play face down 4 Press play to start playback If you re playing a DVD or Video CD an on screen menu may appear See DVD Video disc menus on page 22 and Video CD PBC menus on page 22 for more on how to navigate these If you re playing a containing DivX video files or MP3 WMA audio files it may take a few seconds before playback sta...

Page 28: ...k Note The Last Memory function doesn t work with VR format DVD RW discs If you don t need the Last Memory function when you stop a disc you can press OPEN CLOSE to stop playback and open the disc tray Button What it does Starts playback If the display shows RESUME or LAST MEM playback starts from the resume or last memory point see also Resume and Last Memory below Pauses a disc that s playing or...

Page 29: ...g playback using a number button to select a track rather than the play button Button What it does TOP MENU Displays the top menu of a DVD disc this varies with the disc MENU Displays a DVD disc menu this varies with the disc and may be the same as the top menu Moves the cursor around the screen ENTER Selects the current menu option RETURN Returns to the previously dis played menu screen Numbers r...

Page 30: ...ts are such that even when played on a widescreen TV black bars are necessary at the top and bottom of the screen This is not a malfunction I have a standard 4 3 TV and set the player to show widescreen DVDs in pan scan format so why do I still get black bars top and bottom with some discs Some discs override the display preferences of the player so even if you have 4 3 Pan Scan selected those dis...

Page 31: ...eo CDs 2 Press repeatedly to increase the scanning speed The scanning speed is shown on screen 3 To resume normal playback press play When scanning a Video CD playing in PBC mode or a WMA MP3 track playback automatically resumes at the end or beginning of the track Depending on the disc normal playback may automatically resume when a new chapter is reached on a DVD disc Playing in slow motion You ...

Page 32: ...reen you may notice black bars at the sides or at the top and bottom of the screen While the slideshow is running Note The time it takes for the player to load a file increases with large file sizes Browsing DVD or Video CD disc with the Disc Navigator Use the Disc Navigator to browse through the contents of a DVD or Video CD disc to find the part you want to play Important You can t use the Disc ...

Page 33: ...the cursor buttons and ENTER to select a thumbnail or the number buttons To select using the number buttons enter a two digit number then press ENTER Tip Another way to find a particular place on a disc is to use one of the search modes See Searching a disc on page 30 Browsing WMA MP3 DivX video and JPEG files with the Disc Navigator Use the Disc Navigator to find a particular file or folder by fi...

Page 34: ...t function allows you to specify two points A and B within a track CD Video CD or title DVD that form a loop which is played over and over You can t use A B Repeat with Video CDs in PBC mode or WMA MP3 DivX video files 1 During playback press PLAY MODE and select A B Repeat from the list of functions on the left 2 Press ENTER on A Start Point to set the loop start point 3 Press ENTER on B End Poin...

Page 35: ... remains in effect until you select Random Off from the random play menu options You can t use random play with VR format DVD RW discs Video CDs playing in PBC mode WMA MP3 discs DivX video discs or while a DVD disc menu is being displayed You can t use random play together with program or repeat play 1 Press PLAY MODE and select Random from the list of functions on the left 2 Select a random play...

Page 36: ...automatically moves down one 4 Repeat step 3 to build up a program list A program list can contain up to 24 titles chapters tracks You can insert steps into the middle of a program list by just highlighting the position where you want the new step to appear and entering a title chapter track number To delete a step highlight it and press CLEAR 5 To play the program list press play Program play rem...

Page 37: ...minutes and seconds into the currently playing title DVD DivX video or track CD Video CD you want playback to resume from For example press 4 5 0 0 to have playback start from 45 minutes into the disc For 1 hour 20 minutes and 30 seconds press 8 0 3 0 4 Press ENTER to start playback Switching subtitles Some DVD and DivX video discs have subtitles in one or more languages the disc box will usually ...

Page 38: ...Normal 2x or 4x Since DVD Video CD DivX video title and JPEG pictures have a fixed resolution picture quality will deteriorate especially at 4x zoom This is not a malfunction 2 Use the cursor buttons to change the zoomed area You can change the zoom factor and the zoomed area freely during playback If the navigation square at the top of the screen disappears press ZOOM again to display it Switchin...

Page 39: ...wide variations in volume you may not notice much change Note Audio DRC is only effective with Dolby Digital audio sources Audio DRC is only effective through the digital output when Digital Out is set to On and Dolby Digital Out is set to Dolby Digital PCM see Digital Audio Out settings on page 34 The effect of Audio DRC also depends on your speakers and AV receiver settings Virtual Surround Sett...

Page 40: ...he Video Adjust screen you can adjust various settings that affect how the picture is presented 1 Press HOME MENU and select Video Adjust from the on screen display 2 Make settings using the cursor buttons and ENTER You can adjust the following picture quality settings Sharpness Adjusts the sharpness of edges in the picture Fine Standard default Soft Brightness Adjusts the overall brightness 20 to...

Page 41: ...k the operating instructions supplied with your other equipment to see which digital audio formats it s compatible with Some settings such as TV Screen Audio Language and Subtitle Language may be overridden by the DVD disc Often these settings can also be made from the DVD disc menu The HDMI Out HDMI Resolution and HDMI Color settings only need to be set if you connected this player to an HDMI com...

Page 42: ...mpatible with DTS audio DTS audio output from HDMI is turned off Linear PCM sources are heard as is Off No digital audio output Setting Option What it means TV Screen This setting effective for analog and HDMI video output See also Screen sizes and disc formats on page 41 4 3 Letter Box Set if you have a conventional 4 3 TV Widescreen movies are shown with black bars top and bottom 4 3 Pan Scan Se...

Page 43: ...elected on the disc then it will be played Other Language Select to choose a language other than the ones displayed see page 42 Subtitle Language See also Displaying DivX subtitle files on page 10 English If there are English subtitles on the disc then they will be displayed Languages as displayed If there is the subtitle language selected on the disc then it will be displayed Other Language Selec...

Page 44: ...displayed On screen displays are shown in the language selected Angle Indicator On A camera icon is displayed on screen during multi angle scenes on a DVD disc Off No multi angle indication is shown Setting Option What it means Parental Lock See Parental Lock on page 38 DivX VOD Display See About DivX VOD content on page 39 DV393 KU book Page 37 Thursday March16 2006 1 17 PM ...

Page 45: ...password confirm your existing password then enter a new one 1 Select Password Change 2 Use the number buttons to enter your existing password then press ENTER 3 Enter a new password and press ENTER This registers the new password and you will return to the Options menu screen Setting changing the Parental Lock 1 Select Level Change 2 Use number buttons to enter your password then press ENTER 3 Se...

Page 46: ... select Initial Settings 2 Select Options then DivX VOD 3 Select Display Your 8 digit registration code is displayed Make a note of the code as you will need it when you register with a DivX VOD provider Playing DivX VOD content Some DivX VOD content may only be playable a fixed number of times When you load a disc containing this type of DivX VOD content the remaining number of plays is shown on ...

Page 47: ...nal fully circular discs Do not use shaped discs Pioneer disclaims all liability arising in connection with the use of shaped discs Cleaning discs Fingerprints and dust on discs can affect playback performance Clean using a soft dry cloth wiping the disc lightly from the center to the outside edge as shown below If necessary use a cloth soaked in alcohol or a commercially available CD DVD cleaning...

Page 48: ...different screen aspect ratios ranging from TV programs which are generally 4 3 to CinemaScope widescreen movies with an aspect ratio of up to about 7 3 Televisions too come in different aspect ratios standard 4 3 and widescreen 16 9 Widescreen TV users If you have a widescreen TV the TV Screen setting page 35 of this player should be set to 16 9 Wide When you watch discs recorded in 4 3 format yo...

Page 49: ...ur DVD player also has a region mark which you can find on the rear panel Discs from incompatible regions will not play in this player Discs marked ALL will play in any player The diagram below shows the various DVD regions of the world Selecting languages using the language code list Some of the language options such as DVD Menu Lang in the Setup Navigator allow you to set your preferred language...

Page 50: ...al of the component to do this Check that the HDMI cable is connected properly and that the cable isn t damaged Check that components connected using the HDMI interface are switched on and HDMI compatible No HDMI video output Make sure that you ve selected this player as the HDMI input in the settings for the component you re using You may need to refer to the instruction manual of the component t...

Page 51: ...y protection is a technology designed to prevent unauthorized copying by restricting playback etc of material on devices other the PC or other WMA recording equipment used to record it For detailed information please see the instruction manuals or help files that came with your PC or other WMA recording equipment and or software DTS 3 A multi channel audio encoding system developed by Digital Thea...

Page 52: ...n CDs Good quality but requires a lot of data compared to Dolby Digital DTS and MPEG encoded audio See also Digital audio Progressive scan video All the lines that make up a video picture are updated in one pass compared to interlace which takes two passes to update the whole picture Regions These associate DVD Video discs and players with particular areas of the world See DVD Video regions on pag...

Page 53: ...309 Macedonian mk 1311 Malayalam ml 1312 Mongolian mn 1314 Moldavian mo 1315 Marathi mr 1318 Malay ms 1319 Maltese mt 1320 Burmese my 1325 Nauru na 1401 Nepali ne 1405 Norwegian no 1415 Occitan oc 1503 Oromo om 1513 Oriya or 1518 Panjabi pa 1601 Polish pl 1612 Pashto Pushto ps 1619 Quechua qu 1721 Rhaeto Romance rm 1813 Kirundi rn 1814 Romanian ro 1815 Kinyarwanda rw 1823 Sanskrit sa 1901 Sindhi s...

Page 54: ...put 1 stereo pair Output level During audio output 200 mVrms 1 kHz 20 dB Number of channels 2 Jacks RCA HDMI output DV 490V HDMI output 19 pin Digital audio characteristics Frequency response 4 Hz to 44 kHz DVD fs 96 kHz S N ratio 115 dB Dynamic range 88 dB Total harmonic distortion 0 0065 Wow and flutter Limit of measurement 0 001 W PEAK or lower Digital output Coaxial digital output RCA jack Acc...

Page 55: ...SX 316 S Audio Multi Channel Receiver SX_316 book Page 1 Tuesday March 7 2006 12 01 PM ...

Page 56: ...ting To prevent fire hazard the openings should never be blocked or covered with items such as newspapers table cloths curtains or by operating the equipment on thick carpet or a bed D3 4 2 1 7b_A_En Operating Environment Operating environment temperature and humidity 5 ºC to 35 ºC 41 ºF to 95 ºF less than 85 RH cooling vents not blocked Do not install this unit in a poorly ventilated area or in l...

Page 57: ...e personnel D3 4 2 1 2 2_B_En IMPORTANT THE MOULDED PLUG This appliance is supplied with a moulded three pin mains plug for your safety and convenience A 10 amp fuse is fitted in this plug Should the fuse need to be replaced please ensure that the replacement fuse has a rating of 10 amps and that it is approved by ASTA or BSI to BS1362 Check for the ASTA mark or the BSI mark on the body of the fus...

Page 58: ...nel 13 Display 14 Remote control 16 About the WMA9 Pro decoder 18 04 Listening to your system Auto playback 19 Listening in surround sound 19 Using the Advanced surround effects 20 Setting the effect options 20 Using the Virtual Surround Back mode VSB 21 Listening in stereo 21 Using the Sound Retriever 22 05 The System Setup menu Making receiver settings from the System Setup menu 23 Channel level...

Page 59: ...ot use different batteries together When disposing of used batteries please comply with governmental regulations or environmental public instruction s rules that apply in your country area WARNING Do not use or store batteries in direct sunlight or other excessively hot place such as inside a car or near a heater This can cause batteries to leak overheat explode or catch fire It can also reduce th...

Page 60: ...STANDBY ON to switch on 2 Press QUICK SETUP 3 Use the MULTI JOG dial to choose your room size Depending on the distance of your speakers from the listening position choose between small medium or large S M or L M being an average sized room 4 Press ENTER 5 Use the MULTI JOG dial to choose your listening position You can cycle between the following choices FWD If you are nearer to the front speaker...

Page 61: ...o cables analog Use audio cables not supplied to connect audio components Connect red plugs to R right jacks white plugs to L left Be sure to insert completely Coaxial and Optical digital audio cables Coaxial digital audio cables standard video cables can also be used or optical cables are used to connect digital components to this receiver Be sure to insert completely When inserting the plug of a...

Page 62: ...o do so you will have to select the CD input function when you want to hear playback from your DVD player Connecting a tape deck or VCR The diagram below shows a tape deck or VCR connected to the receiver using two sets of stereo analog audio cables one set for the audio input and one set for output from the receiver for recording COAX OPT CD DIGITAL IN FRONT R L SURROUND S P E A K E R S DVR COAX ...

Page 63: ...you will have to select the CD input function when you want to hear playback from your digital component Connecting antennas Connect the AM loop antenna and the FM wire antenna as shown below To improve reception and sound quality connect external antennas see Using external antennas below Always make sure that the receiver is switched off and unplugged from the wall outlet before making or changi...

Page 64: ...ap the connector shut Using external antennas To improve FM reception Connect an external FM antenna To improve AM reception Connect a 5 m to 6 m length of vinyl coated wire to the AM antenna terminal without disconnecting the supplied AM loop antenna For the best possible reception suspend horizontally outdoors 10 mm AM LOOP FM UNBAL 75 Ω ANTENNA J shapedplug 75 Ω coaxial cable AM LOOP FM UNBAL 7...

Page 65: ...pedance between 8 Ω and 16 Ω COAX OPT CD DIGITAL IN FRONT R L CENTER SURROUND S P E A K E R S DVR COAX DVD LD R L SUB WOOFER AM LOOP FM UNBAL 75 Ω PLAY IN IN OUT TV SAT CD R TAPE MD ANTENNA AUDIO R L REC 110 V 110 V 120 127 V 120 127 V 220 V 240 V 240 V 220 V TWO VOLTAGE SELECTORS ACIN Front L Surround L Surround R Subwoofer Front R Center Red Front right R White Front left L Grey Surround right R...

Page 66: ...iscoloration of the picture when the TV is switched on If you do not have magnetically shielded speakers and notice discoloration of the TV picture move the speakers farther away from the TV Place the center speaker above or below the TV so that the sound of the center channel is localized at the TV screen If possible place the surround speakers slightly above ear level Try not to place the surrou...

Page 67: ...Use to set the listening volume 10 LISTENING MODE buttons STANDARD Press for Standard decoding and to switch between Pro Logic II options page 19 UP DOWN MULTI JOG MASTER VOLUME ENTER AUDIO MULTI CHANNEL RECEIVER SX 316 STANDBY ON PHONES FRONT AUDIO INPUT DVD LD TV SAT DVR CD CD R TAPE MD FRONT AUDIO FM AM STANDARD MIDNIGHT LOUDNESS ADVANCED SURR ST DIRECT AUTO SURR LISTENING MODE QUICK SETUP SETU...

Page 68: ...Loudness sources Press to switch between MIDNIGHT LOUDNESS and OFF 16 SLEEP Press to change the amount of time before the receiver switches into standby 30 min 60 min 90 min Off 17 MUTE Mutes unmutes the sound 18 TUNER EDIT Press to memorize and name a station for recall page 25 19 TONE Press this button to access the bass and treble controls which you can then adjust with the MULTI JOG dial 20 QU...

Page 69: ...ignal 9 SLEEP Lights when the receiver is in sleep mode 10 Tuner indicators MONO Lights when the mono mode is set using the MPX button STEREO Lights when a stereo FM broadcast is being received in auto stereo mode TUNED Lights when a broadcast is being received 11 Speaker indicator Shows if the speaker system is on or not SP A means the speakers are switched on SP means the headphones are connecte...

Page 70: ...name a station for recall page 25 Also functions as the SETUP button for DVD DVR units S RETRIEVER Press to restore CD quality sound to compressed audio sources page 22 5 RECEIVER CONTROL buttons VOLUME Use to set the listening volume EFFECT CH SEL Press repeatedly to select a channel then use LEVEL to adjust the level page 24 Also adjusts the level of the Advanced Surround effects as well as Dolb...

Page 71: ...11 RETURN Confirm and exit the current menu screen ONE TOUCH COPY Copies the currently playing title from DVD to HDD or vice versa 12 DVD DVR control buttons You can use these buttons to control a Pioneer DVD player or recorder connected to your system press DVD DVR to access the below controls Button What it does DVD DVR Turns DVD player or DVD recorder power on off AUDIO Changes the audio langua...

Page 72: ... switching to mono will improve the sound quality About the WMA9 Pro decoder This unit has an on board Windows Media Audio 9 Professional WMA9 Pro decoder so it is possible to playback WMA9 Pro encoded audio using a coaxial or optical digital connection when connected to a WMA9 Pro compatible player However the connected DVD player set top box etc must be able to output WMA9 Pro format audio signa...

Page 73: ...rce you re listening to While listening to a source press STAN DARD If the source is Dolby Digital DTS or Dolby Surround encoded the proper decoding format will automatically be selected and shows in the display With two channel sources press STANDARD repeatedly to select from 2 Pro Logic II MOVIE Up to 5 1 channel sound especially suited to movie sources 2 Pro Logic II MUSIC Up to 5 1 channel sou...

Page 74: ...below for the options available for each setting The defaults if not stated are listed in bold 3 Press EFFECT CH SEL again to adjust other settings Note 1 Use with Dolby Pro Logic for a stereo surround effect stereo field is wider than Standard modes with Dolby Digital sources INPUTSELECTOR RECEIVER STANDARD ADV SURR STEREO MIDNIGHT LOUDNESS SLEEP F AUDIO DVR DVD CD R AM FM CD RECEIVER TV DIMMER A...

Page 75: ...n you select STEREO or DIRECT you will hear the source through just the front left and right speakers Dolby Digital and DTS multichannel sources are downmixed to stereo While listening to a source press STEREO for stereo playback Press repeatedly to switch between STEREO The audio is heard with your surround settings and you can still use the Midnight Loudness and Tone functions DIRECT Bypass all ...

Page 76: ...ressed 2 channel audio by restoring sound pressure and smoothing jagged artifacts left over after compression While listening to a 2 channel source press S RETRIEVER Press repeatedly to switch between RTRV ON This option is engineered especially for portable digital audio players RTRV OFF Switches the Sound Retriever off TOP MENU SETUP RETURN S RETRIEVER TUNEREDIT ONE TOUCH COPY EFFECT CHSEL LEVEL...

Page 77: ...pecify how dual mono encoded Dolby Digital soundtracks should be played dual mono is sometimes used when two languages need to be sent to separate channels LFE ATT Some Dolby Digital and DTS audio sources include ultra low bass tones Set the LFE attenuator as necessary to prevent the ultra low bass tones from distorting the sound from the speakers Channel level Default setting 0dB all channels 1 S...

Page 78: ... Mid setting MAX Dynamic range is reduced loud sounds are reduced in volume while quieter sounds are increased 3 When you re finished press RETURN Dual Mono Setup Default setting CH1 1 Select DUAL MONO from the OTHER setup menu 2 Use cursor left right to choose the setting that you want CH1 Only channel 1 is played CH2 Only channel 2 is played CH1 CH2 Both channels are played through the front spe...

Page 79: ...nt You can also use the MULTI JOG dial front panel to select station presets 4 Press ENTER to store the station Naming station presets You can name your station presets for easy recall 1 Choose the preset you want to name See Listening to station presets below 2 Press SHIFT TUNER EDIT to select ST NAME A cursor appears at the first character position 3 Input the name you want then press ENTER Use ...

Page 80: ...may not be suitable for your country region Here s how to switch the setting 1 Switch the receiver into standby 2 On the front panel press STANDBY ON while you press and hold the TUNER EDIT button The channel tuning step alternates between 10K STEP and 9K STEP each time you do this SX_316 book Page 26 Tuesday March 7 2006 12 01 PM ...

Page 81: ... of speaker wire touching the rear panel This could cause the receiver to shut off automatically If the power shuts off automatically take the unit to your nearest Pioneer authorized service center or your dealer for servicing No sound is output when a function is selected Make sure the component is connected correctly refer to Connecting up on page 7 Press MUTE on the remote control to turn mutin...

Page 82: ...r speakers Connect the speakers properly Refer to Channel level on page 23 to check the speaker levels No sound from subwoofer The Dolby Digital or DTS source you are listening to may not have an LFE channel Switch the LFE Attenuator Setup on page 24 to LFEATT 0 or LFEATT 10 Noise during playback of a cassette deck Move the cassette deck further from your receiver until the noise disappears No sou...

Page 83: ... 108 MHz Antenna Input 75 Ω unbalanced AM Tuner Section Frequency Range 9 kHz step 531 kHz to 1 602 kHz 10 kHz step 530 kHz to 1 700 kHz Antenna Loop antenna Miscellaneous Power requirements AC 110 V 120 V to127 V 220 V 240V 50 Hz 60 Hz Power consumption 320 W In standby 0 5 W AC 220V 50 Hz Dimensions 420 mm W x 158 mm H x 348 mm D Weight without package 8 4 kg Furnished Parts AM loop antenna 1 FM...

Page 84: ...TEL 03 570 05 11 PIONEER ELECTRONICS ASIACENTRE PTE LTD 253 Alexandra Road 04 01 Singapore 159936 TEL 65 6472 7555 PIONEER ELECTRONICS AUSTRALIA PTY LTD 178 184 Boundary Road Braeside Victoria 3195 Australia TEL 03 9586 6300 PIONEER ELECTRONICS DE MEXICO S A DE C V Blvd Manuel Avila Camacho 138 10 piso Col Lomas de Chapultepec Mexico D F 11000 TEL 55 9178 4270 K002_A_En XRB3057 A 06C00001 Publishe...

Page 85: ... obstacles between the remote and the remote sensor on the unit The remote has a range of about 7m Remote operation may become unreliable if strong sunlight or fluorescent light is shining on the unit s remote sensor Remote controllers for different devices can interfere with each other Avoid using remotes for other equipment located close to this unit Replace the batteries when you notice a fall ...

Reviews: