background image

19

Section

04

English

En

Installation

Connecting the unit

 WARNING

•   To  avoid  the  risk  of  accident  and  the 

potential violation of applicable laws, no 

viewing of front seat video should ever 

occur while the vehicle is being driven.

•   In some countries or states the viewing 

of images on a display inside a vehicle 

even by persons other than the driver 

may be illegal. Where such regulations 

apply, they must be obeyed.

WARNING

L I G H T   G R E E N   L E A D   A T   P O W E R 

CONNECTOR IS DESIGNED TO DETECT 

P A R K E D   S T A T U S   A N D   M U S T   B E 

CONNECTED TO THE POWER SUPPLY 

SIDE OF THE PARKING BRAKE SWITCH. 

IMPROPER CONNECTION OR USE OF 

THIS LEAD MAY VIOLATE APPLICABLE 

LAW AND MAY RESULT IN SERIOUS 

INJURY OR DAMAGE.

CAUTION

•    PIONEER  does  not  recommend  that 

you install or service your display unit 

yourself. Installing or servicing the 

product may expose you to risk of electric 

shock or other hazards.

   Refer all installation and servicing of your 

display unit to authorized Pioneer service 

personnel.

•    Secure all wiring with cable clamps or 

electrical tape. Do not allow any bare 

wiring to remain exposed.

•    Do  not  drill  a  hole  into  the  engine 

compartment to connect the yellow 

cable of the display unit to the vehicle 

battery. Engine vibration may eventually 

cause the insulation to fail at the 

point where the wire passes from 

the passenger compartment into the 

engine compartment. Take extra care in 

securing the wire at this point.

•    It  is  extremely  dangerous  to  allow  the 

microphone lead to become wound 

around the steering column or gearstick. 

Be sure to install the unit in such a way 

that it will not obstruct driving.

•    Make sure that cables will not interfere 

with moving parts of the vehicle, such 

as the gearshift, parking brake or seat 

sliding mechanism.

•    Do  not  shorten  any  cables.  If  you  do, 

the protection circuit may fail to work 

properly.

WARNING

•    Use speakers over 50 W (power value) 

and  between  4  Ω  to  8  Ω  (impedance 

value). Do not use 1 Ω to 3 Ω speakers 

for this unit.

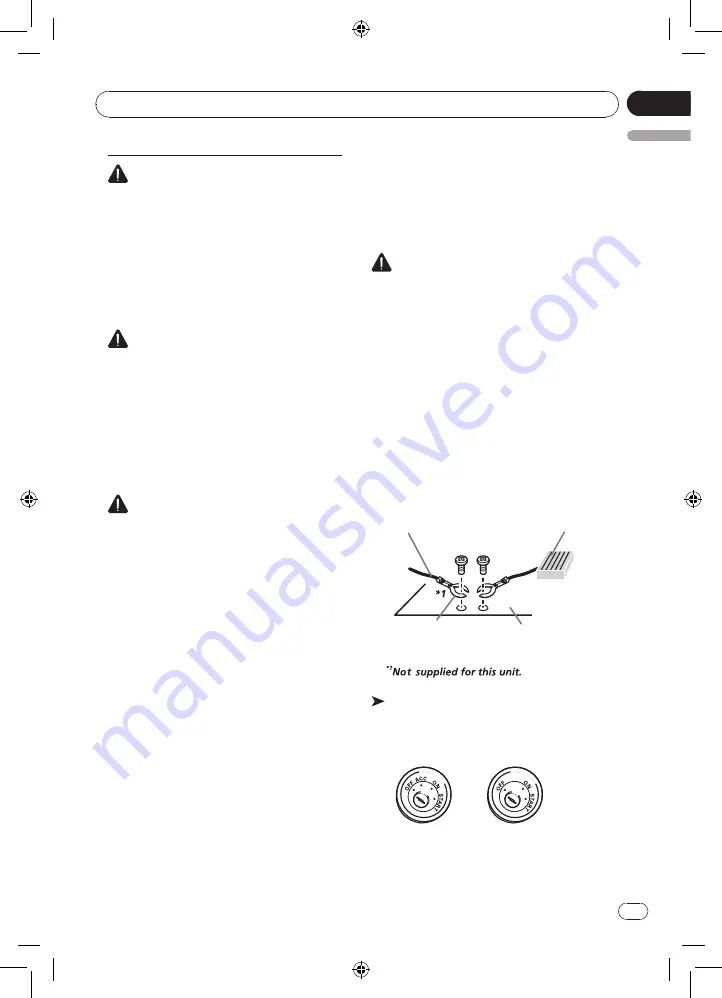
•    The  black  cable  is  ground.  When 

installing this unit or power amp (sold 

separately), make sure to connect the 

ground wire first. Ensure that the ground 

wire is properly connected to metal parts 

of the car’s body. The ground wire of the 

power amp and the one of this unit or 

any other device must be connected to 

the car separately with different screws. If 

the screw for the ground wire loosens or 

falls out, it could result in fire, generation 

of smoke or malfunction.


Ground wire

Metal parts of car’s body

POWER AMP

Other devices
(Another electronic
 device in the car)

 Important

•    This unit cannot be installed in a vehicle 

without ACC (accessory) position on the 

ignition switch.

  ACC position  

No ACC position

•    Use this unit with a 12-volt battery and 

negative grounding only. Failure to do so 

may result in a fire or malfunction.

Summary of Contents for DVH-785AV

Page 1: ...English DVH 785AV DVD AV RECEIVER Owner s Manual ...

Page 2: ...cal distant seek tuning 11 USB playback 12 Playing files on a USB storage device 12 Stopping playback of files on a USB storage device 12 List menu 12 Selecting file category 12 Selecting a folder 12 Selecting a file chapter 12 Selecting a file of other folder 12 Playing audio files 12 Playing photo files 13 Playing video files 13 Playing DivX VOD content 13 Disc playback 14 Insert a disc 14 Eject...

Page 3: ... not in motion 10 Never set the volume of your display so high that you cannot hear outside traffic and emergency vehicles WARNING Do not attempt to install or service your display by yourself Installation or servicing of the display by persons without training and experience in electronic equipment and automotive accessories may be dangerous and could expose you to the risk of electric shock or o...

Page 4: ...initial condition We recommend that you transcribe the audio adjustment data WARNING Do not use with vehicles that do not feature an ACC position CAUTION USE OF CONTROLS OR ADJUSTMENTS OR PERFORMANCE OF PROCEDURES OTHER THAN THOSE SPECIFIED HEREIN MAY RESULT IN HAZARDOUS RADIATION EXPOSURE CAUTION THE USE OF OPTICAL INSTRUMENTS WITH THIS PRODUCT WILL INCREASE EYE HAZARD CAUTION This product is a c...

Page 5: ...zed Pioneer Service Station Resetting the microprocessor The microprocessor must be reset in the following situations Before using this unit for the first time after installation If the unit fails to operate properly When strange or incorrect messages appear on the display 1 Press the page 6 button on the top left of the front panel to flip down it 2 Press RESET with a pen tip or other pointed ins...

Page 6: ...e control to select the desired mode and press M C button on the front panel or ENTER button on the remote control to confirm SRC Power off 2 sec Select playing mode Radio Disc when disc inserted USB when USB connected AUX IN front audio video input External peripheral devices with RCA audio and video outputs can be connected with the unit AV Input rear audio video input External peripheral device...

Page 7: ...io mode Right Search the next station automatically press more than 2 seconds in Radio mode Search the next station manually in Radio mode Search the next track or chapter in CD MP3 WMA and DVD video mode Fast forward by 2 4 8 16 step 2 sec in CD MP3 WMA and DVD video mode Navigate right among option items ESC Cancel source select menu and return to previous menu When play back videos press to sho...

Page 8: ...P BSM Display playback information Radio preset scan Radio auto preset 1 9 Digit buttons G Goto search there is no function in this model VOLUME Press to increase or decrease volume MUTE Press to mute Press again to unmute AUDIO MUSIC Switch audio channel Switch DVD audio language Show music list MENU PBC Access DVD menu Access PBC menu for VCD 2 0 or up ESC Exit the current menu and return to las...

Page 9: ...ab the left side of the front panel push it to the right then push it in until it clicks 1 Make sure that the front panel has been properly connected to the main unit 2 Press the upper left end of the front panel until it is firmly seated 2 If you can t attach the front panel to the main unit successfully try again Forcing the front panel into place may result in damage Turning the unit on Press S...

Page 10: ...tery with metallic objects If the battery leaks wipe the remote control completely clean and install a new battery When disposing of used batteries comply with governmental regulations or environmental public institutions rules that apply in your country area Important Do not store the remote control in high temperatures or direct sunlight The remote control may not function properly in direct sun...

Page 11: ... preset station automatically BSM best stations memory automatically stores the 6 strongest stations of each band the unit can store 24 stations in total Best stations memory 1 Press and hold BSM button more than 2 seconds to search and store stations During searching and storing BSM appears on the display 2 The unit will scan play the preset stations automatically and STATION appears on the displ...

Page 12: ... type selecting Press Up Down button on the front panel or button on the remote control to select file category Audio Photo Video press M C or ENTER to confirm Selecting a folder 1 Press Up Down or button to select a folder if there are folders in the storage press M C or ENTER to confirm 2 To find a sub folder repeat above step Selecting a file chapter In file list menu press Up Down or button to...

Page 13: ...cable CD U50E to connect the USB audio player USB memory as any device connected directly to the unit will protrude out from the unit and may be dangerous Do not use unauthorized products Playing DivX VOD content Some DivX VOD video on demand content may only be playable a fixed number of times When you attempt to play back this type of content saved on an external storage device the remaining num...

Page 14: ... press BAND or to pause playback The sound will be muted Display shows Pause Press BAND or again to continue playback To resume normal play repeat the operation Stop playback entirely 1 During playback press BSM button once to stop the playback and the relevant location on the disc is saved press BAND or to resume the playback from the saved disc location 2 Press BSM twice to cease the playback Pr...

Page 15: ...e beginning of the 1st track automatically 3 When PBC is set to On the PBC menu will be displayed use navigation buttons or digit buttons to select desired track press M C or ENTER button to confirm the playback then the PBC will be set to Off automatically DVD audio select Press AUDIO MUSIC button to select audio language to listen if the DVD has multiple audio languages VCD audio select Press AU...

Page 16: ...ion To show the DivX registration code and web site Parental control 1 When Enter password appears on the display input a 4 digit password by remote control Original password 8888 press M C or ENTER button to confirm and Correct Password appears 2 Press M C or ENTER then rotate M C or press Up Down or button to select a rating level The rating is from 1 to 8 1 with the most limits when playing 8 w...

Page 17: ...we want to keep the video signal without distortion the video should not be set to full screen like 16 9 Language Language Select on screen display language Subtitle Select subtitle language Options available depending on DVD disc Audio Select audio language Options available depending on DVD disc DVD Menu Select DVD menu language Options available depending on DVD disc Audio Loudness Turn on or o...

Page 18: ...stable when video output to the other devices display Other Function Using an AUX source A separately sold auxiliary device such as a VCR or portable device can be connected to this unit When connecting auxiliary device using the front AUX input You need to activate the AUX function in the initial setting menu page 17 A portable audio video player can be connected by using a 3 5mm plug 4 pole with...

Page 19: ...t where the wire passes from the passenger compartment into the engine compartment Take extra care in securing the wire at this point It is extremely dangerous to allow the microphone lead to become wound around the steering column or gearstick Be sure to install the unit in such a way that it will not obstruct driving Make sure that cables will not interfere with moving parts of the vehicle such ...

Page 20: ...pe Do not shorten any cables Never cut the insulation of the power cable of this unit in order to share the power with other devices The current capacity of the cable is limited Use a fuse of the rating prescribed Never wire the negative speaker cable directly to ground Never band together negative cables of multiple speakers When this unit is on control signals are sent through the blue white cab...

Page 21: ...nuous 12V cc ILLUMI Illumination Ignition key 12V cc when ON ACC Ground lead Connected to a clean paint free metal location Motor Electric antenna relay control lead Amplifier relay control lead Light Green Violet White REVERSE SW PARKING SW Active low level input Violet Black Stripe Violet Fuse 10A Rear R Subwoofer out Rear L Subwoofer out VIDEO OUT To Monitor with NTSC system This output Volume ...

Page 22: ...ou start reverse driving As the reverse driving is done the playing source switches to the previous Parking Brake 1 If PARKING SW cable is connected to hand brake switch video display on the TFT monitor will be controlled by this function Parking cable function ceases when the playing source is CAMERA 2 The monitor displays the black screen with warning information to prevent the driver watching v...

Page 23: ...ushion Installation 7 Test the unit using the Operation instructions that follow Kit installation If your vehicle requires the use of an installation kit to mount this unit follow the instructions included with the installation kit to attach the unit to the mounting plate supplied with the kit 1 Wire and test the unit as outlined in the Mounting Sleeve Installation instructions 2 Install the radio...

Page 24: ...snap the plastic frame from the front of the new unit chassis Remove and discard the frame 3 Remove the factory mounting brackets and hardware from the existing unit and attach them to the new unit Do not exceed M5 x 6mm maximum screw size Longer screws may damage components inside the chassis 4 Wire the new unit as outlined in the Mounting Sleeve Installation instructions 5 Mount the new unit ass...

Page 25: ...ot connected correctly Connect the cables correctly There is no sound Mute is On at the time of the source of AV AUX Press MUTE Demo mode always starts System setting returns to initial state Wiring of ACC and Battery are reversed each other Please confirm wiring of Battery and ACC Refer to Wiring diagram page 21 The aspect ratio is incorrect and the image is stretched The aspect ratio setting is ...

Page 26: ...label side up Disc not present in loading compartment Insert disc Error Disc Disc is dirty Clean disc with soft cloth Disc is upside down Insert disc with label side up Disc format is not compatible with this unit Change another disc Video resolution not supported The video resolution exceeds 720X576 Change to a supported file Wrong region DVD is not compatible with region code of unit Use discs w...

Page 27: ...e disc When using discs that can be printed on label surfaces check the instructions and the warnings of the discs Depending on the discs inserting and ejecting may not be possible Using such discs may result in damage to this equipment Do not attach commercially available labels or other materials to the discs The discs may warp making the disc unplayable The labels may come off during playback a...

Page 28: ... jammed under the brake or accelerator pedal Depending on the USB storage device the device may cause noise to occur in the radio The device may generate noise in the radio This unit can play back files in the USB portable audio player USB memory that is USB Mass Storage Class However copyright protected files that are stored in the USB devices cannot be played back You cannot connect a USB portab...

Page 29: ...n 2 3 is given priority over Version 1 0 M3u playlist Not compatible MP3i MP3 interactive mp3 PRO Not compatible DivX compatibility Compatible format DivX video format implemented in relation to DivX standards File extensions avi or divx DivX UItra format Not compatible DivX HD format Not compatible DivX files without video data Not compatible DivX plus Not compatible Compatible audio codec MP2 MP...

Page 30: ...the small fluorescent tube used inside the display may be shortened Small black dots or white dots bright dots may appear on the LCD screen These are due to the characteristics of the LCD screen and do not indicate a malfunction When using a cellular phone keep the antenna away from the display to prevent disruption of the video image by the appearance of spots colored stripes etc LED light emitti...

Page 31: ...stributed without a license from Microsoft Licensing Inc DivX DivX DivX Certified and associated logos are trademarks of DivX LLC and are used under license This DivX Certified device has passed rigorous testing to ensure it plays DivX video To play purchased DivX movies first register your device at vod divx com Find your registration code in the DivX VOD section of your device setup menu Dolby D...

Page 32: ...dels 2 for Middle East Asian models Frequency response 20 Hz to 20 kHz with DVD at sampling frequency 96 kHz Signal to noise ratio 75 dB 1 kHz IEC A network RCA level Output level Video 1 0 Vp p 75 Ω 0 2 V Number of channels 2 stereo MP3 decoding format MPEG 1 2 Audio Layer 3 WMA decoding format Ver 7 8 9 CBR VBR Support 353 format MPEG video decoding format MPEG 1 MPEG 2 MPEG 4 video DivX decodin...

Page 33: ...1 USB 2 0 full speed Maximum current supply 500 mA File system FAT16 FAT32 FM tuner Frequency range 87 5 MHz to 108 0 MHz Usable sensitivity 10 dBμ S N 30 dB AM tuner Frequency range 531 kHz to 1 602 kHz 9 kHz 530 kHz to 1 640 kHz 10 kHz Usable sensitivity 30 dBμ S N 20 dB Note Specifications and the design are subject to modifications without notice ...

Page 34: ......

Page 35: ......

Page 36: ...CTRONICS USA INC P O Box 1540 Long Beach California 90801 1540 U S A TEL 800 421 1404 PIONEER EUROPE NV Haven 1087 Keetberglaan 1 B 9120 Melsele Belgium Belgique TEL 0 3 570 05 11 PIONEER ELECTRONICS ASIACENTRE PTE LTD 253 Alexandra Road 04 01 Singapore 159936 TEL 65 6472 7555 PIONEER ELECTRONICS AUSTRALIA PTY LTD 5 Arco Lane Heatherton Victoria 3202 Australia TEL 03 9586 6300 PIONEER ELECTRONICS ...

Reviews: