En
7
English
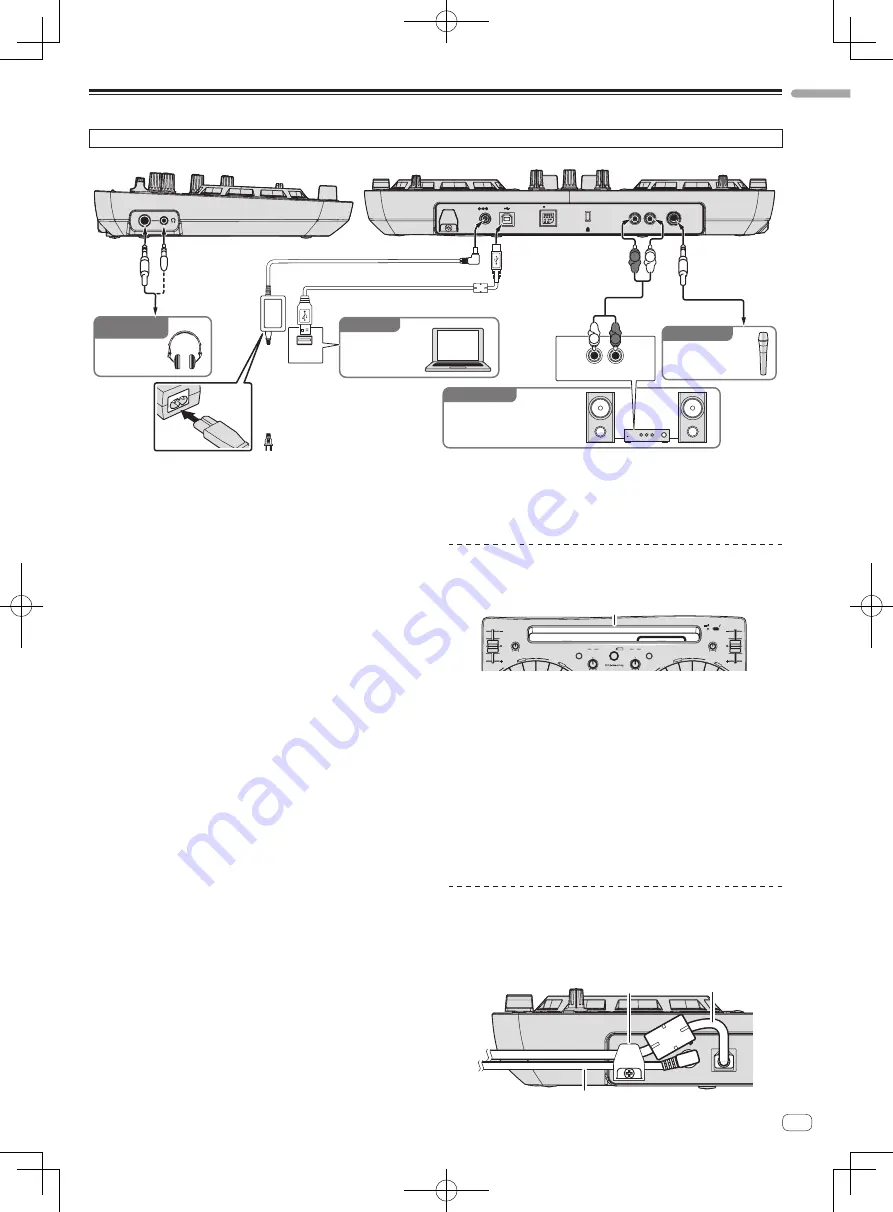
Connecting with a computer
Since the iPhone/iPad connection has priority, do not connect an iPhone/iPad to the unit when using a computer.
DC IN
USB
12V
iOS DEVICE
MASTER OUT
MIC
5 V 2100 mA
R
L
For audio output
For checking
the output sound
For audio input
DJ software
R
L
R L
USB
To power
outlet
Headphones
Power cord
(included)
Component, amplifier,
powered speaker, etc.
To headphones
Headphones cord
AC adapter (included)
USB cable (included)
Computer
Microphone
To microphone
Microphone cable
Rear panel
Audio input
Side panel
Left
(L)
Right
(R)
Audio cable
To audio input
terminals
To USB port
1
PHONES terminals
Connect headphones here.
Both stereo phone plugs (
Ø
6.3 mm) and stereo mini phone plugs
(
Ø
3.5 mm) can be used.
!
Connect headphones with an impedance of 32
W
or more.
Headphones with an impedance of less than 32
W
are not
supported.
!
Do not connect headphones simultaneously to the stereo phone
jack and the stereo mini-phone jack.
2
Cord hook
Secure the AC adapter’s power cord and USB cable on this hook.
!
The sound will be interrupted if the AC adapter’s power cord or
USB cable is disconnected from the unit during playback.
3
DC IN terminal
Connect the included AC adapter’s DC plug here. Wait until all con-
nections of the equipment are completed before connecting the
power cord.
Be sure to use the power cord and AC adapter included with this
product.
4
USB terminal
When using a computer
!
Connect this unit and the computer directly using the included
USB cable.
!
A USB hub cannot be used.
When using an iPhone/iPad
!
If not using an AC adapter, connect this unit and a USB mobile
battery or USB power adapter using the included USB cable.
!
If power is supplied by USB bus power, iPhone/iPad recharging
cannot be performed. To recharge the iPhone/iPad, use an AC
adapter.
!
USB bus power must have a power supply capacity of
DC 5 V/500 mA or greater. Note that depending on the capacity
and charging status of the product being used, operation may be
unstable.
5
iOS DEVICE terminal
Connect this unit with the iPhone/iPad using the iPhone/iPad con-
nection cable.
6
Kensington security slot
7
MASTER OUT terminals
Connect powered speakers, etc., here.
8
MIC terminal
Connects a microphone here.
!
Only the volume of the microphone’s sound can be adjusted.
!
Supports unbalanced input only.
Caution when using the iPhone/iPad
stand
LOO
P
2X FX1 FX
2
AU
TO
LOO
P M
ANUAL
JOG FX
SEL
ECT
LOO
P
2X FX1 FX
2
AU
TO
LOO
P M
ANUAL
JOG FX
SEL
ECT
HI
B
HI
DJ CONTROLLER
A
LOAD
LOAD
BROWSE BACK
A
A
MIC VOL
TEMPO
STANDBY ON
TEMPO
MASTER VOL
iPhone/iPad stand
!
This stand is exclusively for use with an iPhone/iPad. Do not place
tablets other than iPad or large devices on the stand.
!
Set the iPhone/iPad on the stand in the horizontal direction. It may
be unstable if set in the vertical direction.
!
Do not apply excessive force to the stand. Doing so may damage this
unit.
!
Please note that Pioneer will accept no responsibility whatsoever for
damage to or malfunction of the device, injury, etc., due to the device
falling, etc.
!
Do not move with an iPhone/iPad placed on the stand. The iPhone/
iPad could fall off.
!
If there is a cover on the iPhone/iPad, remove the cover before plac-
ing the iPhone/iPad on the stand. If the cover is left on, the iPhone/
iPad could be unstable.
Using the cord hook
Fasten the AC adapter’s power cord and USB cable in place by hooking
them on the cord hook. This prevents the power cord and USB cable
from being accidentally pulled and the plugs from being disconnected
from the terminals.
DC IN
USB
12V
AC adapter’s power cord
Cord hook
USB cable
Summary of Contents for DDJ-WEGO3
Page 13: ......


