AVIC-X930BT/XNUC
21
5
6
7
8
5
6
7
8
C
D
F
A
B
E
When
connecting
a
rear
view
camera
When
this
product
is
used
with
a
rear
view
camera,
it
is
possible
to
automatically
switch
from
the
video
to
rear
view
image
when
the
gear
shif
t
is
moved
to
REVERSE
(
R
).
Rear
View
mode
also
allows
you
to
check
what
is
behind
you
while
driving.
WARNING
USE
INPUT
ONL
Y
FOR
REVERS
E
OR
MIRROR
IMAGE
REAR
VIEW
CAMERA.
OTHER
USE
MA
Y
RESUL
T
IN
INJURY
OR
DAMAGE.
CAUTION
The
screen
image
may
appear
reversed
.
The
rear
view
camera
is
used
as
an
aid
to
keep
an
eye
on
trailers,
or
backing
into
a
tight
parking
spot.
Do
not
use
this
function
for
en-
tertainment
purposes.
Objects
in
rear
view
may
appear
closer
or
more
distant
than
in
reality
.
Please
note
that
the
image
area
shown
by
the
rear
view
camera
may
differ
slightly
when
full-
screen
images
are
displayed
when
backing
and
when
checking
the
rear
of
the
vehicle
while
moving
for
ward.
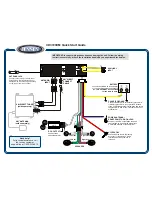
The navigation unit
20 cm (7-7/8 in
.)
(e.g. ND
-BC4)
(sold separately)
R
ear view camera
T
o video output
RCA cable
Brown
(REAR VIEW CAMERA IN)
RCA connector
P
ower cord
(REVERSE GEAR SIGNAL INPUT)
V
iolet/white
F
or
mor
e
details
about
the
wiri
ng,
refer
to
Connecting
the
power
cord
(2)
on
page
12.
Notes
This
mode
is
available
when
the
rear
view
camera
setting
is
set
to “
On
”.
(F
or
details,
refer
to
Operati
on
Manual.)
Connect
the
navigatio
n
system
to
the
rear
view
camera
only
.
Do
not
connect
to
any
other
equipme
nt.
When
connecting
the
exter
nal
video
component
Using
an
A
V
input
(A
V1)
The navigation unit
RCA cables
(sold separately)
Y
ellow
R
ed, white
External video
component
(sold separately)
T
o video output
T
o audio outputs
Mini-jack A
V cable
(CD
-RM10)
(sold separately)
USB and
mini-jack connector
2 m (6 f
t. 7 in
.)
Y
ou
must
set “
A
V1
Input
” in “
A
V
System
Settings
” to “
Video
” when
connecting
the
external
video
component.
(F
or
details,
refer
to
Operation
Manual.)
CAUTION
Be
sure
to
use
a
mini-jack
A
V
cable
(CD
-RM10)
(sold
separately)
for
wiring.
If
you
use
other
cables,
the
wiring
position
might
differ
resulting
in
disturbed
images
and
sounds.
OK
G
V
R
L
G
R
V
L
L
:
Lef
t audio (White)
R
:
Right audio (R
ed)
V :
V
ideo
(Y
ellow)
G :
Ground
Summary of Contents for AVIC-F930BT
Page 27: ...AVIC X930BT XNUC 27 5 6 7 8 5 6 7 8 C D F A B E ...
Page 80: ...AVIC X930BT XNUC 80 1 2 3 4 1 2 3 4 C D F A B E Side A SCLOCK SDATA D CP_RESET D DGND2 ...
Page 165: ...AVIC X930BT XNUC 165 5 6 7 8 5 6 7 8 C D F A B E ...
Page 175: ...AVIC X930BT XNUC 175 5 6 7 8 5 6 7 8 C D F A B E ...
Page 207: ...AVIC X930BT XNUC 207 5 6 7 8 5 6 7 8 C D F A B E ...
Page 215: ...AVIC X930BT XNUC 215 5 6 7 8 5 6 7 8 C D F A B E ...
Page 263: ...AVIC X930BT XNUC 263 5 6 7 8 5 6 7 8 C D F A B E ...
Page 269: ...AVIC X930BT XNUC 269 5 6 7 8 5 6 7 8 C D F A B E ...