En
14
Operation
Basic Operation
Outputting sound
1 Press [POWER] button.
Turn on the power of this unit.
2 Switch the input selector switches.
Selects the input sources for the different channels from among the
devices connected to this unit.
3 Turn the [TRIM] control.
Adjusts the level of audio signals input in each channel.
The corresponding channel level indicator lights when audio signals are
being properly input to that channel.
4 Move the channel fader away from you.
Adjusts the level of audio signals output in each channel.
5 Switch the [CROSS FADER ASSIGN (A, THRU, B)]
selector switch.
Switches the output destination of each channel.
6 Set the crossfader.
This operation is not necessary when the [
CROSS FADER ASSIGN
(
A
,
THRU
,
B
)] selector switch is set to [
THRU
].
7 Turn the [MASTER LEVEL] control.
Audio signals are output from the [
MASTER1
] and [
MASTER2
]
terminals.
The master level indicator lights.
Monitoring sound with headphones
1 Connect headphones to the [PHONES] terminal.
2 Press the [CUE] button(s) for the channel(s) you want
to monitor.
3 Switch the [MONO SPLIT, STEREO] selector switch.
4 Turn the [MIXING] control.
This adjusts the monitor volume balance of the sound of channels for
which the [
CUE
] button is pressed and the sound of the [
MASTER
]
channel.
5 Turn the [LEVEL] control for [HEADPHONES].
The sound of the channels for which the [
CUE
] button is pressed is
output from the headphones.
!
When the [
CUE
] button is pressed again, monitoring is canceled.
Using a microphone
1 Connect a microphone to the [MIC1] or [MIC2]
terminal.
2 Set the [OFF, ON, TALK OVER] selector switch to [ON]
or [TALK OVER].
!
When set to [
TALK OVER
], the sound of channels other than the
[
MIC
] channel is attenuated by 18 dB (default) when a sound of –10
dB or greater is input to the microphone.
!
The sound attenuation level of [
TALK OVER
] can be changed with
[
UTILITY
]. For details on how to change the level, see the Operating
Instructions.
!
The TALK OVER mode can be switched to normal mode or advanced
mode. For details on how to change the mode, see the Operating
Instructions.
3 Turn the [MIC1 LEVEL] control or [MIC2 LEVEL]
control.
Adjust the level of the sound output from the [
MIC
] channel.
!
Pay attention that rotating to the extreme right position outputs a
very loud sound.
4 Input audio signals to the microphone.
Audio is output from the [
BOOTH
]
terminal
Turn the [BOOTH MONITOR] control.
Adjusts the level of audio signals output from the [
BOOTH
] terminal.
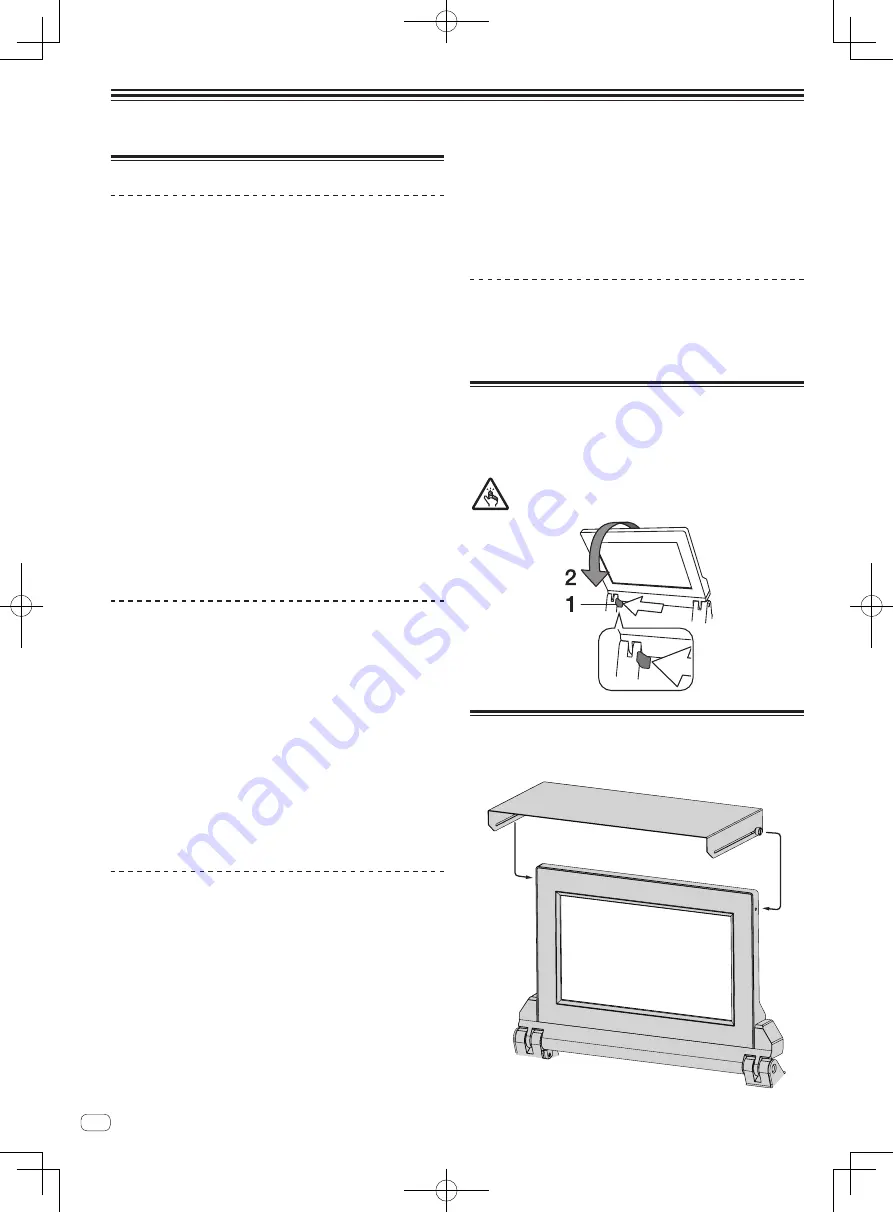
How to use the TILTABLE DISPLAY
When the display is closed, the lock engages when the display is at a
certain angle. When the lock is engaged, move the display back a little
in the open direction once and then press unlock button 1. To fully close
the display, lower the display while pressing the unlock button.
Be careful not to get your fingers caught in the Tiltable display when
opening and closing it.
About the display shade
If outdoor light reflecting on the display bothers you, it can be reduced
by attaching the supplied display shade.
Summary of Contents for DJM-TOUR1
Page 17: ...17 En Additional information...
Page 18: ...18 En...


