


Page | 40
9
F
LUOR
P
EN SOFTWARE
9.1
S
OFTWARE INSTALLATION
1.
Copy the FluorPen software provided on the USB flash disk to your computer and launch the FluorPen program.
2.
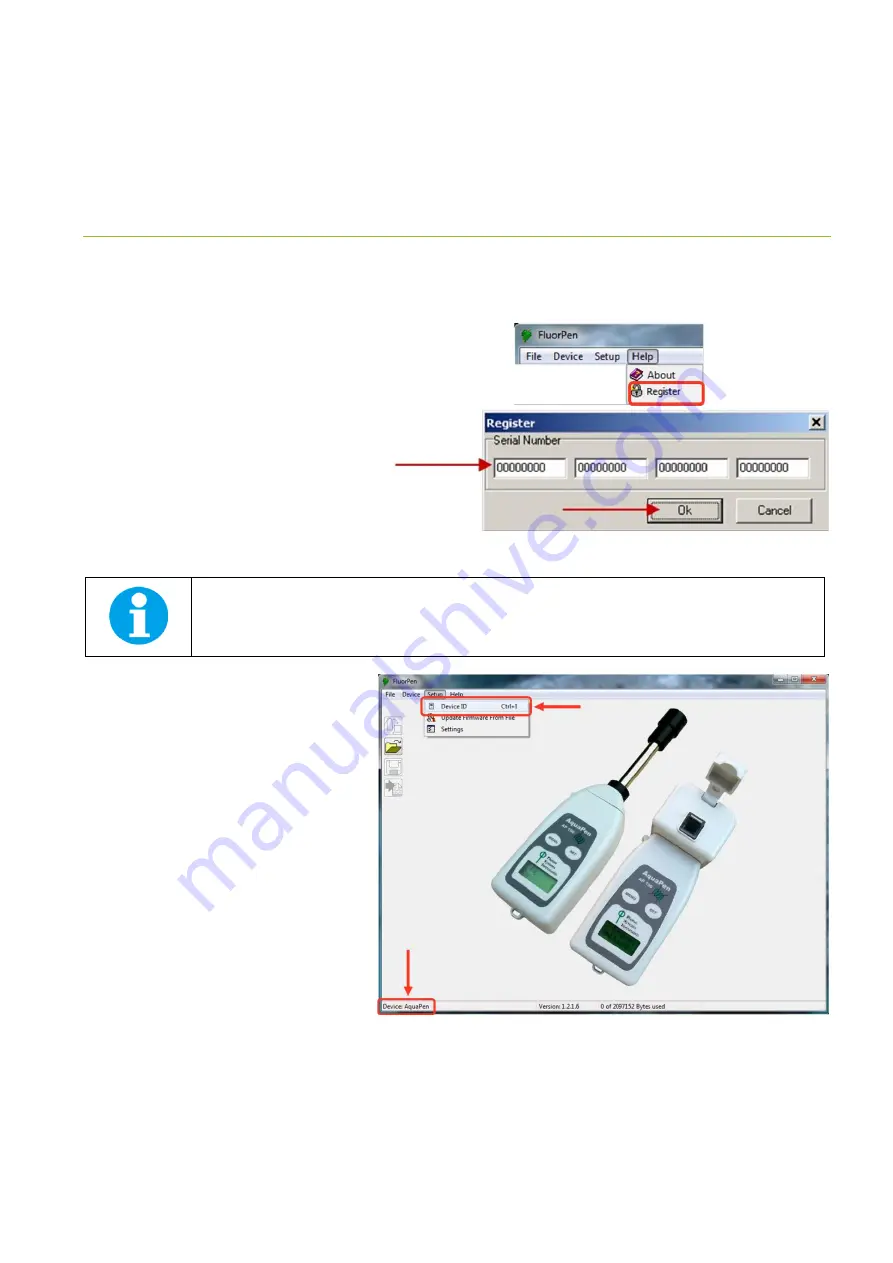
To connect and recognize the AquaPen device
in the FluorPen software, proceeds first with
the registration of the FluorPen software (Fig.
18).
•
Select: Help
> Register
•
Enter: your serial registration number
(found in a text file on the USB flash disk
drive included with the device).
•
Select: OK
Please note that the serial (registration) number for the AquaPen may be found in the file
SN.txt
, which is included
on the enclosed USB flash disk.
Please Note: it is not possible to download data from the AquaPen device without software registration.
3.
Switch on the AquaPen and enable Bluetooth
or connect USB cable to the PC.
4.
Ensure the PC and the AquaPen are properly
paired (see chapter 7 and 8 for complete
information on USB and Bluetooth pairing).
5.
In the software select:
Setup > Device ID
(Ctrl+I)
. If properly connected, the message
“Device: AquaPen” appears in the bottom
part of the screen (Fig. 19). If the connection
is not successful then message “Device not
found” will appear. In the latter case check
all the connections (USB) and Bluetooth
pairing.
Fig. 18 Software registration.
Fig. 19 Connecting AquaPen with software.
Summary of Contents for AquaPen-C AP 110-C
Page 1: ......
Page 9: ...Page 9 3 DEVICE DESCRIPTION Fig 1 Device description...
Page 13: ...Page 13 Fig 3 AquaPen C AP110 C Fig 4 AquaPen P AP 110 P...
Page 22: ...Page 22 Fig 8 NPQ Protocol...
Page 24: ...Page 24 Fig 9 LC1 Protocol...
Page 25: ...Page 25 Fig 10 LC2 Protocol...
Page 29: ...Page 29...
Page 30: ...Page 30...
Page 31: ...Page 31...
Page 32: ...Page 32...
Page 33: ...Page 33...
Page 34: ...Page 34...
Page 35: ...Page 35...
Page 47: ...Page 47 Fig 26 Data export...
Page 51: ...Page 51 Fig 34 GPS coordinates...


