background image

page 17

PHONIC CORPORATION      Helix Board 18 FireWire User's Manual

Helix Board Control Panel

The  Helix  Board  FireWire  control  panel  can  be 
accessed  at  any  time  by  entering  choosing  the 
shortcut from your Programs menu.  This program will 
not only allow users to alter their device and channel 
names and properties, but will also let them correct for 
latency issues, change sampling rates, and so forth.  
When opening the software, a number of options will 
be available for users to select from, allowing them to 
adjust the available properties.
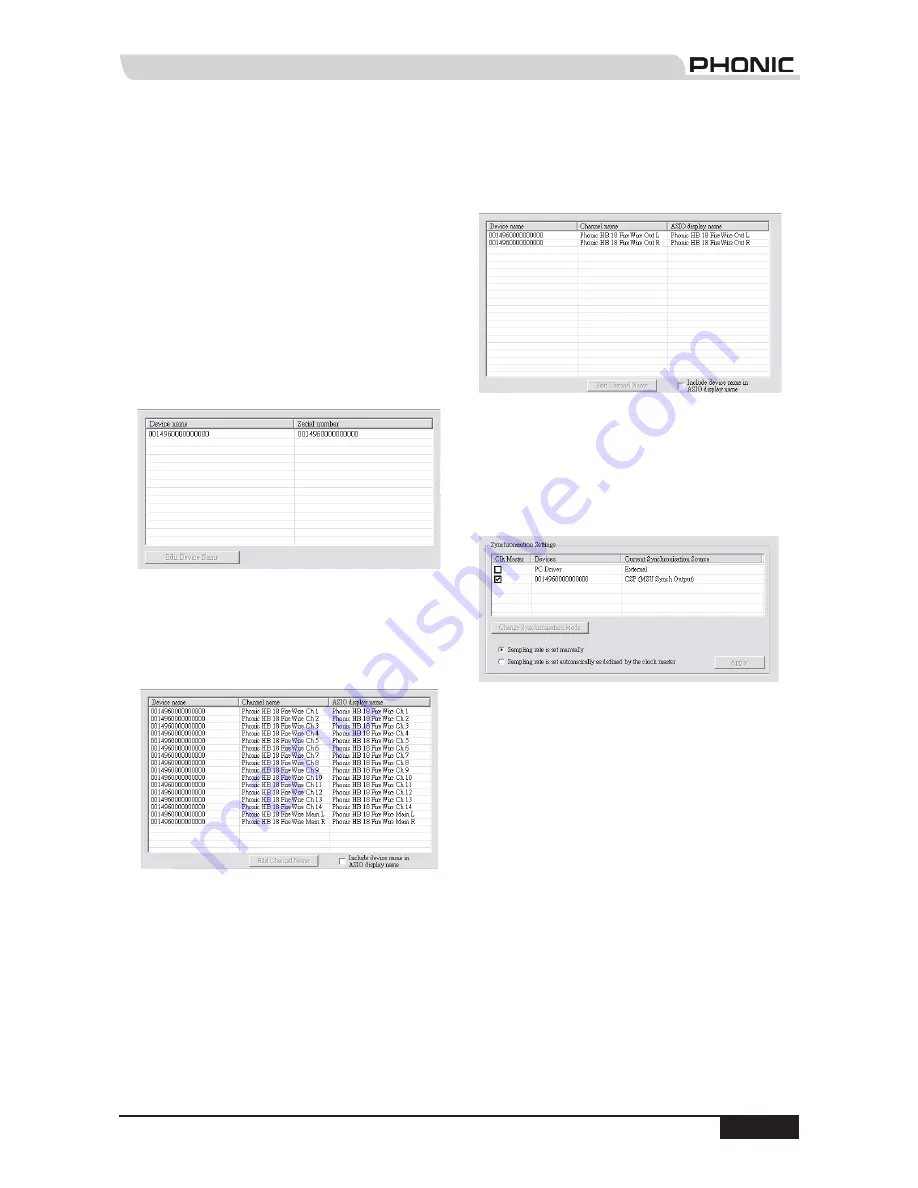
Devices

In the Devices section, users are able to view and edit 
the name of the Phonic FireWire Devices connected 
to their computer.

Input Channels

The Input Channels section allows users to view and 
edit the name of the various input channels received 
from the FireWire input.  For a list of default channel 
names, please consult the table on page 16.

Output Channels

By entering the Output Channels section, users can 
view and edit the names of the two output channels 
from the computer to the Helix Board 18 mixer.

Synchronization

In the Synchronization section, users can adjust the 
sampling  rate  and  other  synchronization  properties.  
Many of these adjustable properties, as they are, are 
set for optimum performance and, unless you are sure 
of  what  you  need  to  change,  are  probably  best  left 
alone.  

First off, the synch mode can be altered, though making 
this alteration is not recommended for novice users.  
The  synch  mode  is  basically  the  way  the  computer 
determines  what  the  'clock  source'  (ie.  device  that 
your computer will use to determine the timing of all 

digital  signals  received)  will  be.   The  default  setting 

for this feature is "CSP", meaning the Helix Board 18 
FireWire  is  the  "master"  clock  source  of  the  device.   
The other options allow users to make the Helix Board 
18 FireWire follow the "timing" of whichever device is 
the clock source.  Having two clock sources has the 
potential  to  create  very  undesireable  audio,  so  it  is 
best avoided.   If the Helix  Board  18 FireWire  is the 
only piece of digital audio equipment attached to the 
computer,  there  is  no  reason  this  option  should  be 
changed.

Summary of Contents for HELIX BOARD 18 FIREWIRE MKII

Page 1: ...User s Manual ENGLISH Helix Board 18 FireWire 18 Input 2 Subgroup FireWire Mixer ...

Page 2: ...uring lighting storms or when unused for long periods of time 14 Refer all servicing to qualified service personnel Servicing is required when the apparatus has been damaged in any way such as power supply cord or plug is damaged liquid has been spilled or objects have fallen into the apparatus the apparatus has been exposed to rain or moisture does not operate normally or has been dropped IMPORTA...

Page 3: ... Getting Started 5 Channel Setup 5 Making Connections 6 Inputs and Outputs 6 Rear Panel 7 Controls and Settings 7 Rear Panel 7 Channel Controls 7 Digital Effect Engine 9 Master Section 9 FireWire Interface 12 System Requirements 12 Driver Installation 12 Channel Assignment 16 Cubase LE 16 Helix Board Control Panel 17 Digital Effects Table 19 Application 20 Specifications 22 Dimensions 24 Block Dia...

Page 4: ...you do we strongly urge you to take a look through this manual Inside you will find important facts and figures on the set up use and applications of your brand new mixer If you do happen to be one of the many people who flatly refuse to read user manuals then we just urge you to at least glance at the Instant Setup section After glancing at or reading through the manual we applaud you if you do r...

Page 5: ...dio level of the input channel is selected each of the Mixer s Channel s ON buttons should be disengaged which should turn the corresponding LED indicator off as well as the SOLO buttons on each channel and 2T RTN To Ctrl Rm 2 Ensure the channel you wish to set has a signal sent to it similar to the signal that will be sent when in common use For example if the channel has a microphone connected t...

Page 6: ... mono input and the signal will appear in the right as well NB When any device is plugged into the mixer s AUX Return 2 the mixer s internal digital effect engine is then disabled 5 AUX Sends These 1 4 TRS outputs may be used to connect to an external signal processor or even to an amplifier and speakers depending on your desired settings from the mixer The signal from the AUX Sends is controlled ...

Page 7: ...imultaneously depends on the DAW software used and 2 audio channels of the computer to be returned to the mixer Please observe the FireWire section of this manual for more information 16 Power Connector This port is for the addition of a power cable allowing power to be supplied to the mixer Please use the power cable that is included with this mixer only The Helix Board 18 FireWire features a swi...

Page 8: ... this signal of which can be returned to mixer via the AUX return input or simply as an additional auxiliary output 26 Pan Balance Controls This alternates the degree or level of audio that the left and right side of the main mix should receive On mono channels the PAN control will adjust the level that the left and right should receive pan where as on a stereo channel adjusting the BAL control wi...

Page 9: ...fect program that is applied to the audio feed Please refer to the Digital Effects Table for more information on Effect parameters NB The digital effect engine has a memory function which allows you to adjust the parameters of a program then if you change the parameters of another program and return to the original one your parameter setting will be kept until the Parameter Control is turned once ...

Page 10: ... indicator located beside the Level Meter is illuminated one or more Solo buttons has been pushed In that case the Level meter will display properties of the Solo signal which is helpful with setting of channel properties If Solo indicator illuminates green this means the Solo feed is a pre fader signal If the solo indicator illuminates red the feed is post fader If the no Solo buttons are activat...

Page 11: ...e two faders are the final level control for the Main Left and Right audio feeds sent to the Main L and R outputs These faders are possibly fed by the various mono and stereo channels as well as AUX and EFX returns and 2T inputs depending on the your selections When pushed all the way up these faders provide 10 dB of gain to the signal and when set all the way down effectively mute the signal 52 G...

Page 12: ... the necessary drivers from the included CD ASIO and WDM drivers It is important that users read all instructions carefully before continuing on to the each step of installation as users will be required to unplug and plug in their FireWire device This is not necessary for Mac users Windows XP with Service Pack 1 or 2 1 It is recommended that you quit all applications before starting the installat...

Page 13: ...8 FireWire User s Manual Read and accept the terms of the License Agreement and click Yes to continue Either select a new destination for the installation or else click Next to accept the default directory Click Next to begin the installation ...

Page 14: ...e 14 After installation is complete users are free to use the device as they wish Connect the Helix Board FireWire to the Computer and turn the power on If a message is displayed indicating that the software has not passed Windows Logo test click Continue Anyway ...

Page 15: ...rd 18 FireWire is working enter the Utilities folder and double click the Audio MIDI Setup icon Mac users are able to use GarageBand Digital Audio Workstation Software in conjunction with the Helix Board 18 FireWire Enter the Audio Device s section From the Properties for pull down tab select Helix Board 18 FireWire At the bottom of the window users can edit the setup of the Helix Board 18 FireWir...

Page 16: ...FireWire can also be selected as the default output device for individual programs by editing said programs settings options Cubase LE Cubase LE is a fairly powerful program provided along with the Helix Board FireWire mixer that allows users to record edit delete and alter their tracks Please note that only 4 tracks can be recorded at once with the version of Cubase included and users must upgrad...

Page 17: ...nd edit the names of the two output channels from the computer to the Helix Board 18 mixer Synchronization In the Synchronization section users can adjust the sampling rate and other synchronization properties Many of these adjustable properties as they are are set for optimum performance and unless you are sure of what you need to change are probably best left alone First off the synch mode can b...

Page 18: ...the depth is too low various clicks and pops may become obvious It is best to set the Stream Buffer Depth to a level that allows users to get the lowest latency while still maintaining an optimal performance The default settings are ideal for most computers The ASIO Buffer Depth is adjustable between 4 and 40 milliseconds This allows users to adjust the latency of the stream received by ASIO drive...

Page 19: ...0 800 ms ECHO 2 Ideal for Echoing vocals Delay Time 0 800 ms DELAY 1 Delays the audio signal Delay Time 0 800 ms DELAY 2 Delays the audio signal Delay Time 0 800 ms EARLY REF Modifies early reflections creating a deeper sound or an echo like effect Room Size 0 1 10 0 GATE REVERB Produces effect by cutting the reverberation Room Size 0 01 5 0 DOUBLER Creates an effect simulating 2 vocalists Pitch F...

Page 20: ... Channels In 2 Channels Out ACTIVE MONITORS KEYBOARDS OR SYNTHESIZERS HEADPHONES GUITAR COMPRESSOR RECORDING DEVICE AMPLIFIER FOH SPEAKERS EQUALIZER AMPLIFIER FLOOR MONITORS DRUM MACHINE ELECTRIC GUITAR ST GUITAR EFFECTS GUITAR EFFECTS Application Live Band 8 Track Recording and Monitoring ...

Page 21: ...eWire User s Manual Studio Recording and Monitoring MICROPHONES NOTEBOOK 16 Channels In 2 Channels Out ACTIVE STUDIO MONITORS KEYBOARD OR SYNTHESIZER COMPRESSORS ELECTRIC GUITAR HEADPHONES HEADPHONE AMPLIFIER DRUM KIT DIGITAL DELAY GUITAR EFFECTS ...

Page 22: ...s 3 Master Aux Send Solo 3 Stereo Aux Returns 2 Aux Return Assign to Subgroup 1 Effects Return to Monitor 2 Global AFL PFL Solo Mode Yes Phones Level Control Yes Faders Aux return 2 Aux 1 2 subgroups Main L R Metering Number of Channels 2 Segments 13 Phantom Power Supply 48V DC Switches Master Effect Processor 16 effects with one main parameter control tap delay control foot switch effect on off t...

Page 23: ...9 5 dBm THD Any output 1KHz 14dBu 20Hz to 20KHz channel inputs 0 005 CMRR 1 KHz 60dBu Gain at maximum 80dB Maximum Level Mic Preamp Input 10 dBu All Other Input 22 dBu Balanced Output 28 dBu Impedance Mic Preamp Input 2 K ohms All Other Input except insert 10 K ohms RCA 2T Output 1 1 K ohms All other outputs 200 ohms Equalization 3 band 15 dB Low EQ 80 Hz Mid EQ mono channel 100 8k Hz sweepable LM...

Page 24: ...Helix Board 18 FireWire User s Manual PHONIC CORPORATION page 24 104 5 4 1 89 3 5 407 16 4 1 7 5 3 5 3 8 8 Dimensions measurements are shown in cm inches ...

Page 25: ...1 2 3 4 5 6 FIREWIRE MOD LO MID HI 80 100 8K 12K EQ RTN1 SOLO POST RED GP1 2 MAIN L 48V L R FADER PRE POST R HelixBoard18 Firewire BLOCK DIAGRAM GP1 2 MIC IN 2 3 1 L MONO PEAK SOLO AU3 EFX SND_FW11 13 STEREO CHANNEL7 10 SND_FW_L CTRL RM MAIN R AUX3 SEND CTRL RM R SND_FW7 9 PAN GAIN GP2 SND_FW_L TO AUX1 TAP DELAY CTRL RM L TO MAIN L R ON ON PRE GRN ON R ON GP1 FADER TO AUX1 AU3 EFX 75Hz HPF LOW CUT...

Page 26: ...Helix Board 18 FireWire User s Manual PHONIC CORPORATION page 26 ...

Page 27: ...page 27 PHONIC CORPORATION Helix Board 18 FireWire User s Manual ...

Page 28: ......

Reviews: