background image

For test purposes you may wish to use hand operated switches to 
manually control the pumps and simply watch the system LEDs 
to see if the Skymetry WTU-14 is functioning properly. If you are 
using “duplex” pump control, select the other output and set it for


Pump Control

 mode also.  After verifying that the unit is function-

ing properly, move your hand-operated pump switches to “Auto” 
and verify that the WTU-14 is properly controlling the system.

Output Wiring

The output relays on the Skymetry WTU-14 are for low current 
control signals (0.3A 120VAC/1.0A 24VDC maximum).

DO NOT directly connect the power for the pumps to these relays—
THIS WILL PERMANENTLY DAMAGE THE WTU-14. 

Use the WTU-14 outputs to control intermediate motor contactors/
relays that will switch actual power to the pumps.

Figure 4: Output wiring to two pumps

Chapter 6: Pump Control

57

Summary of Contents for Skymetry WTU-14

Page 1: ...WTU 14 User s Manual version 1 11 Phonetics Inc LIT 0085...

Page 2: ...ee that changes in equipment made by other manufacturers and referred to in this manual will not affect the applicability of the information in this manual Copyright 2004 by Phonetics Inc dba Sensapho...

Page 3: ...used by persons walking on it Do not overload wall outlets and extension cords as this can result in the risk of fire or electric shock Never push objects of any kind into this product through ventila...

Page 4: ...t 15 This equipment has been tested and found to comply with the limits for a Class A digital device pursuant to Part 15 of the FCC Rules These limits are designed to provide reasonable protection aga...

Page 5: ...v...

Page 6: ...rom original purchase warrantor will repair the defect and return it to you at no charge This warranty shall terminate and be of no further effect at the time the product is 1 damaged by extraneous ca...

Page 7: ...AGENTS SUPPLIERS OR AFFILIATED COMPANIES FOR ANY AND ALL LIABILITIES POTENTIALLY ARISING FROM ANY CLAIM DEMAND OR ACTION BASED UPON ANY LOSSES LIABILITIES DAMAGES OR COSTS INCLUDING BUT NOT LIMITED T...

Page 8: ...imiting the duration of implied warranties then the implied warranties herein are to be limited to the same duration as the applicable written warranty or warranties herein The warranty or warranties...

Page 9: ...ctivating your Skymetry WTU 14 21 Mounting the Skymetry WTU 14 Aluminum Housing 21 Mounting the Skymetry WTU 14 NEMA 4X Housing 23 Locking the NEMA 4X Enclosure 24 Antenna Information 25 Connecting th...

Page 10: ...nable Disable 42 Configuring the Input Type 42 Configuring the Run Timer 42 Configuring the Pulse Counter 42 Alarm Enable Disable 43 Alarm on Return to Normal 43 Alarm Recognition Time 43 Alarm Reset...

Page 11: ...How it works Analog Level Sensor 55 Installation Recommendations 55 Programming for Pump Control 55 Output Wiring 57 Chapter 7 Machine to Machine Control 59 Local Output Control 60 Important Informati...

Page 12: ...Acknowledgment Voice Notification 78 Alarm Acknowledgment Alphanumeric Pager 79 Alarm Acknowledgment Text Message to Cell Phone 79 Alarm Acknowledgment Automatic 80 PART TWO Status Request 81 Chapter...

Page 13: ...roubleshooting 93 APPENDIX C Thermistor Table 99 APPENDIX D SKYMETRY WTU 14 Specifications 101 APPENDIX E Replacing the Backup Battery 103 APPENDIX F Optional Accessories 105 APPENDIX G Returning Your...

Page 14: ...Skymetry WTU 14 Manual xiv...

Page 15: ...elephone call e mail and text messaging You can also request a status report from most two way text devices like alphanumeric pagers and cell phones The Skymetry WTU 14 is fully programmable via the i...

Page 16: ...6 hour battery backup Features 8 Dry Contact Inputs NO NC Pulse Count Equipment Run Time 6 Analog Inputs 10K Thermistor temperature or 4 20mA 2 Relay Outputs 20 different automatic and manual modes Lo...

Page 17: ...Skymetry WTU 14 Diagram 1 Antenna 2 LEDs 3 Terminal blocks 4 RS 232 DCE 5 Jumpers for Temperature or 4 20mA settings Chapter 1 Introduction 17...

Page 18: ...ven control outputs Before any of these features can be utilized the unit must first initialize the web server This happens automatically immediately after your first local programming session with th...

Page 19: ...rammed additional programming changes are minimal However if you were to completely reprogram the unit and change every parameter then the maximum number of data messages would be transmitted Technica...

Page 20: ...Skymetry WTU 14 Manual 20...

Page 21: ...nal antenna see Appendix F Accessories A poor operating environment may result in unwanted system resets and or system lockup The temperature range the unit can operate in is 20 F to 158 F 29 C to 70...

Page 22: ...The mounting surface should be sturdy enough to support 2 lbs The unit should be mounted using four 10 32 bolts where appro priate or four 10 tapping screws The screw kit for the Skymetry WTU 14 inclu...

Page 23: ...the top and bottom of the hous ing are mounting tabs to attach the unit to a wall The mounting surface should be sturdy enough to support 10 lbs The unit should be mounted using four 10 32 bolts where...

Page 24: ...res to the terminal strips The dimensions of the NEMA 4x enclo sure are 12 1 x 8 0 x 5 5 See Figure 2 Figure 2 NEMA 4 Mounting diagram Locking the NEMA 4X Enclosure The Skymetry WTU 14 enclosure can b...

Page 25: ...over tighten the antenna on the Skymetry WTU 14 this may cause permanent dam age to the device The antenna must be connected before the device is powered up Connecting the Power Supply The Skymetry WT...

Page 26: ...aintain the proper charge for a 12V gel cell battery whenever the power supply is plugged in The unit also includes special circuitry to prevent the battery from being damaged in the event of an exten...

Page 27: ...11 5V If the battery voltage continues to fall below 10 5V the unit will disconnect the battery to prevent deep discharge damage to the battery The unit will not reconnect the battery until the batte...

Page 28: ...that can be used to moni tor Normally Open N O or Normally Closed N C sensors In addition they can also be used for pulse counting and equipment run time accumulation When used for pulse count or run...

Page 29: ...rminal however the normal condition for each sensor on the same terminal must be identical either all N O or all N C Normally Closed Sensors To wire more than one normally closed sensor on one input t...

Page 30: ...y Contact input connect them in parallel To do this take one lead from each sen sor and attach it one of the Dry Contact Input terminals Then take the second lead from each sensor and attach it to the...

Page 31: ...ature The unit will accept 10K thermistors These should be wired to an Analog Input terminal and the adjacent ground termi nal For compatible thermistors check the accessory list or thermis tor data i...

Page 32: ...Figure 11 A thermistor and a 4 20mA transducer connected to the unit Skymetry WTU 14 Manual 32...

Page 33: ...uit separat ed from AC power or output wiring When wire runs are long or are in close proximity to large power consuming power generating or power switching equipment it is highly recommended that shi...

Page 34: ...ng or receiving messages LED On Registered IN RANGE LED Off Not in range of wireless network LED On In range of wireless network BATTERY OK LED Off No Battery LED Blinking Battery condition low LED On...

Page 35: ...ware is easy to install Make sure that all Windows applications are closed before attempt ing to run Setup If you encounter problems during installation please call Phonetics Technical Support at 610...

Page 36: ...the In Range and Registered LEDs are lit Note The Registered LED will blink when the Skymetry is sending or receiving messages Connecting Locally The Skymetry Software will allow you to connect with t...

Page 37: ...rompt you Figure 3 SkyID Warning message Figure 4 Programming Download in progress If this was a new unit factory default settings the Name you entered on the edit screen will automatically be copied...

Page 38: ...ime of the wireless network Take care not to make additional program ming changes until the web initialization has finished To view status or make programming changes via the web page go to www skymet...

Page 39: ...t you click the Programming Refresh Link on the web page soon thereafter This is to ensure that the information you are viewing on the web page is up to date This will also ensure that the alarm log i...

Page 40: ...me c The alarm has not been acknowledged An input that is in a Normal but Unacknowledged state means that a The selected input is within its programmed alarm limits b A Normally Open input is open or...

Page 41: ...uld appear at the bottom of the screen to acknowledge the alarm Dry Contact Programming Click the input name to bring up the properties screen for the select ed input The following screen will appear...

Page 42: ...ed will increment the Run Timer if enabled will start running and the Alarm Recognition timer will start running if alarms are enabled Configuring the Run Timer The Run Timer can be used to track how...

Page 43: ...The sensor channel must remain beyond the limits or in a fault condition continuously for this entire period of time in order to become an alarm The range of values is 0 32 767 seconds Alarm Reset Ti...

Page 44: ...ord Alarm If the alarm was unacknowledged the Alarm State would say Alarm Unack and a button would appear at the bottom of the screen to acknowledge the alarm Analog Inputs Programming Figure 4 Analog...

Page 45: ...ater in a 15 foot well Simply enter a Table Low value of 0 and a Table High value of 15 and the WTU 14 will scale the input to read between 0 and 15 feet Programmable range Table Low High 16 334 to 16...

Page 46: ...Table High value 100 Alarm Recognition Time The Recognition Time is the time required for a fault condition to qualify as an alarm event The sensor channel must remain beyond the programmed limits con...

Page 47: ...ecific task depending on whether Dry Contact or Analog Level is selected as the Pump Control method The tables below identify which inputs are used and what function they serve Refer to the Pump Contr...

Page 48: ...Skymetry WTU 14 Manual 48...

Page 49: ...turn on when any alarm occurs n Either relay can be set to turn on when any digital or any analog alarm occurs n One or both relays can be programmed to operate in pump con trol mode simplex duplex fo...

Page 50: ...e for the output You can have the relay automatically turn on for a variety of alarm conditions either individual alarms or if any alarm occurs If you will be controlling the output manually or via a...

Page 51: ...ent state of the output as well as the number of times the relay has turned on the total time the relay has been on cumulative and the alarm status of the out put valid in pump control mode only This...

Page 52: ...Skymetry WTU 14 Manual 52...

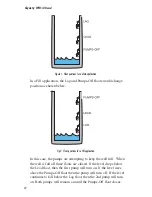
Page 53: ...oat switches three floats are required Lead Lag and Pumps Off see Fig 1 The Lead float determines when to turn on the first pump If the first pump is unable to bring the level below the Pumps Off floa...

Page 54: ...ps are attempting to keep the well full When the well is full all three floats are closed If the level drops below the Lead float then the first pump will turn on If the level rises above the Pumps Of...

Page 55: ...only one output is set then Simplex control will be performed The analog level sensor must be a 4 20mA transducer that is selected and calibrated based on the depth of the well The specified output of...

Page 56: ...programming If you select one of the Analog modes you will have to fill in the Lead Lag and Pumps Off fields In Dry Contact Float mode these fields are disabled Enter the appropriate values and click...

Page 57: ...g properly move your hand operated pump switches to Auto and verify that the WTU 14 is properly controlling the system Output Wiring The output relays on the Skymetry WTU 14 are for low current contro...

Page 58: ...Skymetry WTU 14 Manual 58...

Page 59: ...st be programmed to make the output change back For example if you program output 1 to turn on when input 5 is greater than 60 the output will not turn off when the input drops below 60 A separate eve...

Page 60: ...n line locally Next enter the SkyID and Password of the WTU 14 unit whose out put you want to switch Select the output number and action either ON or OFF Click Apply or OK when finished Remember the t...

Page 61: ...commands are not processed while logged in with the PC software The user should log off and the serial cable should be unplugged during normal operation to ensure that peer to peer commands are proper...

Page 62: ...e well The first would be to turn ON the pump if the level is Less Than 5 The second event would be to turn the pump OFF if the level is Greater Than 20 Consider the rate at which the well fills when...

Page 63: ...Figure 5 Turn Pump Off is Level is Greater than 20 feet Chapter 7 Machine to Machine Control 63...

Page 64: ...Skymetry WTU 14 Manual 64...

Page 65: ...ations at tier 1 Once the Tier Delay expires the unit will start sending alarm messages to destinations in the next tier The Tier Delay time begins as soon as the alarm occurs so if it were pro gramme...

Page 66: ...on the programming in your Skymetry WTU 14 including the programmed Unit Name Destination Name SkyID and Input Name To program a Voice destination click on the Alarm Notification tab Figure 1 Alarm N...

Page 67: ...ge press 2 To end this call press 3 To acknowledge the alarm you must press 2 reply to the mes sage Next enter the four digit alarm ID that was spoken at the end of the message followed by the key Whe...

Page 68: ...r E mail Enter the name for this destination up to 12 characters and in the Type field select Internet E mail In the To field enter the e mail address up to 34 characters Warning Before entering an e...

Page 69: ...u on how to enter the e mail address for your particular service pro vider The alarm message will comprise information from within your Skymetry WTU 14 including the programmed Unit Name Destination N...

Page 70: ...ging com Airtouch Pagers 10digitpagernumber myairmail com Arch Wireless 10digitphonenumber archwireless net or 10digitphonenumber epage arch com AT T Paging 10digitphonenumber page metrocall com Bell...

Page 71: ...ng com Teletouch 10digitpagernumber pageme teletouch com TSR Wireless pagernumber alphame com Verizon Wireless 10digitphonenumber MyAirMail com WebLink Wireless 10digitphonenumber airmessage net Text...

Page 72: ...ear Figure 8 Destination Edit for Cell Phone Enter the name for this destination up to 12 characters and in the Type field select Internet E mail In the To field enter the e mail address as described...

Page 73: ...com Cellular One phonenumber cellularone txtmsg com Cellular One phonenumber message cellone sf com CellularSouth 10digitphonenumber csouth1 net Cingular 10digitphonenumber mobile mycingular net Clea...

Page 74: ...enter the alarm ID number in the message For example if the alarm ID number was 1720 then you would reply with a 1720 in your reply message to indicate to the WTU 14 that you received and acknowledged...

Page 75: ...f the fault condition lasts long enough to meet its programmed recognition time the fault condition becomes an alarm and the WTU 14 begins the alarm notification sequence Alarm Notification The WTU 14...

Page 76: ...age Skymetry alarm at Oak Station unit name SkyID number 1123350 skyid Contact 1 Security input name is in alarm To acknowledge send 1201 alarm ID End of message To replay message press the key To rep...

Page 77: ...t of 15 To acknowledge send 1204 Tier Delay You can group destinations into tiers and then program a delay time until the next tier gets called This allows you to contact your primary personnel first...

Page 78: ...nowledging an alarm will halt the alarm notification process Voice notification alarms must be acknowledged during the original phone call E mail Alphanumeric pager and Cell phone alarms can be acknow...

Page 79: ...e with the alarm ID number which will acknowledge the alarm For example if the alarm ID was 1503 you would simply reply back with 1503 If you do not have a two way pager then you can send the WTU 14 a...

Page 80: ...m Acknowledgment Automatic The Skymetry WTU 14 will acknowledge an alarm itself automati cally if all of the destinations have been contacted and no acknowl edgement was received Skymetry WTU 14 Manua...

Page 81: ...n below To skyID mobilemessage com replace skyID with your unit s skyID number Subject Message p password gst replace password with your unit s password A sample e mail Status Report is shown below D1...

Page 82: ...Skymetry WTU 14 Manual 82...

Page 83: ...the updates from your unit you can go to www skymetry com enter your SkyID and Password and click Login The web page for your Skymetry WTU 14 will be displayed The web page presents a view of the sys...

Page 84: ...ck this button if you believe that programming changes may have occurred locally at the unit and you want to refresh the information on the web server Programming via the Web Page You can change any p...

Page 85: ...ages Status Refresh 5 7 Programming Refresh 9 115 Machine to machine command 1 Voice Alarm 2 4 E mail alarm 1 3 Alarm message to web server 1 Programming change 1 item 2 E mailed Status via GST comman...

Page 86: ...Skymetry WTU 14 Manual 86...

Page 87: ...switch on and off when instructed Control programming Local control Machine to machine or Pump control to make sure that the system is functioning properly as required for your application Notificati...

Page 88: ...e Output LEDs on the front of the unit should also turn on and off Control Programming For applications that utilize control programming it is important to test all scenarios that may affect system op...

Page 89: ...s Both Pumps would turn off when all three floats closed To test Pump Control using a level transducer you can temporar ily force the input level to a certain value by adjusting the calibra tion for t...

Page 90: ...Skymetry WTU 14 Manual 90...

Page 91: ...ripping all connected sensors This will verify that each input is being recognized by the unit and that it is programmed properly Temperature sensors Heat or cool the sensor Motion sensors Have someon...

Page 92: ...tery LED glows steadily Keep the AC adapter unplugged so that a Power Failure alarm occurs Allow the unit to send its alarm message to all pro grammed contacts while running on battery backup Plug in...

Page 93: ...changed the password This is required to initialize the web page Have you entered the proper SkyID and Password Why is the IN RANGE LED off If the unit is not within range of the wireless network the...

Page 94: ...me alarm messages The WTU 14 will not send any alarm messages if you are con nected locally There are no destinations programmed None of the destinations are enabled The unit is not activated on the w...

Page 95: ...no destinations programmed None of the destinations is enabled The unit is not activated on the wireless network There are no unacknowledged alarms Why does the unit call people even after I acknowled...

Page 96: ...my 4 20mA transducer The analog input jumper isn t set to the 4 20mA position The analog input type isn t set to 4 20mA in the software The transducer is not wired correctly The transducer is not cali...

Page 97: ...tton on the web page to retrieve a current snapshot Why can t I get pump control to work The Output s are not set to Pump Control mode The Pump Control parameters are programmed incorrectly The level...

Page 98: ...Skymetry WTU 14 Manual 98...

Page 99: ...X C Thermistor Table 10K Thermistor Data Degrees Celsius Resistance Ohms 30 135 2K 20 78 91K 10 47 54 0 29 49K 10 18 79K 20 12 25K 30 8 194 40 5 592 50 3 893 60 2 760 70 1 990 Appendix C Thermistor Ta...

Page 100: ...Skymetry WTU 14 Manual 100...

Page 101: ...10 000 Analog Input Electrical Characteristics 22K to 2 5V tem perature and 250 Ohms to ground 4 20mA Input Connector terminal block A D Converter Resolution 10 bits 2 LSB Input Protection Metal Oxid...

Page 102: ...0 hrs ENVIRONMENTAL Operating Temperature 20 to 158 F 29 to 70 C Operating Humidity 0 to 90 RH non condensing Storage Temperature 20 to 158 F 29 to 70 C PHYSICAL Skymetry Unit Dimensions 8 0 h x 6 1 w...

Page 103: ...lack to come into the enclosure This will make it easier to turn the panel over 5 Remove the four screws securing the Skymetry housing to the back panel and carefully remove the Skymetry WTU 14 6 Remo...

Page 104: ...through the compression connectors and secure the fittings 14 Plug the power transformer into the outlet 15 Connect the Black battery wire to the BAT terminal 16 Connect the Red battery wire to the B...

Page 105: ...Water Detector FGD 0022 Temp Alert FGD 0023 ISOTEL Surge Protector FGD 0027 Humidistat FGD 0049 Smoke Detector with Built in Relay FGD 0052 Humidity Transmitter FGD 0054 Power Out Alert FGD 0056 Zone...

Page 106: ...Skymetry WTU 14 Manual 106...

Page 107: ...e phone If the unit must be sent to Phonetics for servicing please do the following 1 Unplug the power supply disconnect the battery and disconnect all wiring 2 Carefully pack the unit to avoid damage...

Page 108: ...Skymetry WTU 14 Manual 108...

Page 109: ...Test Log...

Page 110: ......

Page 111: ...ternet E Mail 67 Text Messaging to Cell Phones 71 74 Cellular Providers Formats 73 74 Voice Phone Call 66 68 Alarm Programming 40 46 See also Input Programming I Input Programming Alarm States 39 Anal...

Page 112: ...Web Page Initilization 18 M Machine to Machine Control 59 64 Important Information and Warnings 61 Local Output Control 60 Sample Application 61 63 O Operation 75 82 Alarm Noti cation and Acknowledgme...

Page 113: ...ng a Battery 26 Grounding 27 28 Connecting the Power Supply 25 LED Indicators 34 Mounting the Skymetry WTU 14 Aluminum Housing 21 Antenna Information 25 NEMA 4X Housing 23 Operating Environment 21 Wir...

Page 114: ...kymetry WTU 14 36 Installing and Starting 35 Skymetry WTU 14 Web Page 38 See also Skymetry Web Page T Testing the Skymetry WTU 14 87 89 Control Programming 88 89 Input Testing 87 88 Noti cation Testin...

Reviews:

Related manuals for Skymetry WTU-14