background image

9

1

2

3

4

5

6

MENU

P

Ú

B

o

p

œ

π

®

Ò

V

-

+

-

+

OK

j

h

d

f

y

u

X

fi

s

U

i

1

2

3

4

5

6

7

8

9

0

MENU

SMART  CONTROLS

P

Ú

B

o

p

œ

π

®

Ò

π

F

V

-

+

-

+

0

¬

q

S

a

M

®

OK

j

h

d

f

b

m

y

u

X

fi

s

U

i

u

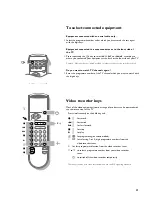
Select peripherals

Press this key repeatedly to select 

EXT1-CVBS

EXT2- Y/C

or 

FRONT-Y/C

,

according to where you connected your

peripherals
(see p. 17).

X

Bilingual choice and

sound mode selection

Press this key

• to switch from 

Stereo 

to 

Mono 

sound, in

case of stereo transmission, or from 

Digital

Sound

to 

Digital Sound available

, in case

of digital transmission;

• to choose between language 

Y

(Dual 

Y

) or

language 

Z

(Dual 

Z

), in case of bilingual

transmission.

The setting is stored for each TV channel

separately.

s

Personal Preferences

Restore picture and sound settings, stored in

the features menu (see p. 11).

P

Digital Noise Reduction

To reduce the image noise and improve

picture quality when receiving weak signals.

Press this key to select 

DNR 

On

or 

DNR 

Off

.

DNR can be individually set for each TV

channel.

i  

Permanent programme number 

Screen information

Press for 5 seconds to activate/de-activate the
continuous display of the programme number.
Press briefly to display information about the
selected TV channel and programme, the sound
reception, the selected DNR setting and picture
format and the remaining time set with the
sleeptimer.

U  

Time display 

The time, downloaded from the TV channel (with
teletext) stored on programme number 1 or under
the lowest favourite programme number, is
displayed in the upper left corner of the screen.

This function is not available when continuous subtitles
have been switched on (see page 14).

3104 305 4756.1.gb  28-05-1999  16:31  Pagina 9

Summary of Contents for TV Remote Control

Page 1: ...ourite TV channels __________________________________6 Install TV set up ____________________________________________7 The keys on the front of the TV _______________________________7 Operation Use of the remote control __________________________________8 9 Use of the menus Picture menu __________________________________________10 Sound menu___________________________________________10 Features me...

Page 2: ...ate your choice p 8 m incredible sound on off p 8 B switch to standby p 3 Installation U f yÚ p 8 R programme selection P volume key p 13 b teletext on off p 8 sound temporarily switched off 0 previous programme p 8 a picture M sound p 8 q picture format S freeze the picture Teletext Menu 8 7 9 5 4 6 0 3 1 2 F yÚ h d U f i j X u P fi s MENU B M a q 0 S OK P V m b p 17 u selection of EXT1 EXT2 or F...

Page 3: ...l regulations Switch TV on Press the power switch A on the front of your TV A green indicator and the screen light up If the indicator is red press the R key on the remote control The green lamp blinks every time you press a key on the remote control When you switch on your set for the first time the MENU LANGUAGE automatically appears on the screen Alternatively the explanation appears in the dif...

Page 4: ...which broadcasts ACI Automatic Channel Installation or a TV channel transmitting a teletext page with the frequencies and programme names of all the TV channels which can be received is detected the search is stopped and a programme list appears The programme list is automatically filled with all the programme numbers and names of the TV channels transmitted It is possible that the cable company o...

Page 5: ...to receive the TV channel If you are connected to a cable system select your country é Search for a TV channel The frequency or the channel number increases until a TV channel is found In case of poor reception you can improve the reception by adjusting the frequency with the R key Direct selection of a TV channel If you know the frequency or the C or S channel number enter it directly with the di...

Page 6: ...herals that are connected Select Give Name in the Installation menu and press the blue OK key é Select the programme number Press the blue OK key Select the character with the EF keys Select the following position with the CD keys Select the following character è Press the blue OK key when finished Press the red MENU key to return to the Installation menu A space numbers or other special character...

Page 7: ...or another message which appears briefly in the information line at the bottom of the screen When selected Off the information line will only appear after pressing the i key and not after the selection of a TV channel To exit from the menu Keep the red MENU key pressed SETUP CD i Photo CD Decoder Descrambler Information Line DECODER DESCRAMBLER Programme Decoder Status Should your remote control b...

Page 8: ...sound In STEREO sound mode when Incredible Sound On is selected it seems as though the loudspeakers are spread further apart from one another q Wide Screen To switch to a Wide Screen format A black band appears at the top and bottom of the screen The TV has an automatic switching function Video recorders or programmes carrying special signals will automatically switch the TV to the correct screen ...

Page 9: ...Restore picture and sound settings stored in the features menu see p 11 P Digital Noise Reduction To reduce the image noise and improve picture quality when receiving weak signals Press this key to select DNR On or DNR Off DNR can be individually set for each TV channel i Permanent programme number Screen information Press for 5 seconds to activate de activate the continuous display of the program...

Page 10: ...outspoken In certain circumstances it may be preferred to switch Off Contrast Plus Store the modified adjustments for Contrast Brightness Colour Tint and Contrast Plus for all TV channels with Store PP in the FEATURES menu Sound menu Switch Loudness on or off When Loudness On is selected the low and high frequencies are amplified so that the natural balance is restored when listening at a low volu...

Page 11: ...ue OK key to select the desired TV channel Sleeptimer With the sleeptimer you can set a time period after which the TV should switch itself off to standby The counter runs from Off up to 180 min or from 180 min down to Off One minute before the TV is set to go to standby the remaining minute and the message Good Night appear on screen You can always switch off your set earlier or change the set ti...

Page 12: ...ys to select the way the message will be displayed Wipe Slide Fall or Fade Run Press the CD keys to select the display frequency Continuous Once or No Display message Switch the TV to standby The message appears on the screen when the TV is switched on again If you selected Once the message will disappear from the screen after 30 seconds If you selected Continuous the message will appear on the sc...

Page 13: ... another number With the option line Select with the colour keys corresponding to the coloured options at the bottom of the screen the desired subject Quickly run through the teletext pages Press EF to run through the previous or the following pages Select the previously selected txt page Press the 0 key Select the index teletext page Press the white colour key to display the main index usually p ...

Page 14: ...e For each TV channel you can store a subtitle page which will be displayed continuously if the programme being broadcast is transmitted with subtitles Press b to switch on teletext and select the proper subtitle page The selected subtitle page appears and also the subtitles when the programme transmitted is subtitled Press j The message Subtitle stored appears Press b to switch off teletext Every...

Page 15: ...our video recorder after you have stored the test signal Decoder and video recorder Connect a eurocable 4 to your decoder and to the special euroconnector of your video recorder See also the video recorder handbook See Define Decoder Descrambler prog numbers as well p 7 You can also connect your decoder directly to EXTERNAL 1 with a eurocable or with an aerial cable to the aerial socket x of your ...

Page 16: ...ed to switch off all menus Audio equipment Connect the audio cables to the audio input of your audio equipment and to AUDIO L and R at the back of your TV You can listen to your TV sound via your audio equipment Headphone Insert the plug into the headphone socket L at the front side of the TV Press to switch off the internal loudspeakers of the TV The headphone impedance must be between 8 and 4000...

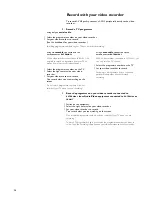
Page 17: ...er of the TV channel which you want to watch with the digit keys Most of the video equipment from our range of products can be operated with the remote control of the TV Video recorder keys Press simultaneously on the VCR key and k for record Ò k for rewind k for fast forward k for stop π k for play F b for programming on certain models 3 0 for selecting 1 or 2 digit programme numbers from the vid...

Page 18: ... the screen Do not switch programme numbers or do not switch off your TV when you are recording using a eurocable connected to the euroconnector EXTERNAL 1 With a video recorder connected to EXTERNAL 1 you can only record a TV channel Select the programme number on the TV Set your video recorder to record Switching to a programme from a connected peripheral equipment does not disturb recording 2 R...

Page 19: ...Menu Have you selected the wrong menu Press the same key again to exit from the menu No solution Switch your TV off and then on again Never attempt to repair a defective TV yourself Check with your dealer or call a TV technician End of life directives Your new TV contains materials which can be recycled and reused At the end of life specialised companies can dismantle the discarded TV to concentra...

Page 20: ...eletext pages and gives you instant access to them Euroconnector A 21 pins connector system enabling you to simply connect various types of audio video and computer equipment Incredible sound Feature to enrich the sound performance of your TV set or audio equipment It enhances the stereo effect by giving the impression that the speakers are positioned much wider apart than they actually are Menu O...

Reviews: