background image

© 2007 - Philips Innovative Applications, Interleuvenlaan 74-76, 3001 Leuven (Belgium)

SRM7500 - Instructions for Use

Installing the Remote Control

The initial installation of your remote is divided into 2 main parts:

Preparing the PC

you want to control with the SRM7500 by

installing the MediaControl software and the USB transceiver,
enclosed.

Configuring the remote control

to set up the connection to the

correct PC and define the devices the SRM7500 will work with.

Preparing Your  PC

Warning

It is very important to 

follow the specified sequence of actions

during the installation. 
First you need to 

install the software

. This software controls the

connection of the SRM7500 to the host PC and will allow you to use
the features of your media player. Only then you can 

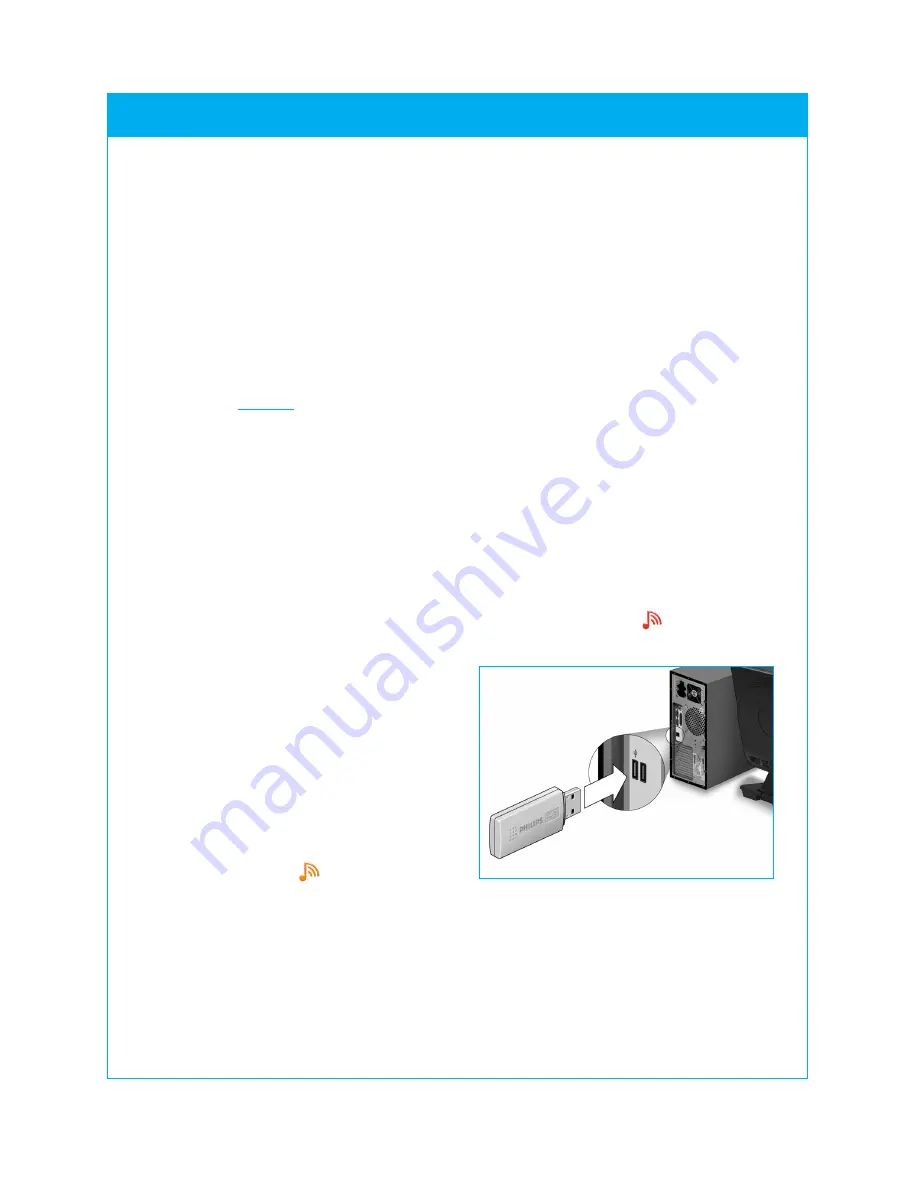
insert the USB

transceiver

.

1

Insert the 

installation CD

enclosed.

An installation wizard appears on your PC screen.

2

Install the 

MediaControl software

by following the onscreen

instructions.
When the software is installed, the MediaControl icon 

appears in

the taskbar on your PC screen.

3

When requested in the
installation wizard, insert the

USB transceiver

in the

dedicated port on your PC.
The USB transceiver will be
recognized and installed
automatically.
When the USB transceiver is
correctly installed, the
MediaControl icon turns 
orange: .

4

After the USB transceiver is installed, insert 

the batteries

in the

remote control, as shown.

SRM7500 - Instructions for Use

4

Summary of Contents for SRM7500

Page 1: ...SRM7500 Instructions for Use EN Quick Easy Setup www philips com urc ...

Page 2: ...ve a universal remote control but also a music controller that enables you to control the media player installed on your PC via the screen of the remote SRM7500 operates like a universal remote control that can control up to 6 AV devices and your PC Media Center if available You can also configure 8 activities By selecting an activity you automatically start a sequence of maximal 25 key presses to...

Page 3: ... p 12 Mode key See p 11 As music controller Playback Settings menu key See p 9 As universal remote More key See p 11 Mute key Channel Up key Channel Down key MC Start key See p 13 Playback keys Device specific keys MC Digit keys TV Sat Cable Digit keys Audio set Input source keys Device specific keys MC Color keys TV Sat Cable Color keys Audio set See p 12 Press the Music en Mode key simultaneousl...

Page 4: ...are This software controls the connection of the SRM7500 to the host PC and will allow you to use the features of your media player Only then you can insert the USB transceiver 1 Insert the installation CD enclosed An installation wizard appears on your PC screen 2 Install the MediaControl software by following the onscreen instructions When the software is installed the MediaControl icon appears ...

Page 5: ...mote is within a range of 6 feet 2 meters of the PC When the connection between the remote and the PC is installed successfully a confirmation message appears on the SRM7500 screen and the MediaControl icon in the taskbar on your PC screen turns green The name of the PC you want to control with your SRM7500 appears 3 Confirm that you want to add other devices like your TV or DVD player by selectin...

Page 6: ...ce is installed the following screen appears 6 When you want to add another device select Yes press and repeat step 5 and 6 or When you added all your devices select No and press to exit the wizard Note You can adjust the settings of SRM7500 via the Setup menu Refer to page 15 for more information on these advanced features Replacing the batteries When the batteries are almost empty the Battery Lo...

Page 7: ... your PC Media Center You select the device and SRM7500 changes into that specific remote Refer to chapter Using SRM7500 as a universal remote control on page 11 Using SRM7500 as a music controller If you did not install a PC during the initial installation pressing starts the wizard to set up the connection to your PC Refer to chapter Configuring the Remote Control on page 5 for more information ...

Page 8: ... Playing screen Press to return to the previous screen Press to go to the next screen Press to return to the playlists Press or to start playing the song To scroll through a list on a screen Use the digit keys to jump immediately to a specific point in the list This is the most efficient way to scroll through a list very fast For example when you press 3 times you automatically jump to the first i...

Page 9: ... settings and press Repeat to repeat the playing playlist Shuffle to play the selected playlist in a random sequence The corresponding icon will appear on the remote s screen Note When you are using iTunes you can repeat a single song by selecting Repeat in the Playback Settings menu and pressing twice The icon appears on the remote s screen To disable a playback setting 1 Press to open the Playba...

Page 10: ...ed to the list Notes You can only add a song to the queue while another song is playing When there is no song being played the selected song will immediately start to play Pressing will stop the currently playing song and start the selected song To delete a playing queue 1 Navigate with the cursor keys to the Now Playing list for Windows Media Player or the PartyShuffle list for iTunes and press T...

Page 11: ...icon appears on the screen of the SRM7500 The hard keys on your SRM7500 then get the same function as the corresponding keys on the original remote control of the selected device Notes Some specific keys that are available on the original remote will not be available on SRM7500 or vice versa Check your original remote for the available functions You can learn functions from the original remote Ref...

Page 12: ... the functions that are labeled on the remote Check your original remote when you are not sure MC TV Sat Cable Audio set Guide Guide Guide Band Live TV Exit Return to Live TV Scan Recorded TV Exit DVD menu Menu Menu Menu Digit keys Digit keys Digit keys Input sources Surround AV input TV SAT input Surround Mode Text Text Text RDS Clear Text off Help Clear Enter PIP Enter Enter 16 9 16 9 Home GEQ C...

Page 13: ...evices do not have any extra functions available in the onboard database However you can copy additional functions from your original remote by learning keys See Add a Function on page 19 Opening Your PC Media Center To open your PC Media Center on your PC press The PC Media Center main menu appears on your PC or TV screen according to your configuration You browse the content of your PC Media Cen...

Page 14: ...d sound system Press the Play key to start the DVD By selecting the activity Watch DVD all the actions are executed automatically in the predefined sequence To start up an activity 1 Press repeatedly until the Activity name appears in the header of the SRM7500 screen 2 Confirm your selection by pressing The activity starts up You can add up to 8 activities to your SRM7500 Refer to the chapters Add...

Page 15: ...tion Show Details to your PC 19 RF Settings Reestablishes the connection from your SRM7500 Reconnect to PC to your PC 19 Add an activity Programs a sequence of different key presses 20 Delete an activity Removes a programmed activity 21 Change language Changes the language of the instructions on the remote control 21 Display time out Changes the time out of the remote control 22 Copy volume Copies...

Page 16: ...s and press Note If you already added 6 devices on the remote apart from your PC Media Center you will be asked to delete a device Refer to page 17 on how to delete a device 2 Select the device and brand you want to add and press The remote will search for available codes for the brand 3 Follow the onscreen instructions to test the codes When a working code set is found your device is correctly in...

Page 17: ... press The device is deleted and becomes available again in list of devices you can add 4 Select Exit and press to return to the Setup menu Notes Keys of the deleted device that are used elsewhere e g in an activity or the volume keys you copied will be deleted as well Check the activities you programmed and volume keys for your devices and reprogram them if necessary Fix a Key If a hard key is no...

Page 18: ...th fixed keys to clear memory Refer to page 17 for more information on how to delete a device 4 Follow the onscreen instructions to fix the key 1 Point the 2 remotes towards each other at a distance of 0 5 2 inch 2 5 cm 2 Select the hard key or extra function you want to fix on the SRM7500 Extra functions can be selected by pressing the key selecting the function with the Cursor Up key or Cursor D...

Page 19: ...nction is added to your remote control You can access the extra functions by pressing Show details You can check the status of the connection of your SRM7500 1 Select the option RF Settings in the Setup menu by using the cursor keys and press 2 Select Show details and press The name of the connected PC and the strength of the signal appear 3 Select Next and press to return to the Setup menu Note W...

Page 20: ...placing the default delay counts as a step in the activity If an activity needs no delay between the different key presses to simulate a long key press you can add the option no delay For example When you would like to turn the volume up during an activity by pressing 4 times the Volume Up key you do not need to insert delays between these 4 key presses Between each step you add the option no dela...

Page 21: ... Delete an Activity You can delete an activity from your remote control 1 Select the option Delete an activity in the Setup menu by using the cursor keys and press 2 Select the activity you want to delete and press 3 Confirm you want to delete the activity by selecting Yes and press The activity is deleted and becomes available again in the list of activities you can add 4 Select Exit and press to...

Page 22: ... copies the Volume keys and Mute key as follows Video devices like DVD DVDR VCR and Satellite box use the Volume keys of the TV provided that you have programmed a TV Audio devices like CD DMR and Tuner use the Volume keys of the Amplifier or Receiver provided that you have programmed an Amplifier or Receiver Note By default your PC uses the Volume settings of Microsoft Windows These Volume keys c...

Page 23: ...eleting all programmed devices activities learned keys and other settings After the reset you will have to configure your remote again 1 Select the option Full reset in the Setup menu by using the cursor keys and press 2 Confirm you want to perform a full reset by selecting Yes and press 3 Press to reconfirm The remote control deletes all settings When the full reset is ended the remote re initial...

Page 24: ... If the RF Settings option is not available in the Setup menu press on your SRM7500 to start the wizard and follow the onscreen instructions If the RF Settings option is available in the Setup menu reconnect the remote to the PC Refer to chapter Reconnect to PC on page 19 Support Troubleshooting Preparing your PC Configuring the SRM7500 Solution Cause Problem Cannot connect to PC appears on the SR...

Page 25: ...onal video recorders and hard disc recorders DMR contains Digital Media receivers TV VCR TV DVD DVD VCR DVD HDD contain combination devices GAME contains the DVD playback functions of the game consoles e g Xbox and Play Station Solution Cause Problem I cannot find my brand in the list of the selected device Not all brands are available in the database When your brand is not in the list you select ...

Page 26: ...d a Device on page 16 Enjoying Your SRM7500 The No Connection icon blinks in the upper right hand corner of the screen The SRM7500 is too far from the PC to set up a connection The SRM7500 should be maximum 33 ft 10 m from the PC Obstructions in the path from the remote to the PC can reduce this distance The PC is not powered Turn on your PC The PC is in standby mode It can take a while for the PC...

Page 27: ...means that only the hard keys on SRM7500 that have a function in the device will work The code behind the key is defect You can fix keys from your original remote control Refer to chapter Fix a Key on page 17 Some keys have device specific functions Refer to chapter Device specific keys on page 12 for more information The No Connection icon blinks in the upper right hand corner of the screen The U...

Page 28: ...Tuner use the Volume keys of the Amplifier or Receiver If you did not install the source device the Volume keys and the Mute key will not work You can choose to install the source device on your remote Refer to page 16 Or you can choose to copy the Volume keys of another source device Refer to page 22 I cannot see all the music that is available on my PC on my SRM7500 screen Only music that is ava...

Page 29: ...he batteries 2 Reconnect to PC via the Setup Menu Refer to page 19 Advanced features Need Help If you have any questions about the SRM7500 you can always contact us You will find our contact details on page 30 of this Instructions for Use Read this Instruction for Use carefully before you contact us When you call our helpline make sure the device is at hand so that our operators can help you deter...

Page 30: ...d 0180 5 007 533 0 12 España 902 889 343 0 15 France 08 9165 0007 0 23 Ireland 01 6011158 Local tariff Italia 199 404 043 0 25 Luxembourg 40 6661 5645 Tarif local Nederland 0900 0400 062 0 20 Norge 22 70 82 58 Lokal takst Östereich 0820 901116 Lokaler Tarif Portugal 2 1359 1441 Preço de chamada local Suisse die Schweiz 044 212 00 45 Tarif local Lokaler Tarif Suomi 09 2294 8258 Paikallinen puheluma...

Page 31: ...ontrol declares under his responsibility that the product SRM7500 is in compliance with the essential requirements and other relevant provisions of Directive 1999 5 EC EMC Radio ETSI EN 300 328 EMC ETSI EN 301 489 17 Safety EN60950 1 2001 Name Signature Werner van Eck Dutch Hierbij verklaart Philips Consumer Electronics Business Line Remote Control dat het toestel SRM7500 in overeenstemming is met...

Page 32: ...ali e componenti di alta qualità che possono essere riciclati e riutilizzati Se su un prodotto si trova il simbolo di un bidone con ruote ricoperto da una X vuol dire che il prodotto soddisfa i requisiti della Direttiva comunitaria 2002 96 CE Informarsi sulle modalità di raccolta dei prodotti elettrici ed elettronici in vigore nella zona in cui si desidera disfarsi del prodotto Attenersi alle norm...

Page 33: ......

Reviews: