background image

18

Use of the menus

TV Ratings Lock

Your TV is equipped with a V-chip.This allows you to control access to
individual programs based on their movie and TV ratings. All settings apply to
all AV inputs (except AV4),TV and external sources.
The program content advisory data are sent by the broadcaster or program
provider.

&

Select 

TV Ratings Lock

with the cursor down.

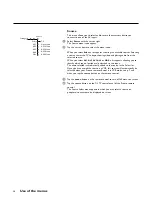
A list appears, showing the age-based TV ratings and a corresponding content-
based ratings list.

é

Tap the cursor right to enter the list.

Select an age-based TV rating with the cursor up/down, and enter, if present,
the list with content-based ratings with the cursor right, and select one
content-based rating.

Tap 

OK

to activate/de-activate the selected rating.

You are asked to enter your PIN. (See Set/Change PIN, p. 20.)
If the PIN is correct, the TV Ratings Lock menu reappears.

(

Select another content-based rating if you like and tap 

OK

again.

You need only enter your PIN once while the menu is active.You can
lock/unlock any number of ratings on the list without re-entering your PIN.

Each ratings item has a box-graphic in front of it to indicate whether or not
programs carrying that rating are currently locked:
• a yellow-colored box: all items in the contents-based list are locked as well;
• a blue-colored box: the item is unselected;
• a half blue, half yellow-colored box: some content-based ratings are 

selected/unselected.

When 

All

has been selected, all items in the age-based and in the contents-

based lists are locked.
If, while 

All

is selected, any other item, either an age-based or content-based

item, is unselected, then 

All

is automatically unselected.

No Rating

is the selection for items that either have no rating information or

have a rating of None.When this is selected, programs without a rating will
be locked.
When an item on the age-based list is selected, all items below that item of
the same group are locked as well.
When you select a content-based rating, all identical content-based ratings in
the younger age-based categories are also selected.

TV-Y

appropriate for children of all ages with themes and elements 
suitable for children aged 2-6 

TV-Y7

programs designed for children age 7 and older

TV-Y7-FV

programs include fantasy violence more intense than other 
programs in the TV-Y7 category

TV-G

programs suitable for all ages.These programs contain little or
no violence, no strong language and little or no sexual dialogue
or situations

TV-PG

programs contain elements that some parents may find unsuitable
for younger children and which may need parental guidance.
The program may contain moderate violence, sexual dialogue
and/or situations and some strong language.

TV-14

programs contain elements that may not be suitable for children
under 14 years of age.These programs include one or more of
the following: intense violence, intense sexual situations,
suggestive dialogue and strong language.

TV-MA

programs are designed to be viewed by adults and may be
unsuitable for children under the age of 17.
These programs may contain graphic violence, explicit sexual
activity and/or crude or indecent language.

Picture  Sound 

Channels

Channel Lock

TV Ratings Lock

Movie Ratings Lock

Set/Change PIN

TV

Install

Settings

...
TV-Y
TV-Y7

(D) Dialogue

TV-PG

(L) Language

TV-14

(S) Sex

TV-MA

(V) Violence

...

TV Ratings Lock

...

Age-based Rating

Content-based Rating

All

none

No Rating

none

TV-Y

none

TV-Y7

(FV) Fantasy Violence

TV-G

none

TV-PG

(D) Dialog
(L) Language
(S) Sex
(V) Violence

TV-14

(D) Dialog
(L) Language
(S) Sex
(V) Violence

TV-MA

(L) Language
(S) Sex
(V) Violence

Summary of Contents for Matchline 34PW9847

Page 1: ...ich may cause an electrical shock For the safety of everyone in your household please do not remove product covering The exclamation point calls attention to features for which you should read the enclosed literature closely to prevent operating and maintenance problems WARNING TO PREVENT FIRE OR SHOCK HAZARD DO NOT EXPOSETHIS EQUIPMENTTO RAIN OR MOISTURE CAUTION To prevent electric shock match wi...

Page 2: ... appliance has been exposed to rain or D The appliance does not appear to operate normally or exhibits a marked change in performance or E The appliance has been dropped or the enclosure damaged 17 Tilt Stability All televisions must comply with recommended international global safety standards for tilt and stability properties of its cabinets design Do not compromise these design standards by app...

Page 3: ...ture menu 14 15 Sound menu 15 17 Channels menu Channel Lock 17 TV Ratings Lock 18 Movie Ratings Lock 19 Set Change PIN 20 Settings menu Speakers 21 22 General 23 27 Source 28 Dual Screen PIP 29 Multi PIP 30 Connect peripheral equipment Connecting and selecting accessory devices 31 35 Connecting external speakers amplifier 36 Recording 37 Before Calling Service 38 Tips 39 Index 39 Glossary 40 Servi...

Page 4: ...event damaging the power AC cord which could cause a hazard do not place the TV on the cord Pronto Remote Control Refer to the separate full use Pronto Owner s Manual supplied for complete details on its function and operation After having inserted the 4 AA batteries into the battery compartment be sure TV is selected for the current device tab item category Turn the TV on Press the power switch A...

Page 5: ...nger nail for best result é To use the touchscreen simply tap the images you see on the screen Note there is no need to turn the touchscreen off It shuts off automatically to save power To change how long the display stays on see the Pronto manual TOUCHSCREEN USE CARE Tap the touchscreen gently when using the Pronto Never use force Do not use pens or any sharp object to tap the screen You might da...

Page 6: ...Functional TV Control Panels Besides the Home page control panel the Pronto Remote Control contains three control panels for the TV For panels related to other devices refer to the Pronto manual 1 3 Control Panel number Shows what panel you are on In this example the first of three TV control panels Contrast dial Turn it to adjust the contrast of the control panel Pronto icon Press and hold for 3 ...

Page 7: ...ows of stored video pictures Tap the OK button in panel 2 or 3 to display a new series of frozen pictures Note continuing to hold the freeze button down will cycle the TV through the various modes Freeze Replay Photo Finish Tap again to return to live picture 12 Tap the number buttons to select a TV channel surf With this feature you can easily switch between different TV channels sources that cur...

Page 8: ...on the sides of 4 3 programs with minimal distortion sound mode Tap this button to summon a list of available sound modes Stereo 3 Stereo Hall or Surround See Sound menu p 16 alt audio When you tune a channel where SAP Second Audio Program is available you can toggle between Main and SAP If not available only Main can be selected auto sound Tap this button to show a list of predefined sound settin...

Page 9: ...olled automatically Tap the cursor in the right direction while the selected Active Control setting information is on top of the screen The Active Control Demo appears The picture settings are being adapted continuously and automatically The Demo items cannot be selected The sliders will be moving showing how the TV is tweaking the current picture and dependent of the selected Auto Picture setting...

Page 10: ...on off See Settings General menu p 23 and Dual Screen PIP p 29 c Switching screens in Dual Screen or PIP See Settings General menu p 23 and Dual Screen PIP p 29 fi Multi PIP Tap fi to turn on off Multi PIP The Multi PIP format that launches on the button press is determined by the selection you made in the Multi PIP Format list in the General menu see Settings General p 24 and Multi PIP Format p 30 ...

Page 11: ...ocus by surrounding the ball indicating the user s current position in the menu hierarchy The puck is always present when the menu system is displayed The puck is divided into 4 wedge shaped regions They correspond to the directional controls up down left right on the remote control In this way users can navigate through the menu hierarchy to arrive at the control they wish to adjust Tapping a val...

Page 12: ...onfirmation prompt is a puck and ball with a task label on the left and sometimes additional text info on the right Tap the OK button to proceed Picture Sound Display Format Automatic Superzoom 4 3 Movie Expand 14 9 Movie Expand 16 9 16 9 Subtitle Widescreen TV Should your Pronto Remote Control be temporarily unavailable or lost or broken the keypad on top of the TV allows you to summon and to nav...

Page 13: ... in autoprogramming with the automatic method choose for Antenna or Cable whether antenna or cable signals are present When Automatic is selected the TV will automatically detect whether or not cable signal input is present When Antenna is selected the TV will detect antenna signals and will search for all antenna TV channels available in your local area When Cable is selected the TV will detect c...

Page 14: ... the picture Dynamic Contrast not available for digital signals via AV4 This feature automatically makes the contrast in the darker and the brighter picture areas more noticeable as the image on screen changes Normally select Medium In certain circumstances it may be preferred to select Minimum Maximum or Off Tap the cursor right to enter the list é Select one of the settings with the cursor up do...

Page 15: ...the audio output signal Bass Bass attenuates or amplifies the low frequency response of the audio output signal Sound Mode The Sound mode feature allows you to select the way that your TV plays audio that it receives from broadcast signals or from external inputs Each mode plays the audio in different configurations depending on the speaker configuration and the sound signal being broadcast The gr...

Page 16: ...d Dolby Surround or to a mono signal 3D Surround 3D Surround enables you to experience the effect of Dolby Surround Pro Logic without the need of having rear speakers connected or activated Select the level of 3D Surround Effect in the Sound menu Pro Logic with Dolby Surround broadcasting In addition to the left and right internal speakers the center and the rear surround speakers reproduce the Do...

Page 17: ...anch tap the diagonal cursor button upright or upleft or tap the menu button Channels menu Channel Lock This feature provides the ability to prevent the viewing of a selected channel Blocked channels can still be tuned with the digit buttons only but the picture is blanked and the audio is muted Select Channel Lock with the cursor down é Tap the cursor right A list with all stored channel numbers ...

Page 18: ...at either have no rating information or have a rating of None When this is selected programs without a rating will be locked When an item on the age based list is selected all items below that item of the same group are locked as well When you select a content based rating all identical content based ratings in the younger age based categories are also selected TV Y appropriate for children of all...

Page 19: ...ovie ratings list become selected All movies are locked If while All is selected any other item is unselected then All is automatically unselected When NR has been selected no other item is selected When any other item has been selected all ratings below are selected as well thus all movies with those ratings will be locked NR not rated G movies with a mild content suitable for all ages PG movies ...

Page 20: ...ons from 0000 to 9999 are valid numbers The Channels menu reappears with a message confirming that the PIN has been created Important You have forgotten your PIN Select Change PIN in the Channels menu é Tap OK Tap the cursor right Enter the overriding code 0 7 1 1 Tap the cursor again and enter a new personal 4 digit PIN code The previous PIN is erased and the new PIN is stored Note The overriding...

Page 21: ...playback Each trim control can be adjusted to match test tone levels Depending on the output mode and sound mode see Main Menu TV Sound Sound mode p 15 selected some menu items may be grayed out and are not selectable Center Mode See Connect Accessory Devices External Speakers Amplifier p 36 If no External Front Speakers are connected do not change the predefined factory settings which is Center M...

Page 22: ...vidual active speakers in a clockwise direction and is meant to be used with the adjustable trim controls Once turned on the Test Tone will continue to circulate through the Left Center Right and both Rear speakers if present Tap the cursor left Tap the cursor up down to select the desired speaker for individual volume level adjustment Tap the cursor left right to adjust the trim level è Continue ...

Page 23: ...ain screen through the speakers and audio from the other screen through the headphones This menu allows you to select the preferred format which can then be displayed toggling the b button on and off on the 3 3 TV control panel of the Pronto remote control See Dual Screen PIP p 29 Select Dual Screen Format with the cursor down é Tap the cursor right Select Dual Screen Large PIP Medium PIP or Small...

Page 24: ...IP 8 or PIP 12 with the cursor up down See Multi PIP p 30 how to operate Freeze Format not available for digital signals via AV4 Freeze Format allows you to select among three options Freeze Replay Photo Finish to be activated when you tap the freeze button on the 1 3 TV control panel of the Pronto remote control See p 7 In this menu you can select which option you prefer In Dual Screen or PIP mod...

Page 25: ...TV will display the currently selected Caption Service when the mute function is active When the mute function is not active the TV will not display Closed captions information Note When Dual Screen Format is selected Closed Captioning if activated appears for the main screen only and it covers the full screen When Multi PIP12 is activated Closed Caption is disabled Caption Service Select Caption ...

Page 26: ...TV will turn on at the channel which was tuned when it was turned off Select On Timer with the cursor down é Tap the cursor right Select Once Daily or Off to set the On Timer for one time operation daily operation or Off When you have selected Once or Daily tap the cursor right Enter the time with the digit buttons or with cursor up down Also enter AM A or PM P with the cursor up down Invalid digi...

Page 27: ... daylight saving time based on specially broadcasted signals Select Off to disable automatic clock correction based on the specially broadcasted signals Tilt Adjust This function allows you if necessary and to compensate for the Geomagnetic field to rotate the picture shown on the screen clockwise or counterclockwise Select Tilt Adjust with the cursor down é Tap the cursor left or right to adjust ...

Page 28: ...tify which type of peripheral is attached to this input The name selected is automatically added to the source in the Select list Once you have named the source e g VCR this source will automatically be selected when your Pronto remote control is in VCR mode see p 7 and when you tap the source button on the remote control Tap the menu button on the remote control to turn off all menus on screen Ta...

Page 29: ...ge TV channels in main screen auxiliary screen and PIP screen Tap the channel up down button the digit buttons or the surf button see 1 3 TV control panel in order to change the TV channels in the highlighted screen Deactivating Dual Screen mode Tap the b button again to return to a full main screen picture The TV tunes to the picture which was highlighted in Dual Screen mode Notes TV or Movie rat...

Page 30: ...nnels or sources selected in the Surf list from top to bottom followed by the channels from the channel map from the lowest to the highest numbered é Tap the cursor left right up down or in case of PIP 12 also cursor diagonal to highlight a PIP screen When the highlight is on one of the PIP screens it begins playing video and the other PIPs freeze The main screen always continues playing audio and...

Page 31: ...ed for daisy chaining or to record programs from your TV See Record with your VCR p 37 If your VCR has an S VHS video jack For improved picture quality connect a S video cable with the S VIDEO input instead of connecting the VCR to the VIDEO jack of AV1 IN S Video does not provide audio so audio cables must still be connected to provide sound CABLE VCR R AUDIO L AUDIO VIDEO AV 1 IN OUT OUT IN AV 2...

Page 32: ... Y C VCR with other AV peripherals CABLE VCR R AUDIO L AUDIO VIDEO AV 2 IN OUT AV 1 IN MONITOR OUT S VIDEO OUT OUT IN OUT IN 3 ANT CABLE Connect the satellite antenna cable 1 to the satellite receiver s SATELLITE IN jack é Connect the Video Audio left and right only for stereo devices AV cables 2 to the VIDEO L and R AUDIO input AV1 IN or AV2 IN jacks If your satellite receiver has an S VHS video ...

Page 33: ...e DVD player s AV OUT jacks and to the TV s AV3 IN jacks Connect an S VIDEO cable with the S VIDEO input instead of connecting the DVD player to the video jack DVD player with Component Video Output Connectors Connect the three separate component video cables to the DVD player s Y Pb and Pr jacks and to the Y Pb and Pr AV3 IN jacks on the TV é Connect the audio cable to the DVD player s audio L an...

Page 34: ...he L and R AUDIO jacks Connect a Set top Box with 2Fh Pr Pb Y output to the Pr Pb and Y jacks and to the L and R AUDIO jacks See also the manual of your High Definition Set top Box Note This television is designed to accept high definition signal standards 480p and 1080i as specified by the Electronic Industries Association standard EIA770 3 Set top boxes from different manufacturers have the poss...

Page 35: ... select Headphone volume to adjust the headphone volume L Connect your camera or camcorder to the AV inputs at the right side of your TV é Connect the device to VIDEO 2 and AUDIO L 3 for mono devices For stereo devices also connect AUDIO R 3 S Video quality with an S VHS Hi 8 or Digital camcorder is obtained by connecting the S Video cables with the S VIDEO input 1 instead of VIDEO 2 and AUDIO inp...

Page 36: ...e Dolby surround output S in the AUDIO OUT grouping at the rear of your TV as shown opposite There is only one cinch output for both speakers Use a mono to stereo adapter to connect two surround speakers Note Turn off the TV and the rear speakers before connecting them Rear Surround speakers should always be located behind or to either side of the listener at about 1 yard above the seated listener...

Page 37: ...umbers on your TV does not disturb recording Record to VCR from MONITOR OUT You can record a program on your VCR from the TV tuner via MONITOR OUT Switch on the device é Select the correct channel on your TV and the correct input on your VCR Set your VCR to record You record the tuner channel of the TV even when you switch to an AV input using the select button on the remote control Do not switch ...

Page 38: ...akers or the center speakers Select an appropriate Sound mode according to the broadcasted sound signal or adjust the volume see Sound Modes p 15 Adjust the contrast and brightness setting Try another auto picture setting Check the transmission system s color settings of this set Sometimes poor picture quality occurs when having activated an S VHS camera or camcorder connected to the right side of...

Page 39: ...es du Règlement sur le matériel brouilleur du Canada Regulatory Notices Federal Communications Commission Notice Care of the screen Clean the TV with a slightly damp soft cloth Do not use abrasive solvent as it can damage the TV screen End of life directives We are paying a lot of attention to environmentally friendly using production methods Your new TV contains materials which can be recycled an...

Page 40: ...TSC analog video signals National Television Standards Committee format devised for TV broadcasting signals in the 1940s 525 lines 60 Hz On Screen Displays OSD Refers to the wording or messages generated by the TV to help the user with specific feature controls color adjustment programming etc Picture Freeze TV mode which allows you to freeze a certain image in order to study a specific detail at ...

Page 41: ...r une preuve d achat pour bénéficier d un service sans frais Pour les produits non couverts par la garantie contactez le center le plus près de chez vous Nota Si Ud reside en una de nuestras zonas para sucursales Philips de servicio al de fábrica ver directorio más abajo Ud puede comunicarse con la sucursal de servicio más cercana para obtener una reparación oportuna y eficaz de su producto Si su ...

Page 42: ...comunicarse con el centro de servicio de fabrica mas cercano para estos lugares dentro de un radio de 80 a 120 km 50 a 75 millas del centro de servicio local GEORGIA Philips Factory Service of Georgia 200 N Cobb Pkwy Suite 120 Marietta GA 30062 770 795 0085 FLORIDA Philips Factory Service of Florida 1911 US Highway 301 North Tampa FL 33619 813 621 8181 WESTERN U S A Philips Factory Service Western...

Page 43: ...ts and technical manual s are not readily available MAKE SUREYOU KEEP Please keep your sales receipt or other document showing proof of purchase Attach it to this owner s manual and keep both nearby Also keep the original box and packing material in case you need to return your product BEFORE REQUESTING SERVICE Please check your owner s manual before requesting service Adjustments of the controls ...

Reviews: