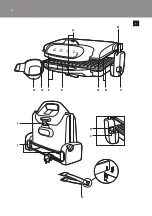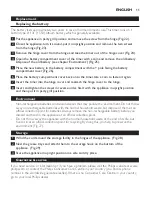
- Party grill position: spread the food on top of the grilling surface. Turn the food from time to
time with spatula/tongs provided.
9
Close the grill (only for contact grill and gratin grill positions).
- Contact grill position: lower the upper grilling plate carefully onto the ingredients. The upper
grilling plate now rests on the food. In this way, the food is grilled evenly on both sides (Fig. 15).
- Gratin grill position: pull the upper grilling plate up to its highest position (1) and then put it in
horizontal position (2). The upper grilling plate must not touch the food (Fig. 16).
10
Open the appliance when the required grilling time has elapsed (only for contact grill and
gratin grill positions).
11
Remove the food.
Use the spatula/tongs provided to remove the food from the appliance. Do not use metal, sharp or
abrasive kitchen utensils.
12
If you want to grill another batch of food, remove excess oil from the plates with a piece of
kitchen paper.
Loosen any caked food or grease carefully with the spatula/tongs provided and remove it from the
plates. Use the spatula with the serrated end for the ribbed section of the plates.
13
Wait until the green ready-to-cook light goes on before you put the food on the grilling plate
or plates.
timer
The timer indicates the end of the grilling time, but does NOT switch off the appliance.
Note: You can also use the health grill without setting the timer.
1
Press the timer button to set the grilling time in minutes. (Fig. 17)
,
The set time becomes visible on the display.
2
Keep the button pressed to put the minutes forward quickly. Release the button once the
required grilling time has been reached.
The maximum time that can be set is 99 minutes.
,
Three seconds after you have set the grilling time, the timer starts to count down.
,
While the timer counts down, the remaining grilling time flashes on the display. The last
minute is displayed in seconds.
Note: You can erase the timer setting by pressing the timer button for 3 seconds (at the moment the time
flashes) until ‘00’ appears.
3
When the preset time has elapsed, you hear an audible signal. After 10 seconds, the audible
signal is repeated. Press the timer button to stop the audible signal.
grilling times
At the end of this booklet, you find a table with ingredients you can prepare with the health grill. The
table shows which temperature to select, how long the food has to be grilled and the appropriate
position of the grill. The time necessary to preheat the appliance is not included in the indicated
grilling time.
The grilling time and temperature depend on the type of food that is prepared (e.g. meat), its
thickness and its temperature and also on your own taste. See also the indications on the health grill.
Note: During the grilling process, the green ready-to-cook light goes on and off from time to time. This
means that the health grill is heating up to the preset temperature setting. When this happens, you can
simply continue grilling.
EnglisH
9
Summary of Contents for HD4409
Page 1: ...HD4409 ...
Page 2: ...2 ...
Page 3: ...3 A B D C E G G H I F L K J M 1 ...
Page 4: ...4 ...
Page 133: ...133 ...
Page 134: ...134 ...
Page 135: ...135 ...
Page 136: ...136 ...
Page 137: ...137 ...
Page 138: ...138 ...
Page 139: ...139 ...
Page 140: ...140 ...
Page 141: ...141 ...
Page 142: ...142 ...
Page 143: ...143 ...
Page 144: ...144 ...
Page 145: ...145 ...
Page 151: ...151 ...
Page 152: ...152 ...
Page 154: ...154 154 2 3 4 5 6 7 8 9 10 1 2 11 12 13 14 15 1 2 16 17 18 19 20 1 2 21 ...
Page 155: ...155 22 1 3 2 23 24 1 2 25 26 27 28 29 ...
Page 156: ...4222 200 0147 2 ...


