Connections
VOLTAGE
NOT FOR ALL
VERSIONS
SELECTOR
110V-
127V
220V-
240V
Game console
OUT
OUT
Wa
rning!
–U
se onl
y the supplied speak
ers.
The
combination of the main unit and
speak
ers pr
o
vides the best sound.
Using
other speak
ers can damag
e the unit and
sound quality will be negativ
el
y affected.
–N
ev
er mak
e or chang
e connections
with the po
w
er switched on.
–C
onnect the
A
C po
w
er cor
d to the
po
w
er outlet onl
y after y
ou ha
v
e finished
hooking up e
v
er
ything.
–T
o a
v
oid o
v
erheating of the system
, a
safety cir
cuit has been built in.
Ther
efor
e
,
y
our system ma
y s
witch to Standb
y
mode automaticall
y under extr
eme
conditions.
If this happens,
let the system
cool do
wn befor
e r
eusing it
(not availab
le f
or
all ver
sions).
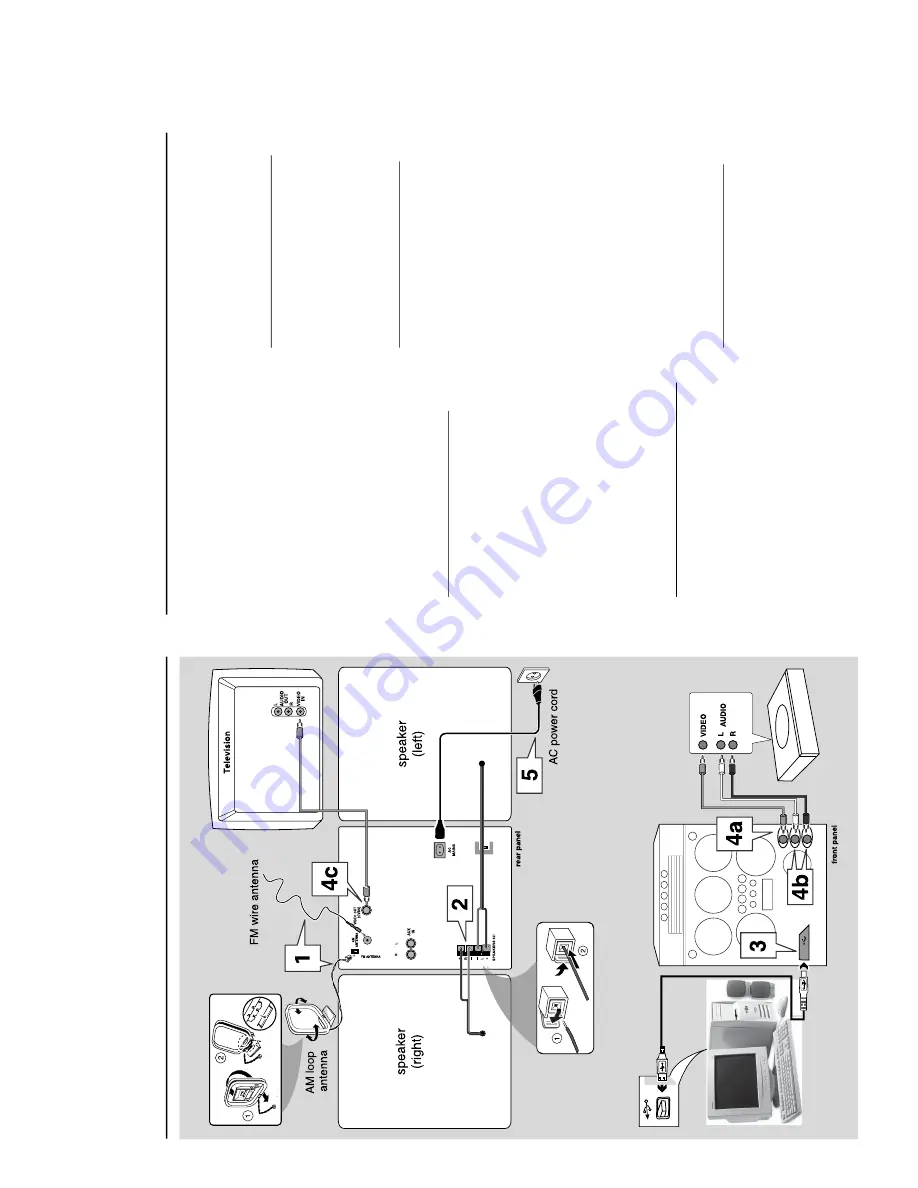
Step 1:
Connecting FM/MW
antennas
–
Place the MW loop antenna on a shelf or
attach it to a stand or wall.
–
Extend the FM antenna and
fix its ends to the
wall.
–
Adjust the position of the antennas fo
r
optimal reception.
–P
osition the antennas as far as possi
bl
e from a
TV
,
VCR or other r
adiation source to prevent
unwanted noise
.
–
For better FM stereo reception, connect
exter
nal FM antenna.
Ref
er to page 10.
Step 2:
Connecting the speak
ers
Connect the speak
er wires to the SPEAKERS
ter
minals,
r
ight speak
er to
“
R
”
and left speak
er to
“
L
”,
coloured (mar
ked) wire to
“
+
”
and b
lack
(unmar
ked) wire to
“
-
”.
Full
y inser
t the
str
ipped por
tion of the speaker wire into the
ter
minal as sho
wn on page 10.
Notes:
–
Ensure that the speak
er cables are corr
ectly
connected.
Impr
oper connections may damag
e the
system due to shor
t-circuit.
–
Do not connect mo
re
than one speak
er to any
one pair of +/- speak
er terminals
.
Step 3:
Connecting to PC vi
a
USB cable
Use the supplied USB cab
le to connect the
system to y
our per
sonal computer’
s USB por
t.
After installing the USB PC LINK application
software onto y
our PC
, y
ou are ab
le to pla
y y
our
music collection via the system (ref
er to “
USB
PC Link
”).
Step 4:
Connecting to game
console
IMPOR
T
ANT!
Gamepor
t inputs are solel
y f
or game
console onl
y.
a.
Use the game console’
s video cab
le (not
supplied) to connect its video output to the
GAMEPOR
T-
VIDEO
ter
minal.
b.
Use the game console’
s audio cab
les (not
supplied) to connect its audio outputs to the
GAMEPOR
T-
A
UDIO L.
/
A
UDIO R.
ter
minals.
c.
Use the video cab
le (y
ello
w) to connect the
VIDEO OUT
ter
minal to the video input on
the
TV for viewing.
Notes:
–
On the
TV
, the
Video Input jac
k is usually y
ello
w
and might be labeled
A/V In,
CVBS
, Composite or
Baseband.
–T
o avoid magnetic interf
er
ence
, do not position
the fr
ont speak
er
s too c
lose to your
TV
.
Step 5:
Connecting the
AC
po
w
er cor
d
“
AUTO INSTALL
-
PRESS PLAY
”m
ay
appear
on the displa
y panel when the
A
C po
w
er cord is
plugged into the po
w
er outlet for the f
ir
st time
.
Press
É
Å
on the main unit to store all a
vailabl
e
radio stations
(pag
e 3 - P3)
or press
Ç
to exit
(refer to
“
Tuner Operations
”)
.
Connections
1-7
Summary of Contents for FW-M589
Page 16: ...Service position A Service position B Service position C 2 4 2 4 DISMANTLING INSTRUCTIONS ...
Page 62: ...9 2 9 2 AF12 BOARD COMPONENT LAYOUT ...
Page 63: ...9 3 9 3 AF12 BOARD CHIP LAYOUT MAPPING AF12 BOARD COMPONENT LAYOUT MAPPING ...
Page 64: ...9 4 9 4 AF12 BOARD CHIP LAYOUT ...
Page 76: ...10 8 Location of switches ...
Page 84: ...10 16 10 16 Exploded view 5DTC mechanic for orientation only ...


