background image

16

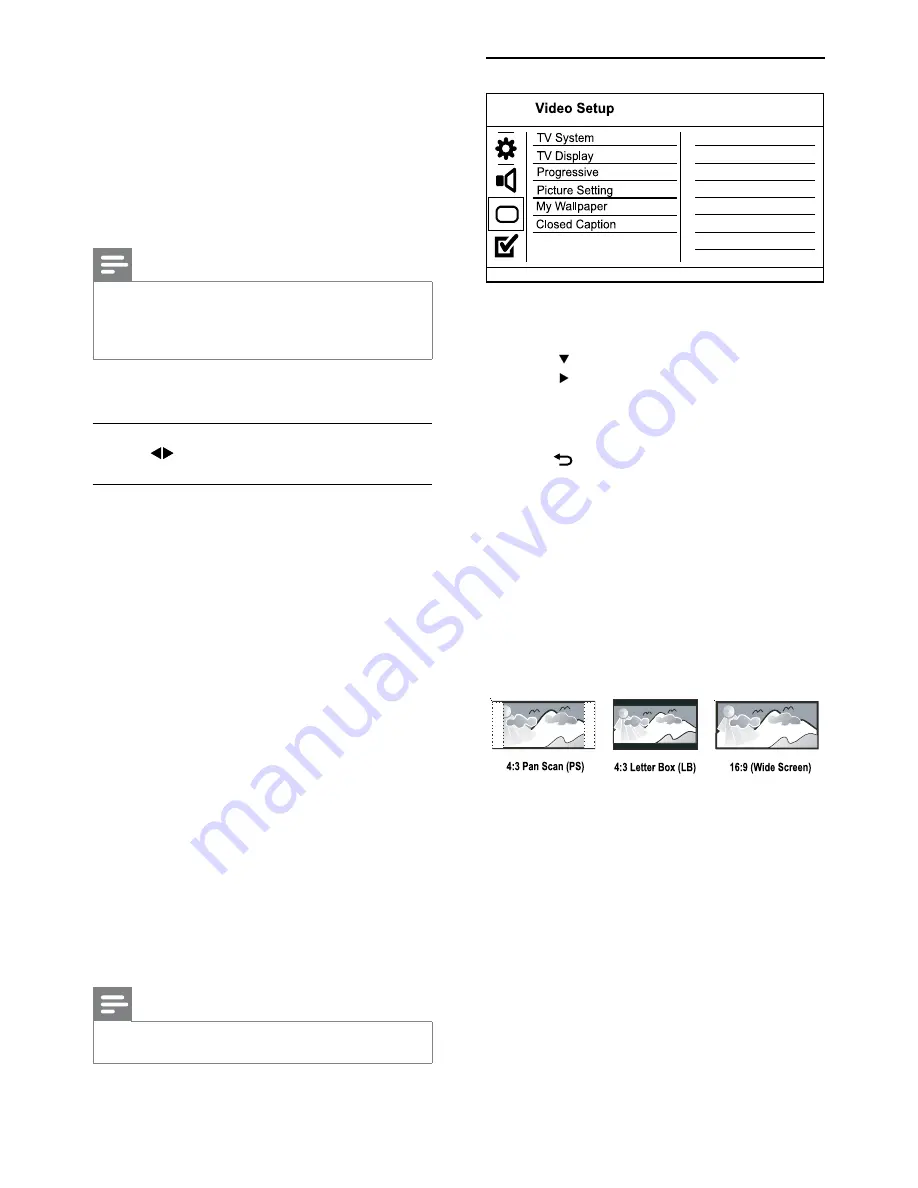
Video setup


1

 Press 

SETUP

.


»

[General Setup]

 menu is displayed.

2

 Press  to select 

[Video Setup]

, and then 

press   to enter the submenu.

3


Select an option, and then press 

OK

.

4


Select a setting, and then press 

OK

.

To return to the previous menu, press 

• 

 BACK

.

To exit the menu, press 

• 

SETUP

.

[TV System]

Change this setting if the video does not appear 
correctly. By default, this setting matches the most 
common setting for TVs in your country.
• 

[PAL]

 - For a PAL-system TV.

• 

[Multi]

 - For TV that is compatible with both 

PAL and NTSC.

• 

[NTSC]

 - For an NTSC-system TV.

[TV Display]

Select a display format:


• 

[4:3 Pan Scan]

 - For a 4:3 screen TV: full-height 

display with the trimmed sides.

• 

[4:3 Letter Box]

 - For a 4:3 screen TV: wide-

screen display with black bars on the top and 
bottom of the screen.

• 

[16:9]

 - For a wide-screen TV: display ratio 

16:9.

[Progressive]

If a progressive scan TV is connected to this 
product, turn on the progressive scan mode.
• 

[On]

 - Turn on progressive scan.

• 

[Off]

 - Turn off progressive scan mode.

• 

[Off]

 - Disable digital output.

• 

[PCM Only]

 - Downmix to two-channel 

audio format.

• 

[LPCM Output]

 - Select the LPCM (Linear 

Pulse Code Modulation) output sampling rate.
• 

[48kHZ]

 - For discs recorded at sampling 

rate of 48 kHz.

• 

[96kHZ]

 - For discs recorded at sampling 

rate of 96 kHz.

Note


[LPCM Output]

 setting is only available if the 

[Digital 

Output]

 is set to 

[PCM Only]

.

The higher the sampling rate, the better the sound 


quality.

[Volume]

Set the default volume level when you play a disc.

1. Press 

OK

.

2. Press 

 to set the volume.

3. Press 

OK

 to confirm and exit.

[Sound Mode]

Select a preset sound effect to enhance the audio 
output.
• 

[3D]

 - Select a virtual surround sound effect 

that is produced from the left and right audio 
channels.

• 

[Movie Mode]

 - Select a sound effect for 

movies.

• 

[Music Mode]

 - Select a sound effect for 

music.

[CD Upsampling]

For better sound quality in stereo mode, convert 
the music CD to a higher sampling rate.
• 

[Off]

 - Turn off CD-upsampling.

• 

[88.2kHz]

 - Convert to twice the original 

sampling rate.

• 

[176.4kHz]

 - Convert to four times the original 

sampling rate.

[Night Mode]

Make loud sound level softer and soft sound level 
louder so that you can watch the DVD movies at a 
low volume, without disturbing others.
• 

[On]

 - Enjoy quiet viewing at night.

• 

[Off]

 - Enjoy surround sound with a full 

dynamic range.

Note

Applicable only to Dolby Digital encoded DVDs.


EN

Summary of Contents for DVP3550KMX

Page 1: ...Register your product and get support at www philips com welcome EN User manual Foto somente ilustrativa DVP3550KMX ...

Page 2: ......

Page 3: ...B flash drive 8 Connect power 8 4 Get started 8 Prepare the remote control 8 Find theTV input channel 8 Select menu display language 8 Turn on progressive scan 9 5 Play 9 Play a disc 9 Play video 9 Play music 11 Play photo 12 Play from a USB flash drive 13 6 Other features 13 Media copy 13 Create MP3 files 13 Karaoke 14 7 Adjust settings 15 General setup 15 Audio setup 15 Video setup 16 Preferences 1...

Page 4: ...tilation Ensure curtains or other objects never cover the ventilation slots on the product Never place the product remote control or batteries near naked flames or other heat sources including direct sunlight Avoid high temperature moisture water and dust This unit must not be exposed to dripping or splashing Never place any object or items that can damage this unit e g liquid filled objects lighted...

Page 5: ...mat Logo Licensing Corporation Manufactured under license from Dolby Laboratories Dolby and the double D symbol are trademarks of Dolby Laboratories 2 Your DVD player Congratulations on your purchase and welcome to Philips To fully benefit from the support that Philips offers register your product at www philips com welcome Playable media This product can play DVD DVD Video DVD R RW DVD R RW DVD R ...

Page 6: ...KE Access or exit the Karaoke setup menu m AUDIO CREATE MP3 Select an audio language or channel on a disc Access the menu of creating MP3 files n Stop play o Start pause or resume disc play p INFO For discs access the play options or display the current disc status For slideshows display a thumbnail view of photo files q OK Confirm an entry or selection r SETUP Access or exit the setup menu Remote co...

Page 7: ...TAL OUT AUDIO IN 3 Connect Make the following connections to use this product Basic connections Video Audio Optional connections Route audio to other devices Digital amplifier receiver Analog stereo system USB flash drive Connect audio video cables Select the best video connection that TV can support Option 1 Connect to the component video jacks for a standard TV or Progressive Scan TV Option 2 Conn...
Page 8: ...ay language 1 Press SETUP General Setup menu is displayed 2 Select OSD Language and then press 3 Press to select a language and then press OK 1 Connect the audio cables supplied to the AUDIO OUT L R jacks on this product the audio input jacks on the device Connect USB flash drive 1 Connect a USB flash drive to the jack on this product Note This product can only play view MP3 WMA DivX Ultra or JPEG fi...

Page 9: ...feature you must connect a progressive scan TV with the component video jacks see Connect Connect audio video cables Option 1 Connect to the component video jacks for details 1 Turn on the TV to the video input channel for this product 2 Press SETUP 3 Press to select Video Setup 4 Select Progressive On and then press OK A warning message is displayed 5 To proceed select Ok and then press OK The pr...

Page 10: ... During play press INFO The disc status menu is displayed 2 Select Angle and then press 3 Press the Numeric buttons to change the angle Play changes to the selected angle Button Action Start pause or resume disc play Stop disc play Skip to a previous next title or chapter Search fast backward or fast forward Press repeatedly to change the search speed Search slow forward or slow backward Press rep...

Page 11: ...ther track folder press then press OK Note Applicable only to discs that contain multi angle scenes Repeat play for a specific section 1 During play press INFO 2 Press to select REPEAT AB 3 Press OK to set the start point 4 Press OK to set the end point Repeat play starts To cancel repeat play press OK again Note The marked section for repeat play is only possible within a track title Play DivX Ult...

Page 12: ...slideshow play press To stop music play press again Note It may require longer time to display the disc content on the TV due to the large number of songs photos compiled onto one disc USB flash drive If the JPEG photo is not recorded with an exif type file the actual thumbnail picture cannot be shown on the screen It is replaced by a blue mountain thumbnail picture This product can only display dig...

Page 13: ...Start Exit Select all Deselect all to change speed Track01 04 14 Track02 04 17 Track03 03 58 Track04 04 51 Track05 03 53 Track06 04 09 Track07 04 38 Press OK button CRT ID3 Yes Device USB 1 Speed Normal Bitrate 128kbps Play from a USB flash drive Note This product plays views MP3 WMA DivX Ultra or JPEG files that are stored on a USB flash drive 1 Connect a USB flash drive to the jack on this product 2...

Page 14: ...ogress bar is displayed When the current song ends the recording completes and stops During recording you may press KOK RECORD and follow the on screen instructions to stop the recording 8 Select Start in the menu and then press OK to start to convert Once complete a new folder is created automatically in the USB flash drive to store all the new MP3 files To exit the menu select Exit and then press ...

Page 15: ...cted through the digital jack coaxial digital Digital Output Select a type of digital output All Support multi channel audio formats Sound Mode CD Upsampling Digital Audio Analogue Output Volume Audio Setup Night Mode 7 Adjust settings Note If the setup option is grayed out it means the setting cannot be changed at the current state General setup 1 Press SETUP General Setup menu is displayed 2 Pre...

Page 16: ...t LPCM Output Select the LPCM Linear Pulse Code Modulation output sampling rate 48kHZ For discs recorded at sampling rate of 48 kHz 96kHZ For discs recorded at sampling rate of 96 kHz Note LPCM Output setting is only available if the Digital Output is set to PCM Only The higher the sampling rate the better the sound quality Volume Set the default volume level when you play a disc 1 Press OK 2 Pres...

Page 17: ...dio Disc Menu DivX Subtitle Password Note For more detailed description see Get started Turn on progressive scan Picture Setting Select a predefined set of picture color settings or customize the personal setting Standard Original color setting Bright Vibrant color setting Soft Warm color setting Personal Customize the color setting Set the level of brightness contrast tint and color saturation the...

Page 18: ...SETUP to exit the menu 4 Visit www philips com support to check for the latest software version using the file name for this product 5 Refer to the upgrade instructions on the website for more information Note Rated DVDs above the level you set in Parental Control require a password to be played The ratings are country dependent To allow all discs to play select 8 Some discs have ratings printed on...

Page 19: ...n the TV Change the TV channel until you see the Philips screen If you have turned on the progressive scan setting or change the TV system setting switch back to default mode 1 Press to open the disc compartment 2 Press the Numeric button 1 for progressive scan or the Numeric button 3 for TV system Note Disconnect the power cord for a few seconds and connect again to turn on the product Care Cauti...

Page 20: ...n 9 or Windows Media player for Windows XP Files are recognized by their file extension wma Sound No audio output from the TV Ensure that the audio cables are connected to the audio input of the TV Assign the audio input of the TV to the corresponding video input See the TV user manual for details No audio output from the loudspeakers of the audio device stereo system amplifier receiver Ensure that ...

Page 21: ...85 Lao 7679 Latina 7665 Latvian 7686 Letzeburgesch 7666 Limburgan Limburger 7673 Lingala 7678 Lithuanian 7684 Luxembourgish 7666 Macedonian 7775 Malagasy 7771 Magyar 7285 Malayalam 7776 Maltese 7784 Manx 7186 Maori 7773 Marathi 7782 Marshallese 7772 Moldavian 7779 Mongolian 7778 Nauru 7865 Navaho Navajo 7886 Ndebele North 7868 Ndebele South 7882 Ndonga 7871 Nederlands 7876 Nepali 7869 Norsk 7879 N...

Page 22: ... 2010 Koninklijke Philips Electronics N V All rights reserved DVP3550KMX_78_UM_V1 0_1006 ...

Reviews: