background image

IMPORTANT SAFETY INSTRUCTIONS. 

READ BEFORE OPERATING EQUIPMENT.

1.

Read these instructions.

2.

Keep these instructions.

3.

Heed all warnings.

4.

Follow all instructions.

5.

Do not use this apparatus near water.

6.

Clean only with a dry cloth.

7.

Do not block any of the ventilation openings. Install in
accordance with the manufacturer’s instructions.

8.

Do not install near any heat sources such as radiators,
heat registers, stoves, or other apparatus (including
amplifiers) that produce heat.

9.

Do not defeat the safety purpose of the polarized or
grounding-type plug. A polarized plug has two blades
with one wider than the other. A grounding type plug
has two blades and a third grounding prong. The wide
blade or third prong are provided for your safety. When
the provided plug does not fit into your outlet, consult
an electrician for replacement of the obsolete outlet.

10.

Protect the power cord from being walked on or
pinched, particularly at plugs, convenience receptacles,
and the point where they exit from the apparatus.

11.

Only use attachments/accessories specified by the 
manufacturer.

12.

Use only with a cart, stand, tripod, bracket, or table

specified by the manufacturer or sold with the
apparatus. When a cart is used, use caution
when moving the cart/apparatus combination to

avoid injury from tip-over.

13.

Unplug this apparatus during lightning storms or when
unused for long periods of time.

14.

Refer all servicing to qualified service personnel.
Servicing is required when the apparatus has been 
damaged in any way, such as if the power-supply cord or
plug is damaged, liquid has been spilled or objects have
fallen into the apparatus, or if the apparatus has been
exposed to rain or moisture, does not operate normally,
or has been dropped.

15.

This product may contain lead and mercury. Disposal of
these materials may be regulated due to environmental
considerations. For disposal or recycling 
information, please contact your local authorities or the
Electronic Industries Alliance: www.eiae.org

16. Damage Requiring Service

- The appliance should be

serviced by qualified service personnel when:

A.

The power supply cord or the plug has been 

damaged; or

B.

Objects have fallen, or liquid has been spilled into the

appliance; or

C.

The appliance has been exposed to rain; or

D.

The appliance does not appear to operate normally

or exhibits a marked change in performance; or

E.

The appliance has been dropped, or the enclosure

damaged.

17. Tilt/Stability

- All televisions must comply with 

recommended international global safety standards for
tilt and stability properties of its cabinet design.
• Do not compromise these design standards by 
applying excessive pull force to the front, or top, of the
cabinet which could ultimately overturn the product.
• Also, do not endanger yourself, or children, by placing
electronic equipment/toys on the top of the cabinet.
Such items could unsuspectingly fall from the top of the
set and cause product damage and/or personal injury. 

18. Wall or Ceiling Mounting 

- The appliance should be

mounted to a wall or ceiling only as recommended by
the manufacturer.

19. Power Lines 

- An outdoor antenna should be located

away from power lines.

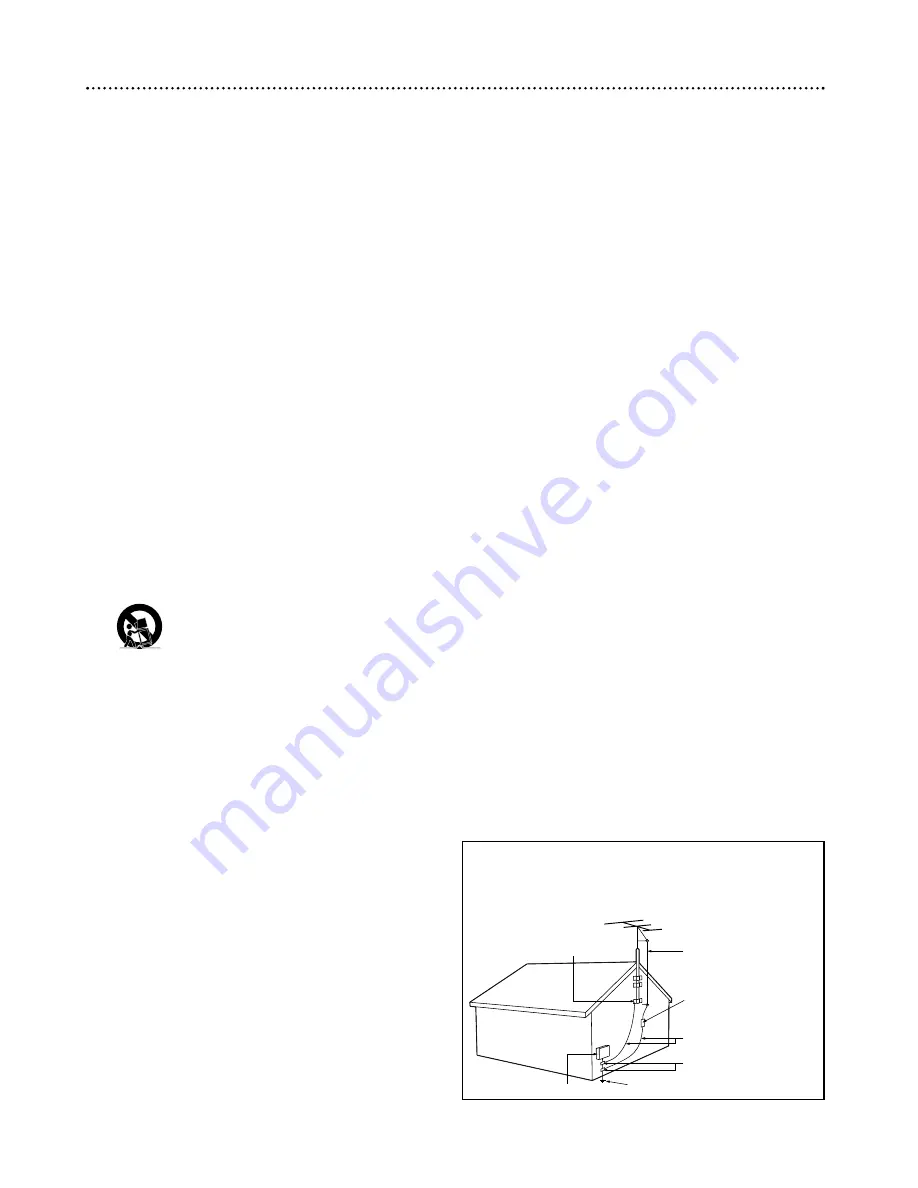
20. Outdoor Antenna Grounding

- If an outside 

antenna is connected to the receiver, be sure the anten-
na system is grounded so as to provide some protection
against voltage surges and built up static charges.
Section 810 of the National Electrical Code, ANSI/NFPA
No. 70-1984, provides information with respect to prop-
er grounding of the mast and supporting structure
grounding of the lead-in wire to an antenna discharge
unit, size of grounding connectors, location of antenna
discharge unit, connection to grounding electrodes and
requirements for the grounding electrode. See Figure
below.

21. Object and Liquid Entry

- Care should be taken so

that objects do not fall and liquids are not spilled into
the enclosure through openings.

22. Battery usage CAUTION 

- To prevent battery leak-

age that may result in bodily injury or damage to the
unit:
• Install all batteries correctly, with + and - aligned as
marked on the unit.
• Do not mix batteries (old and new or carbon and alka-
line, etc.).
• Remove batteries when the unit is not used for a long
time.

ANTENNA LEAD IN WIRE

ANTENNA DISCHARGE UNIT 

(NEC SECTION 810-20)

GROUNDING CONDUCTORS 

(NEC SECTION 810-21)

GROUND CLAMPS

POWER SERVICE GROUNDING ELECTRODE SYSTEM 

(NEC ART 250, PART H)

GROUND CLAMP

ELECTRIC SERVICE EQUIPMENT

Example of Antenna Grounding 

per National Electrical Code

Safety Information (cont’d)  5

Summary of Contents for DVD962SA

Page 1: ... you have any problems Philips Representatives can help you get the most from your new product by explaining Hookups First Time Setup and Feature Operation Do not attempt to return this product to the store For fast help call us first 1 800 531 0039 Thank you for making Philips a part of your home Important Return your Warranty Registration Card within 10 days See why inside ...

Page 2: ...Remember to get the most from your PHILIPS product you must return your Warranty Registration Card within 10 days So please mail it to us right now Know these safetysymbols This bolt of lightning indicates uninsulated material within your unit may cause an electrical shock For the safety of everyone in your house hold please do not remove product covering The exclamation point calls attention to f...

Page 3: ...Video FTS 36 37 Audio CD FTS 38 39 Advanced DVD Player Setup and Features TV Shape 40 Video Shift 41 Digital Crystal Clear 42 Digital Output 43 SACD Sound Mode 44 Analog Output 45 Speakers 46 Night Mode 47 Karaoke Vocal Language 48 Audio Direct Mode 49 Information You May Need Helpful Hints 50 51 Glossary 52 Specifications 53 Limited Warranty 54 55 Index 56 Manufactured under license from Dolby La...

Page 4: ...n radiate radio frequency energy and if not installed and used in accordance with the instructions may cause harmful interference to radio communications However there is no guarantee that interference will not occur in a particular installation If this equipment does cause harmful interference to radio or television reception which can be determined by turning the equipment off and on the user is...

Page 5: ...ed or B Objects have fallen or liquid has been spilled into the appliance or C The appliance has been exposed to rain or D The appliance does not appear to operate normally or exhibits a marked change in performance or E The appliance has been dropped or the enclosure damaged 17 Tilt Stability All televisions must comply with recommended international global safety standards for tilt and stability...

Page 6: ... industry the menus will vary among Discs Furthermore not all Discs have menus However if the Disc has a menu you can access the Disc Menu by pressing DISC MENU on the remote control Details are on pages 16 and 26 DVD Player Menus Some instructions explain how to use the DVD Player s menu or the System Menu to set up features of the DVD Player or the Disc You get to the DVD Player Menu by pressing...

Page 7: ...t play Discs that are labeled for other regions Look for the symbols below on your DVDs If these region symbols do not appear on your DVD you cannot play the DVD in this DVD Player The number inside the globe refers to a region of the world Region 1 repre sents the United States Canada upper regions of North America Bermuda the U S Virgin Islands and small regions near Australia A Disc encoded in ...

Page 8: ...packaging materials exhausted batteries and old equipment Safety Information Do not expose the system to excessive moisture rain sand or heat sources Place the DVD Player on a firm flat surface Keep the DVD Player away from domestic heating equipment and direct sunlight When placing the DVD Player in a cabinet allow about one inch of space all around the DVD Player for ventilation Cleaning Discs W...

Page 9: ...low CVBS Video jack for good picture quality If your TV only has an RF style jack usually labelled Antenna In or 75 ohm you will need an adapter in order to connect the DVD Player to the TV Ask your electronics retailer for details The DVD picture still will exceed the quality of videotapes and other analog recordings Digital audio connections provide the clearest sound Connect one of the DVD Play...

Page 10: ...the DVD Player Connect the other end of the cables to the left right AUDIO IN jacks on the TV Match the cable colors to the jack colors 3 Connect the DVD Player s power cord to the MAINS jack on the rear of the DVD Player Connect the power cords of the DVD Player and the TV to the power outlet Turn on the power of the TV and the DVD Player 4 Set the TV to the correct Component Video In channel Thi...

Page 11: ...V to the power outlet Turn on the power of the TV and the DVD Player 4 Set the TV to the correct S Video In channel This channel might be near channel 00 See your TV owner s manual for details Or con tinue to change channels at the TV until you see the DVD Player s screen saver on the TV screen Hookups cont d 11 Connecting to a TV Only TV has an S Video In Jack COAXIAL OPTICAL DIGITAL AUDIO OUT PC...

Page 12: ...bles to the red and white Left and Right AUDIO OUT jacks on the DVD Player Connect the other end of the cables to the left right AUDIO IN jacks on the TV Match the cable colors to the jack colors 3 Connect the DVD Player s power cord to the MAINS jack on the rear of the DVD Player Connect the power cords of the DVD Player and the TV to the power outlet Turn on the power of the TV and the DVD Playe...

Page 13: ...s 10 and 11 You only need one video connection 2 Connect the supplied red and white audio cables to the red and white Left and Right AUDIO OUT jacks on the DVD Player Connect the other end of the cables to the left right AUDIO IN jacks on the Stereo Receiver Match the cable colors to the jack colors 3 Connect the DVD Player s power cord to the MAINS jack on the rear of the DVD Player Connect the p...

Page 14: ...nly need one video connection 3 Connect the DVD Player s power cord to the MAINS jack on the rear of the DVD Player Connect the power cords of the DVD Player and the TV to the power outlet Turn on the power of the TV and the DVD Player 4 Set the TV to the correct Video In channel These channels often are near channel 00 See your TV manual Or change TV channels until you see the DVD logo on the TV ...

Page 15: ... on the display briefly Black Level Shift If you set the DVD Player to NTSC set Black level shift to On This will improve the color contrast during Disc playback Black level shift has no effect if the DVD Player is set to PAL To set Black level shift to On follow these steps 1 Press SYSTEM MENU then press to select V V Press p 2 p will be selected Press B 3 Press p to select Black level shift then...

Page 16: ...cessary the SOUND MODE key may be used to select the desired audio reproduction mode 5 Playback will stop at the end of the Title or after the last Track 6 To stop playback at any time press STOP C To resume playback at the point at which you last stopped playback on a DVD press PLAY B While you see Resume IB on the TV screen press PLAY B again The resume feature applies not only to the current DV...

Page 17: ... the beginning of the current Track Chapter Press H repeatedly and quickly to step back to previous Tracks Chapters 2 To go directly to any Track Chapter during playback press the Number buttons to enter the Track Chapter number If you enter an invalid number an X may appear in the top left corner of the TV screen The current Track or Chapter will continue to play Or an incor rect Track Chapter ma...

Page 18: ...layback press PLAY B 6 Press SYSTEM MENU to remove the menu bar Still Picture Frame by frame Playback 1 During playback press PAUSE F A still picture will appear on the TV screen 2 To advance the still picture one frame at a time press PAUSE F repeatedly 3 To resume normal playback press PLAY B DVD DVD 1 2 3 4 5 6 7 8 0 9 POWER REPEAT SHUFFLE SCAN REPEAT A B STOP DISPLAY DIM RETURN DISC SYSTEM ANG...

Page 19: ...ks in random order 1 Press the SHUFFLE button SHUFFLE will appear briefly on the DVD Player display panel The Tracks or Chapters will begin playing in random order 2 To return to normal order playback press the SHUFFLE button again SHUFFLE OFF will appear briefly on the display panel Regular play back will resume from the current Track Chapter Set FTS to Off to ensure Scan and Shuffle operate as d...

Page 20: ... Motion etc Details are on page 16 AUDIO DIRECT button Press to disable the picture in order to enhance audio quality Details are on page 49 Next G button Press during playback to go to the next Track or Chapter Press and hold for a fast forward search Details are on page 17 OPEN CLOSE A button Press to open or close the Disc tray Details are on page 16 PAUSE F button Press to temporarily pause pl...

Page 21: ...al Audio In jack of a Stereo Receiver Details are on page 14 MULTICHANNEL AUDIO OUT CENTER FRONT SURROUND and SUB WF Connect these jacks to the corre sponding In jacks on your multi channel receiver not supplied Refer to the multichannel receiver manual for details CVBS VIDEO OUT Connect the yellow video cable sup plied here and to the TV s Video In jack Details are on page 12 OPTICAL DIGITAL AUDI...

Page 22: ...ack for playback Details are on page 17 RETURN Button Press to go back to a previous menu Details are on page 26 DISC MENU Button Press to access or remove the menu of a DVD Details are on page 24 s BopOK Buttons Press s Bopto select an item in a menu Details are on pages 24 and 26 Press OK to confirm the menu selection STOP C Button Press to stop Disc playback PLAY B Button Press to begin or resu...

Page 23: ...on Press repeatedly to play a Chapter Title Track or entire Disc repeatedly Details are on page 35 REPEAT A B Button Press to set up Repeat A B playback in which a certain segment of the Track or Chapter plays repeatedly Details are on page 35 SHUFFLE Button Press to play the Tracks on an Audio CD in random order Or press to play the Chapters of a DVD Title in random order Details are on page 19 S...

Page 24: ...the current Disc has multiple audio soundtracks choose one here For example some Discs let you play the movie in Spanish or hear a director s commentary during playback Check the Disc case for details Details are on page 27 Subtitle Language If the current Disc has subtitles in multiple languages select a language here Details are on page 27 Angle Select to choose a different camera angle if avail...

Page 25: ... 30 34 Safe The current Disc is autho rized for playback Details are on pages 30 34 Resume Press the PLAY B button while Resume appears Play will resume at the point at which it last stopped X The feature you just attempted to access is not avail able on the current Disc or at the current time Status Window Different information appears in the Status Window The window may indicate when the disc tr...

Page 26: ... B button The Video CD will show instructions or options on the TV screen Use the DVD Player s remote control buttons as directed by the Video CD 2 Press RETURN to go to a previous menu 3 If a PBC menu has Titles select a Title directly by pressing the Number buttons on the remote VIDEO CD DVD You may turn off PBC Press the SYSTEM MENU button then press to select V press p repeatedly to select s t...

Page 27: ...ds Subtitles Some DVDs include subtitles in different languages To choose subtitles follow these steps 1 During DVD playback press the SUBTITLE button Z Subtitle will be selected in the menu bar 2 Within five seconds press the SUBTITLE button repeatedly to see the different subtitle languages Or press o or p to see the dif ferent subtitle languages Subtitles will appear after a few seconds The men...

Page 28: ...damage to your TV 5 To remove the zoomed image and return to regular playback press the PLAY B button Camera Angle Some DVDs include scenes recorded from different angles To watch seg ments from a different angle follow these steps 1 During DVD playback press the ANGLE button Angle will be selected in the menu bar 2 Within five seconds press o or p to select a different angle In a few seconds play...

Page 29: ...hich the Disc is currently 4 Press the Number buttons to enter the time at which you want playback to begin Enter the hour minute and second from left to right in the box 5 Press OK After a few seconds playback will resume at the point you selected 6 Press the SYSTEM MENU button to remove the menu DVD e f g h 0 05 34 VIDEO CD 1 2 3 4 5 6 7 8 0 9 POWER REPEAT SHUFFLE SCAN REPEAT A B STOP DISPLAY DI...

Page 30: ... exactly twice This will set your code for the first time 4 Press the p button repeatedly to select Change code Then press the B button 5 Press four Number buttons to enter the new four digit code Then enter it again exactly to confirm it 6 Press the SYSTEM MENU button to remove the menu DVD VIDEO CD You may need to enter the four digit code twice when you enter the code for the very first time ch...

Page 31: ...e OK button If you chose Locked unauthorized or Locked discs will not play unless you enter your four digit code 6 Press the SYSTEM MENU button to remove the menus 1 2 3 4 5 6 7 8 0 9 POWER REPEAT SHUFFLE SCAN REPEAT A B STOP DISPLAY DIM RETURN DISC SYSTEM ANGLE ZOOM AUDIO SUBTITLE PLAY PAUSE FTS T C RESUME SOUND MODE MENU MENU É É É É OK G Ç É Å H 2 1 6 3 1 5 V W X Y Z a 1 2 1en off no off p Acce...

Page 32: ...o lock the Disc so that it will not play always When you insert the Disc playback begins automatically and appears on the TV screen Press the STOP C button while is on the TV screen The locked symbol will appear If the Disc continues playing press the STOP C button again to stop playback You may need to turn off the DVD Player or remove the disc before the Disc is completely Locked The next time y...

Page 33: ...one If no suitable alternative is found playback will stop Enter the 4 digit code to play the Disc 6 Press the SYSTEM MENU button to remove the menus 1 2 3 4 5 6 7 8 0 9 POWER REPEAT SHUFFLE SCAN REPEAT A B STOP DISPLAY DIM RETURN DISC SYSTEM ANGLE ZOOM AUDIO SUBTITLE PLAY PAUSE FTS T C RESUME SOUND MODE MENU MENU É É É É OK G Ç É Å H 2 1 6 3 5 1 5 V W X Y Z a 1 2 1en off no off p Access control s...

Page 34: ...Number buttons to enter your four digit code Child lock will be highlighted 4 Press the p button repeatedly to select Change country Then press the B button 5 Press the o or pbutton to select the country for which the Disc is coded then press the OK button 6 Press the SYSTEM MENU button to remove the menus 1 2 3 4 5 6 7 8 0 9 POWER REPEAT SHUFFLE SCAN REPEAT A B STOP DISPLAY DIM RETURN DISC SYSTEM...

Page 35: ...pter or Track repeatedly Follow these steps 1 Press the PLAY B button to start Disc playback 2 When the Disc reaches the point at which you want repeated playback to begin press the REPEAT A B button A will appear briefly on the TV screen 3 When the Disc reaches the point at which you want to end the segment press the REPEAT A B button again REPEAT A B will appear briefly on the DVD Player s displ...

Page 36: ...a Title press the p button to select Chapter Press the B and s buttons to select a Chapter number then press the OK button The Title and Chapter number will show in the Program Continue steps 3 4 until you enter all the Chapters or Titles you want 5 Press the o button to select FTS then press B or s to choose On or Off Then press the OK button If you choose On press the PLAY B button to play the P...

Page 37: ...press the p button 3 Press the p button to select Program then press the B or s button to select an item 4 Press the OK button to erase the item 5 Press the SYSTEM MENU button to remove the menus 1 2 3 4 5 6 7 8 0 9 POWER REPEAT SHUFFLE SCAN REPEAT A B STOP DISPLAY DIM RETURN DISC SYSTEM ANGLE ZOOM AUDIO SUBTITLE PLAY PAUSE FTS T C RESUME SOUND MODE MENU MENU É É É É OK G Ç É Å H 2 1 2 3 4 5 6 7 8...

Page 38: ...splay and on the DVD Player s display panel Repeat step 3 until you add all the Tracks you want 4 To erase a Track from the Program press the p button to select Program then press the B and s buttons to select a Track num ber then press the OK button The Track number will disappear from the Program 5 To play the Program press the PLAY B button FTS will be On automatically Audio Disk Mode Stop Trac...

Page 39: ...hoose On or Off then press the OK button If you choose On press the PLAY B button to begin playing the Program If you choose Off the Tracks will play in normal order when you begin playback 1 2 3 4 5 6 7 8 0 9 POWER REPEAT SHUFFLE SCAN REPEAT A B STOP DISPLAY DIM RETURN DISC SYSTEM ANGLE ZOOM AUDIO SUBTITLE PLAY PAUSE FTS T C RESUME SOUND MODE MENU MENU É É É É OK G Ç É Å H 2 1 2 3 4 5 6 7 8 0 9 P...

Page 40: ...2 3 4 5 6 7 8 0 9 POWER REPEAT SHUFFLE SCAN REPEAT A B STOP DISPLAY DIM RETURN DISC SYSTEM ANGLE ZOOM AUDIO SUBTITLE PLAY PAUSE FTS T C RESUME SOUND MODE MENU MENU É É É É OK G Ç É Å H 2 1 5 1 4 Most DVDs only play in the format in which they were recorded For example if the DVD case says the DVD is recorded in Letterbox or Widescreen format you may play the DVD only with the black bars showing at...

Page 41: ...y to select Video shift then press B 4 Press s or B to center the picture on your TV screen or shift the video 5 When you are satisfied with the adjustments press OK 6 Press SYSTEM MENU to remove the menus 1 2 3 4 5 6 7 8 0 9 POWER REPEAT SHUFFLE SCAN REPEAT A B STOP DISPLAY DIM RETURN DISC SYSTEM ANGLE ZOOM AUDIO SUBTITLE PLAY PAUSE FTS T C RESUME SOUND MODE MENU MENU É É É É OK G Ç É Å H 2 1 6 1...

Page 42: ...s signal do not synchronize adjust the delay of the chroma signal to get a perfectly clear picture Gamma Adjust the intensity of the picture non linearly A positive value allows you to bring out low level detail in a dark scene A negative value emphasizes contrast Sharpness Adjust the sharpness of the picture DCDi This setting computes and tracks the angle of the edge to fill in the missing pixels...

Page 43: ...or Stereo select Off Select PCM only if you used the COAXIAL or OPTICAL Digital Audio Out jacks of the DVD Player for connections but the audio equipment does not include a digital multi channel Decoder 5 Press the SYSTEM MENU button to remove the menus p Digital output Off PCM output PCM only q Analog output All sp V W X Y Z a 1 2 1en off no off 1 2 3 4 5 6 7 8 0 9 POWER REPEAT SHUFFLE SCAN REPEA...

Page 44: ...t s s then press 3 Press 8 or 9 to select Sound mode then press 4 Press 8 or 9 to select SACD Stereo or SACD Multichannel then press OK 5 Press SYSTEM MENU to remove the menus 1 2 3 4 5 6 7 8 0 9 POWER REPEAT SHUFFLE SCAN REPEAT A B STOP DISPLAY DIM RETURN DISC SYSTEM ANGLE ZOOM AUDIO SUBTITLE PLAY PAUSE FTS T C RESUME SOUND MODE MENU MENU É É É É OK G Ç É Å H 2 1 5 1 4 V W X Y Z a 1 2 1en off no ...

Page 45: ...pment likely will be labelled with the TruSurround logo as shown below Select Multi channel if you connected the Player to a 6 channel Receiver using the MULTICHANNEL AUDIO OUT jacks as described on page 14 Remember to go to page 46 later to adjust your speakers 5 Press SYSTEM MENU to remove the menus V W X Y Z a 1 2 1en off no off p Analog output s Stereo L Night mode Dolby Surround q Karaoke voc...

Page 46: ...speaker capability Choose X to adjust the speaker delay time You can adjust the delay time for only the Center and Surround speakers If the surround speakers are about 150 centimeters nearer to the listening position than the front speakers and the center speaker aligns with the front speakers no adjustment is needed If your speaker setup is different adjust the delay times First measure the dista...

Page 47: ...t mode then press B 4 Press o or p to select On or Off then press OK 5 Press SYSTEM MENU to remove the menus 1 2 3 4 5 6 7 8 0 9 POWER REPEAT SHUFFLE SCAN REPEAT A B STOP DISPLAY DIM RETURN DISC SYSTEM ANGLE ZOOM AUDIO SUBTITLE PLAY PAUSE FTS T C RESUME SOUND MODE MENU MENU É É É É OK G Ç É Å H 2 1 5 1 4 V W X Y Z a 1 2 1en off no off p Digital output PCM output q Analog output Night Mode s On r K...

Page 48: ...ton Audio Language Choose the language in which you want to hear the DVD dialog Subtitle Choose the language in which you want the subtitles to appear Subtitles must be available on the DVD Menu Choose the language in which you want the DVD s Disc or Title menu to appear The language must be available on the DVD 4 Press o or p to select the language you want from the available languages then press...

Page 49: ...ton on the front of the DVD Player The video will be disabled and no video will appear on the television screen Audio quality will be maximized Keys which control video features e g SYSTEM MENU TITLE CHAPTER etc will be disabled Turning off the DVD Player or inserting a DVD or Video CD will automatically turn off Audio Direct Mode 2 Press the AUDIO DIRECT button on the front panel again to restore...

Page 50: ...ifferent than your TV s color system the picture will be distorted or colorless However you can change the color system of the DVD Player by adjusting the TV System setting In the United States NTSC is the most common TV color system Choose NTSC PAL or Auto depending on your TV Details are on pages 7 and 15 No sound Check the audio connections Details are on pages 9 14 Remember you only need one a...

Page 51: ... a malfunction of the DVD Player The still picture is dim or dark A still picture will dim or darken if you leave it on the screen for more than five minutes This dim ming prevents the still image from etching itself into your TV picture tube or screen To protect your TV avoid leaving a still image on the screen This includes video games station identification logos etc Diagnostic Test Mode If the...

Page 52: ...just two channels as analog does Dolby Digital A surround sound system that provides 5 1 channel sound as used in movie theaters DTS Digital Theater Systems This is a surround sound system but it is different from Dolby Digital The formats were developed by different companies DVD Digital Video Disc Letterbox A TV aspect ratio setting 4 3 Displays the video in full width with black bars at the top...

Page 53: ...round for virtual 5 1 channel sound on two speakers AUDIO PERFORMANCE DA Converter 24 bits DVD fs 96 kHz 4 Hz 44 kHz fs 48 kHz 4 Hz 22 kHz Video CD fs 48 kHz 4 Hz 22 kHz Audio CD fs 44 1 kHz 4 Hz 20 kHz Signal Noise 1kHz 100 dB Dynamic Range 1kHz 95 dB Crosstalk 1kHz 105 dB Distortion and Noise 1kHz 92 dB SACD AUDIO PERFORMANCE DA Converter DSD SACD fs 2 8224 MHz DC 100 kHz Maximum output voltage ...

Page 54: ...er Electronics does not dis tribute the product the local Philips service organization will attempt to provide service although there may be a delay if the appropriate spare parts and technical manual s are not readily available MAKE SURE YOU KEEP Please keep your sales receipt or other document showing proof of purchase Attach it to this owner s manual and keep both nearby Also keep the original ...

Page 55: ...55 ...

Page 56: ... button 20 night mode 47 ntsc 7 15 number buttons 22 ok button 22 on screen symbols 25 open close button 20 opt out optical jack14 21 43 52 pal 15 panscan 40 parental levels 33 password 30 pause button 18 20 22 pcm 43 play button 16 20 22 playable discs 7 playback control 26 playing a disc 16 power button 22 power cord 21 power on off button 20 pr cr pb cb y video out jacks 10 13 14 21 prev ious b...

Reviews: