background image

DPM 9350 - User Manual 


19

Chapter 5: Advanced Operations 

This chapter introduces you to some of the more advanced aspects of the DPM: 

• 

Entering user-defined labels 

• 

Assigning Keywords 

• 

Transferring data between the DPM and a PC 

Note:

 These functions are only available when using the DPM 9350 together with DPM Download/Configuration 

program. 

Entering user-defined labels 

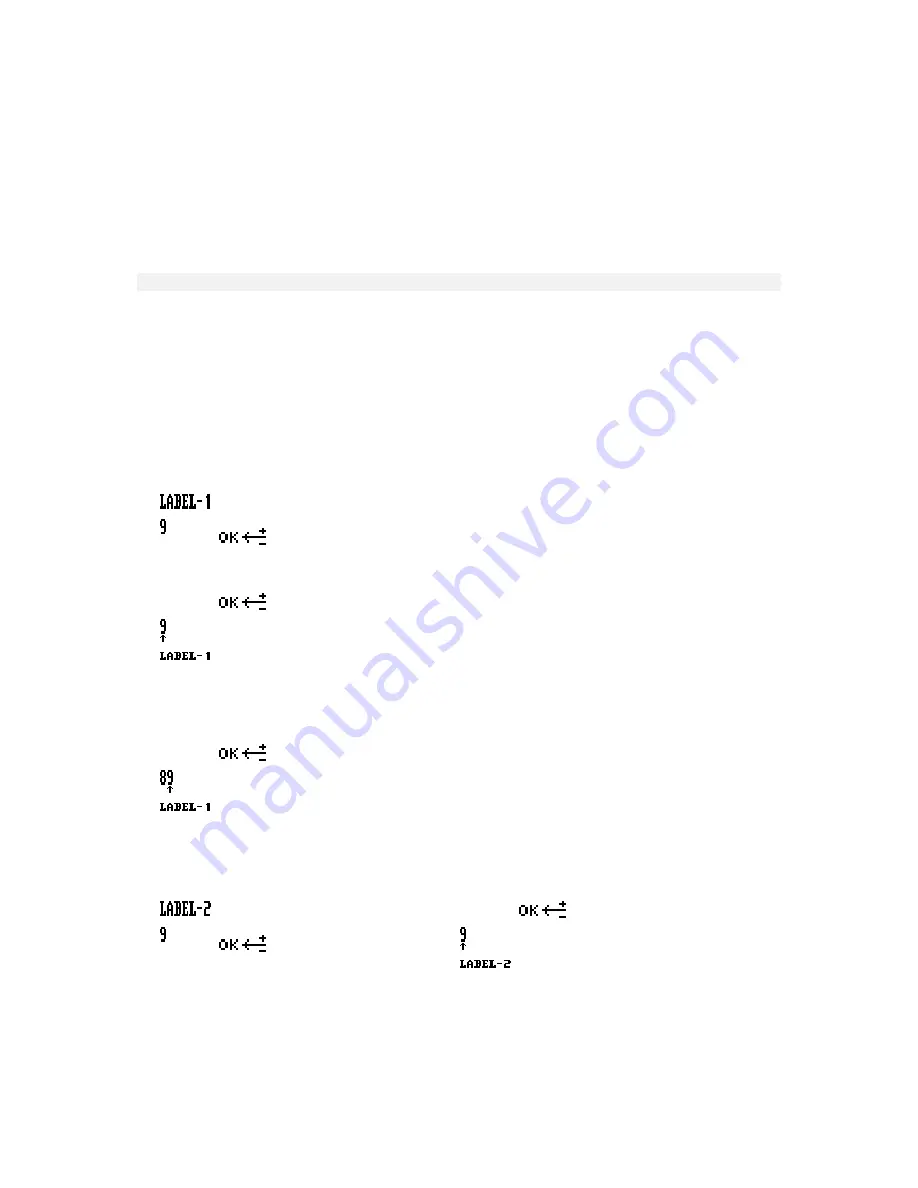
A user-defined label is an alphanumeric string which can have up to 13 characters. Such a label is entered 
directly on the DPM. If and how many user-defined labels can be entered depends on the corresponding setting in 
the DPM Download/Configuration program. For more information, refer to the Online Help delivered with the 
program. 

When entering user-defined labels on the DPM you can use the characters A-Z and the numbers 0-9; spaces are 
also allowed. 

To enter a user-defined label, do the following: 

1.  Press the Jog Dial for about two seconds to access the DPM menu. 

The menu entry for user-defined labels is displayed first per default. If you have previously entered a user-
defined label previously, the menu entry will display this label. 


2.  To start editing the label, press the Jog Dial again. 


Note:

 If the mandatory user input option for entering user-defined labels has been set in the 

DPM Download/Configuration program, you will immediately access the DPM menu at this level. 

3.  Select or change the first character/number of the label by moving the Jog Dial up or down. Confirm a 

character/number selection by pressing the Jog Dial. 


4.  When you have entered the complete label string, confirm by pressing the Jog Dial for about two seconds. 

Additional information 

• 

If there is more than one user-defined label enabled, you will automatically go to the next label upon 
confirming the first label: 


• 

To delete a character from a label string, press the DEL (Delete) button briefly. To discard any changes you 
have made and to exit the DPM menu, press the DEL button for about two seconds. 

• 

To insert a character into a label string, press the INS/OVR (Insert/Overwrite) button. 

• 

To move one character to the left, press the REC (Record) button on DPM 9350/00; on DPM 9350/52, press 
the FFWD (Fast Forward) button. 

• 

To re-use an already existing label without changing it, confirm the label by pressing the Jog Dial for about two 
seconds. The DPM will beep and you are required to confirm again. 

Summary of Contents for DPM-9350

Page 1: ...DPM 9350 User Manual ...

Page 2: ...PC add ons and device drivers change very rapidly we are unable to guarantee conflict free operation The CE mark confirms that the device corresponds to the relevant guidelines of the European Union The cardboard used for packaging can be recycled This electronic facility contains recyclable material Technical changes and errors excepted Declaration of Conformity Tested to comply with FCC standard...

Page 3: ...trast 11 Displaying the recording time 11 Reformatting the memory card 12 Power Save mode 12 Chapter 4 Basic Operations 13 Recording DPM 9350 00 13 Recording DPM 9350 52 14 Finishing a dictation EOL and Priority 14 Recording mode Insert Overwrite 15 Playback 15 Adjusting the volume 15 Fast Forward and Fast Rewind 16 DPM 9350 00 16 DPM 9350 52 16 Deleting 16 Deleting a section 16 Deleting a file 17...

Page 4: ...DPM 9350 User Manual iv ...

Page 5: ...o the PC 4 Position Switch for single handed operation and ease of use User defined information Keywords and labels can be stored with the sound file USB connection for simple data transfer between the device and the PC Ergonomic design High resolution LCD display with backlight Package contents DPM 9350 the digital voice recorder for the professional user Philips memory card of the type MMC Insta...

Page 6: ...verwrite mode the LED is red Overwrite is the default setting for the recording mode In Insert mode the LED is green 2 LCD display 3 Built in loudspeaker 4 Built in microphone 5 Jog Dial Volume control Skip Forward and Skip Back access to the DPM menu and moving between menu entries and confirmation of selections 6 4 Position Switch with Lock Hold switch functionality Depending on your DPM model t...

Page 7: ...5 The function of this button depends on your DPM model DPM 9350 00 Record REC DPM 9350 52 Fast Forward FFWD 16 DL When the DPM is connected to the PC this button activates the download function 17 Power supply socket for Philips LFH 9145 LCD display The DPM 9350 has a high quality graphical LCD display You will see the following symbols Standard Play Long Play mobile AM symbol hours before noon P...

Page 8: ... If the power level in the batteries drops below 2 0 V no recording or playback is possible Recharging the batteries The DPM can be operated with the rechargable Philips NiMH batteries LFH 9144 For recharging these batteries either use the DPM Docking Station 9110 or the Philips power supply LFH 9145 For more information on recharging the batteries with the DPM Docking Station 9110 refer to the do...

Page 9: ... two hours it is automatically turned off In this case it can only be turned on via the Lock Hold switch OFF ON functionality or by moving the 4 Position Switch Memory card The DPM 9350 operates with a memory card of the type MMC or SD It supports MMC and SD cards with storage capacities of up to 512 MB For example a 32 MB memory card of the type MMC supports about 312 minutes of recording time in...

Page 10: ...ting is Overwrite mode For Overwrite mode no symbol is displayed 5 Voice activated recording mode is enabled 6 AM or PM symbol if the US time format is used The US time format is the default setting for DPM 9350 52 7 Current time in HH MM hours minutes 8 The current file number The current file will always be the last file you worked on If you do not jump to a different file this file will be open...

Page 11: ...lay options for enabling disabling the record notification beep and for recording into one file only can only be made via the DPM Download Configuration program Note If the one file function is activated any recording will be stored in a single file The Skip Forward Skip Back and EOL functions are not available If the record notification beep is enabled you will hear two beeps every time the DPM g...

Page 12: ...ed labels on the DPM This is an example screen for a Keyword menu entry which has been defined as follows usage Author content a selection of author names the current Keyword assignment is the author name Jones When you confirm the menu entry selection by pressing the Jog Dial the list of all defined author names is displayed For more information on assigning DPM Keywords refer to the Assigning Ke...

Page 13: ...y moving the Jog Dial up or down Confirm the setting by pressing the Jog Dial 2 Set the month and the day 3 Set the time When you have set and confirmed the MM minutes setting you will automatically return to the DPM main menu Additional information If you do not want to change for example the YY year setting you can proceed to the MM month setting by pressing the Jog Dial When you change the batt...

Page 14: ...turn to the DPM main menu Setting the microphone sensitivity The setting for the microphone sensitivity defines the audio input level for the DPM s built in microphone This is the menu entry for the microphone sensitivity the symbol always shows the current setting Confirm the menu entry selection by pressing the Jog Dial and do the following Set the microphone sensitivity to low when recording di...

Page 15: ... contrast setting by pressing the Jog Dial this also returns you to the DPM main menu Displaying the recording time The DPM enables you to have an additional time displayed for the recording time Depending on the setting which has been made in the DPM Download Configuration program you will either see the used up recording time or the remaining recording time This time display also depends on the ...

Page 16: ...card is not write protected A write protected SD card is indicated with this symbol on the DPM display Power Save mode If the DPM is left inactive for more than four minutes it goes automatically into Power Save mode and the display is turned off You can reactivate the DPM by pressing any button or moving the 4 Position Switch This does not initiate the function of the corresponding button The onl...

Page 17: ...ing mode the LED can be either red or green In Overwrite mode the LED is red Overwrite is the default setting for the recording mode In Insert mode the LED is green 3 To start recording move the 4 Position Switch to the Play position and start dictating Speak clearly and keep a distance of approximately 4 inches ten centimeters between your mouth and the DPM While DPM 9350 00 is in Recording mode ...

Page 18: ...tion Switch to the STOP Stop position to stop recording The Record LED goes out 3 To continue recording move the 4 Position Switch to the REC Record position again 4 When you are finished and do not want to make any further changes to the dictation press the L P button to mark the current dictation as finished EOL symbol The file is closed and a new empty file is automatically generated The file n...

Page 19: ...ite mode The default setting is Overwrite mode which means that new speech replaces existing speech in the sound file from the insertion point forward If the mode setting is Overwrite the LED is red If the device is set to Insert mode the LED is green and an additional symbol is shown on the DPM display This is the DPM display in Stop mode and with Overwrite mode enabled This is the DPM display in...

Page 20: ...g This is the DPM display in Fast Forward mode This is the DPM display in Fast Rewind mode The winding speed starts at 5 times the playback speed After two seconds it is accelerated to 10 times the playback speed after eight seconds to 20 times and after thirty seconds to 100 times the playback speed Deleting The DEL button on the DPM can be used for two purposes deleting a section from a sound fi...

Page 21: ...an be selected for each file the format for a file can be changed as long as no recording has been done in the file After recording has been done in the file it is possible to switch between the SP and LPM recording format in the DPM menu This change will not take effect for the current file but from the next new file onwards From that point on any new files are recorded in the selected format unt...

Page 22: ... a skip function for moving between files Before you move the Jog Dial up or down make sure that the 4 Position Switch is in the Stop position DPM 9350 00 DPM 9350 52 STOP Moving the Jog Dial up skips to the end of the current file Then moving the Jog Dial up will always skip to the end of the next file For example the current file number is 5 Moving the Jog Dial up goes to the end of file number ...

Page 23: ... the menu entry will display this label 2 To start editing the label press the Jog Dial again Note If the mandatory user input option for entering user defined labels has been set in the DPM Download Configuration program you will immediately access the DPM menu at this level 3 Select or change the first character number of the label by moving the Jog Dial up or down Confirm a character number sel...

Page 24: ...s the content for this Keyword would then be a selection of author names Jones Singh Watson etc The second Keyword can have the usage Patient The entries for this Keyword would then be a selection of patient names Peter Steve Patricia etc This information is transferred to the DPM where the author selects the author name and patient for each dictation To assign Keywords to a dictation do the follo...

Page 25: ...e the Barcode Module attached you must scan in the barcode information before you can start to record your dictation If no Barcode Module is attached to the DPM the setting will be ignored Example Barcode scanning Keyword 1 has been configured as patient ID and Keyword 2 as insurance no The DPM is configured for barcode input and the Barcode Module is attached Do the following 1 Make sure the DPM ...

Page 26: ...finition of Keyword 1 is Patient the content definitions of the Keyword 1 column are patient names the content definitions of the Keyword 2 column are the patient IDs In this example a Keyword set thus combines a patient name with the patient ID The Keyword Definition tab in the DPM Download Configuration program is as follows This defines the following Keyword sets Keyword set 1 Peter 123 Keyword...

Page 27: ...n program the download process is either started automatically or by pressing the DL button on the DPM You can also configure whether individual sound files or all of the sound files will be transferred from the DPM to the PC To transfer data from the DPM to the PC with the automatic download functionality enabled in the DPM Downlod Configuration program do the following 1 Make sure the DPM is con...

Page 28: ...th EOL Remove the EOL attribute from the file by pressing the L P or EOL P End of Letter and Priority button once Your memory card of the type SD is write protected Remove write protection from the SD card Wrong file The wrong file is being played back Open the correct file Connection to the PC is not possible USB driver has not been installed properly Solution Check whether the USB drivers have b...

Page 29: ...lays the DPM status as OFFLINE Solution Mount all network drives starting with drive letters Z Y X in reverse alphabetical order PC sound system is not functioning The DPM is used as a USB sound device Open the Sounds and Multimedia Properties dialog box in the Control Panel Make sure your PC s sound system is the Preferred device selection Activate the Use only preferred devices option Recharging...

Page 30: ...Activate 5 Batteries 4 Formatting the memory card 5 Graphic 2 Keywords 20 Memory card 5 Overview 2 Troubleshooting 24 DPM 9350 00 8 13 VA 17 DPM 9350 52 9 14 VA 18 DPM display 7 11 DPM Download Configuration 23 DPM menu 7 8 9 10 11 12 E End of Letter button 14 Entering user defined labels 19 EOL 14 EOL button 14 F Fast Forward 16 DPM 9350 00 16 DPM 9350 52 16 Fast Rewind 16 DPM 9350 00 16 DPM 9350...

Page 31: ...echarge Batteries 4 Record 14 Record LED 13 14 Record Standby 13 Recording DPM 9350 00 13 DPM 9350 52 14 Recording format Long Play mobile 10 17 Standard Play 10 17 Recording mode Insert 15 Overwrite 15 Recording time 11 Reformat Memory card 12 S Scan Barcode 21 SD 5 Section sound file Delete 16 Skip Back 18 Skip Forward 18 Software DPM Download configuration 20 DPM Download Configuration 23 Sound...

Reviews: