background image

17

16

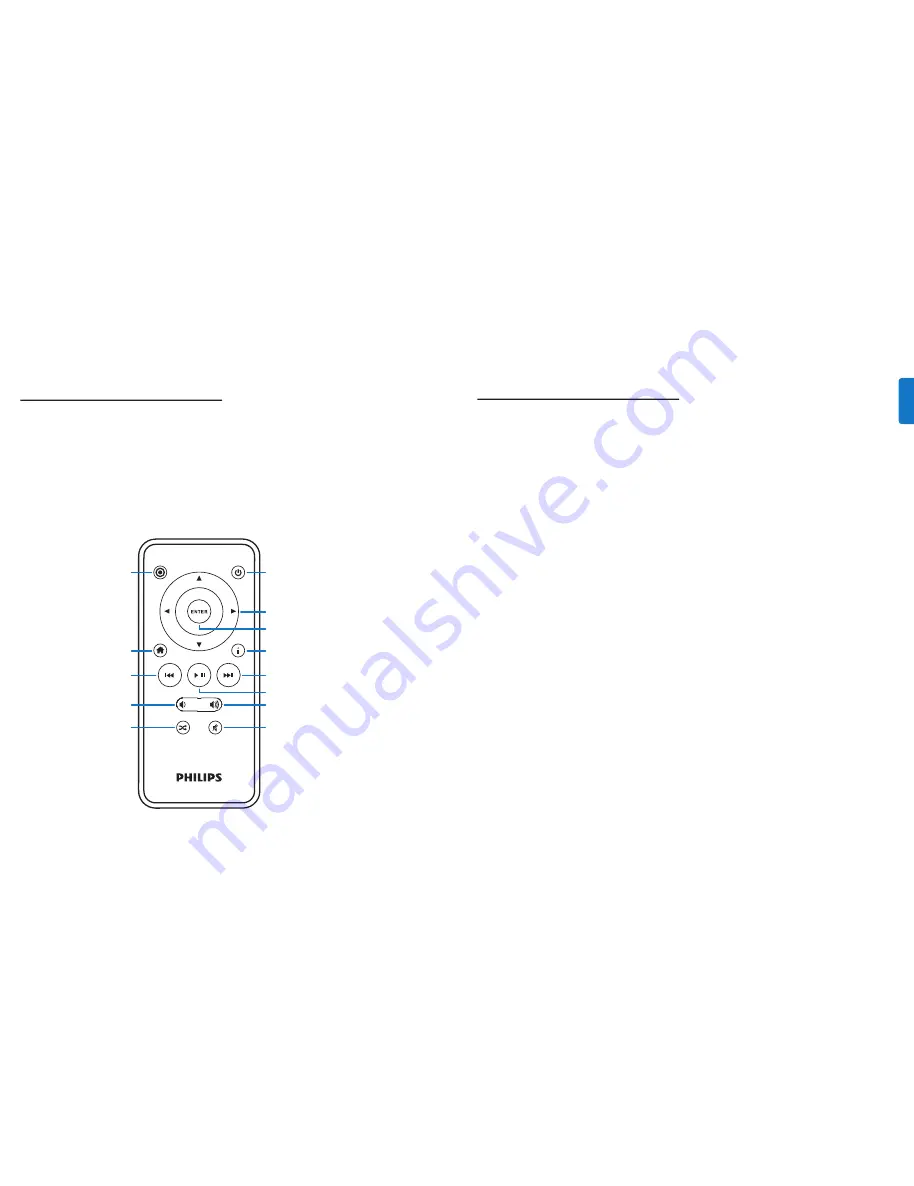
Power

Omnidirectional navigation arrows
Enter/ Select

Info

Next/ Fast-forward
Play/ Pause
Volume up

Mute

Mode

Home/ Previous menu

Previous/ Rewind

Volume down

Shuffle toggle

Settings & features

Languages

HomeDock HD has 19 available languages.

Choose yours from the Settings > Languages menu.
Available Languages: English, Spanish, French, German, Italian,

Dutch, Simplified &Traditional Chinese, Japanese, Korean,

Czech, Polish, Greek, Hungarian, Portuguese, Finnish, Swedish,

Turkish, Russian.

Resolution

You can change the video resolution of HomeDock HD to

match yourTV. Simply choose the correct resolution from

the Settings > Resolution menu.
Available Resolutions:

Standard Definition (PAL)

Standard Definition (NTSC)

High Definition (720p)

High Definition (1080i)

Cataloging Album Art

Cataloging Album Art will allow HomeDock HD to retrieve

Album Art faster during use. Due to the nature of iPod

artwork, it may take several seconds for the Album Art to

display during playback. By choosing the Cataloging option,

HomeDock HD will download and store all the album

artwork from your iPod library, allowing it to be displayed

much faster during playback.You may choose this option

from the Settings > Cataloging menu.

D

Note:

Cataloging may take up to 45 minutes

depending on the size of your library. During the cataloging

process, HomeDock HD will be unresponsive to other

commands. If you want to listen to music or watch videos,

you may cancel the cataloging process before it finishes.

Enjoying photos & slideshows

To view photos and slideshows from your photo-compatible

iPod on yourTV using HomeDock HD:

1.

Select iPod Mode by pressing the Mode button on the

top left of the included RF remote control (see remote

control diagram below).

2.

Ensure that “TV Out” under your iPod Photo Settings is

set to either Ask or On.You can use the remote control’s

Navigation Arrow buttons to make this selection.

Then, you can navigate your iPod Photo Library

on your iPod screen using the remote control.

3.

Control functions such as Play/ Pause, Next Slide,

Previous Slide and more from the comfort of your

couch with the remote control.

D

Note:

iPod touch does not support use of the

remote control when HomeDock HD is in iPod Mode. In

order to enjoy your photos on yourTV screen, start and

navigate from the iPod touch screen itself.

EN

G

LI

SH

All manuals and user guides at all-guides.com

Summary of Contents for DLA99901/10

Page 1: ... 50 ES HomeDock HD 74 NL HomeDock HD 98 IT HomeDock HD 122 PT HomeDock HD 146 SV HomeDock HD 170 EL HomeDock HD 194 PL HomeDock HD 218 RU HomeDock HD 242 CS HomeDock HD 266 HU HomeDock HD 290 TR HomeDock HD 314 FN HomeDock HD 338 All manuals and user guides at all guides com a l l g u i d e s c o m ...

Page 2: ... in the box 6 Getting started 7 Setting up HomeDock HD 8 On screen navigation 11 Enjoying photos slideshows 16 Settings and features 17 Additional usage 19 Warranty and service 20 Technical data 20 Frequently asked questions 21 ENGLISH All manuals and user guides at all guides com ...

Page 3: ...lips offers register your product at www philips com welcome Important information Take time to read this manual before you use your Philips HomeDock HD DLA99901 10 It contains important information and notes about operating your Philips HomeDock HD 2008 Philips Consumer Lifestyle All rights reserved Reproduction in whole or in part is prohibited without the written consent of the copyright owner ...

Page 4: ...ur iPod content onTV D Note For detailed information on setting up your HomeDock HD see Setting up HomeDock HD C Important On your iPod ensure that TV Out under iPodVideo Settings is set to either Ask or On in order to enjoy the video content of your iPod using HomeDock HD For iPod touch in particular see Viewing the video content of your iPod touch in the Setting up HomeDock HD chapter What s in ...

Page 5: ...ock HD using the included AV cable 1 Plug the included AC power adapter into the back of the HomeDock HD base and the other end into any available AC power outlet Plugging in your HomeDock HD will turn it on and start the boot up process which may take a few minutes 2 Plug the included AV cable into the composite video output and RCA audio outputs on the back of the HomeDock HD base Be sure to mat...

Page 6: ...on and start the boot up process which may take a few minutes 2 Plug an S Video cable into the S Video output on the back of the HomeDock HD base 3 Connect the other end of the S Video cable to the corresponding S Video input on yourTV 4 Plug the appropriate audio cable available separately into either the digital audio output or RCA audio outputs on the back of the HomeDock HD base 5 Connect the ...

Page 7: ...nfo can be displayed by choosing Now Playing from the Main menu The current track information includes song title Whenever a selection is playing the Album Art is displayed in the Now Playing Banner near the bottom of the screen When browsing by album the Album Art for the selected album is shown if available as well as the Album Art for the song currently playing D Note Larger artwork may take a ...

Page 8: ...ached in HomeDock HD s memory for faster retrieval later If you d like HomeDock HD to retrieve Album Art even faster during use choose the Cataloging option from the Settings menu See Cataloging Album Art in the Settings features chapter If your current selection does not have any Album Art or if the Album Art is unavailable HomeDock HD will display one of seven placeholder images MUSIC Playlists ...

Page 9: ...y allowing it to be displayed much faster during playback You may choose this option from the Settings Cataloging menu D Note Cataloging may take up to 45 minutes depending on the size of your library During the cataloging process HomeDock HD will be unresponsive to other commands If you want to listen to music or watch videos you may cancel the cataloging process before it finishes Enjoying photo...

Page 10: ...included remote control Using HomeDock HD with other audio devices HomeDock HD will also play the audio from other MP3 players laptops or other digital devices through yourTV or home stereo via HomeDock HD s auxiliary audio input labeled AUX INPUT D Note HomeDock HD does not support on screen navigation when using the aux input to play audio Using HomeDock HD with standard definition televisions W...

Page 11: ...k HD firmware You can check which firmware version you are currently running under the Settings About menu HomeDock HD features a USB input on the back of the base to support firmware updates available from Philips Simply visit http www homedockupdate com to find the most current version for download Save the update to a USB flash drive and connect the drive to your HomeDock HD to initiate the upd...

Page 12: ...your HomeDock HD and stereo TV can affect the audio quality significantly This is only necessary with an AV connection When using an HDMI connection volume is not managed with your HomeDock HD Also it is a good idea to adjust your iPod EQ settings We recommend setting your iPod EQ to Off and adjusting yourTV or home stereo s bass and treble controls to 0 Then you can experiment with iPod EQ settin...

Page 13: ...te collection of batteries because the correct disposal will help prevent negative consequences for the environmental and human health The mains plug of this products adapter is used as the disconnect device and shall remain readily operable CAUTION Danger of explosion if battery is incorrectly replaced Replace only with the same or equivalent type No naked flame sources such as lighted candles sh...

Page 14: ... 2008 Philips Consumer Lifestyle All rights reserved M DLA99901 10 081103 A All manuals and user guides at all guides com ...

Reviews: