background image

>

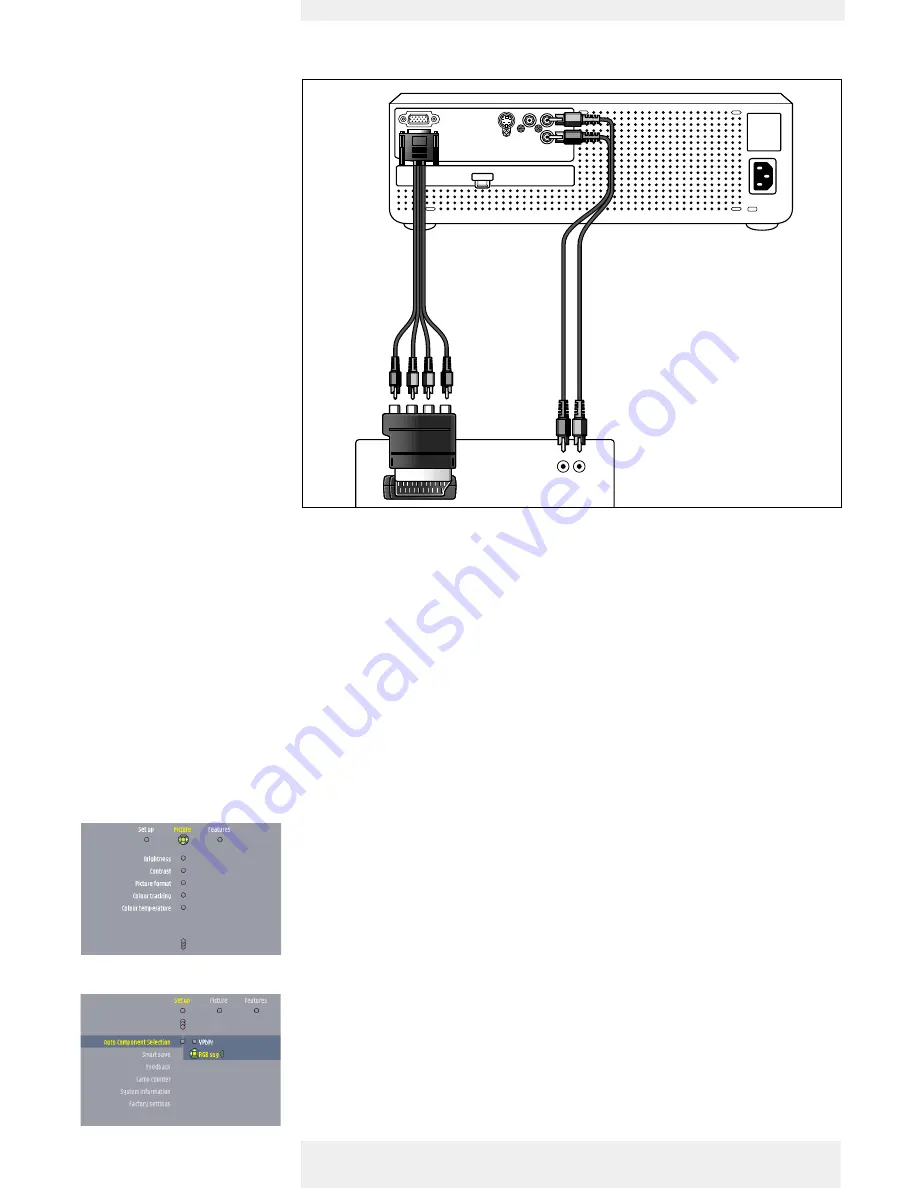
RGBS

1

Connect an optional Scart/RCA Component Video adapter

(1)

to the Scart connector of

your Component- or HDTV-video equipment.

2

Connect an optional VGA/RCA Component Video cable 

(2)

to the Data socket of the

projector.

3

Connect the plugs at the other end of the cable to the appropriate output sockets of your
Component- or HDTV-video equipment (R,G, B, S).

If required you can connect the Audio out L/R sockets of the Component- or HDTV-video
equipment to the Audio (in) L/R sockets of the projector.
For this, use an optional audio connection cable 

(3)

.

Audio information from the Component- or HDTV-video equipment will be played via the
projector speaker.

When RGBsog connection has been made:

1

Press Menu.

The menu bar appears on the screen.
The ‘Picture’ item is highlighted.

2

Use Cursor Control left to select ‘Set up’.

3

Use Cursor Control down to select ‘Auto Component Selection’.

4

Use Cursor Control right to select ‘RGBsog’.

Scart connection

Philips Multimedia Projector

19

English 

User guide 

bClever SV1

4. Installation

Connecting to video equipment 

Component/HDTV

equipment

R

Audio

out

L

DVD player, Settop Box, 

HDTV receiver, etc.

3

2

1

FILTER

MULTIMEDIA

S-VIDEO

VIDEO

AUDIO-L

AUDIO-R

Summary of Contents for bClever SV1

Page 1: ...E SIZE MEN U OK VOL UM E VOL UM E PICT URE SIZE PICT URE SIZE MEN U OK VOL UM E SOU RCE VOL UM E SOU RCE S VI DEO DATA VID EO AV MUT E S VI DEO DATA VID EO STAN DBY TAND BY AV MUT E Multimedia Projector bClever SV1 Philips User guide English ...

Page 2: ...oving transporting the projector 13 Inserting the batteries in the remote control 13 14 20 General information 14 Data input 14 Video input 14 Connecting to a computer 15 16 PC Macintosh 15 Connecting to an external monitor 15 16 Connecting to video equipment 17 20 Video CVBS 17 S Video 17 Scart connection 17 Component HDTV 18 PR R PB B Y G S 18 When YPbPr connection has been made 18 Scart connect...

Page 3: ...S Video adjustments 27 Picture adjustments 27 Features 27 General adjustments settings 28 Set up adjustments 28 Examples 29 30 Zoom Magnification 29 Picture Format 29 Personal Start up text 30 31 33 Cleaning 31 Cleaning the cabinet 31 Cleaning the lens 31 Cleaning the dust filter 31 Lamp 32 Lamp replacement 32 Resetting the lamplife time 33 34 36 5 Operation 6 Maintenance 7 Troubleshooting Philips...

Page 4: ...Lens cap Remote control batteries Scart RCA Audio Video 2 X AAA Zinc Carbon 1 5 V adapter not for USA version Mains Lead VGA cable Audio Video RCA Cable Quick set up Card and Cd rom with Projection Safety Sheet Assistant Warranty card User Guide Spec sheet and more Packaging contents Philips Multimedia Projector 4 English User guide bClever SV1 1 Introduction VOLUME VOLUME PICTURE SIZE PICTURE SIZ...

Page 5: ... 8670 953 16009 LCA 5315 00 VGA RCA Component Video cable 8670 953 15009 LCA 5312 00 SCART RCA Component Video adapter 8670 953 12009 The following accessories are available via our Service organisation only Compact remote Control 3139 228 62571 Mains lead USA 3122 438 75211 Mains lead Euro 3122 438 75191 Mains lead UK 3122 438 75201 Mains lead CCEE 3122 438 75261 VGA cable 3122 438 75230 Audio vi...

Page 6: ...cooling down fast blinks green yellow for 1 second when the projector receives a signal from the remote control in operation mode Indicate the currently active projection source Data S Video Video To reduce enlarge the size of the projected picture When the menu is active the Cursor Control controls the menu cursor to navigate through the OSD menu The cursor control works with up down and left rig...

Page 7: ...1 2 Functional overview Controls VOLU ME VOLU ME PICTUR E SIZE PICTUR E SIZE MENU OK VOLU ME VOLU ME PICTUR E SIZE PICTUR E SIZE MENU OK VOLU ME SOURC E VOLU ME SOURC E S VIDE O DATA VIDEO AV MUTE S VIDE O DATA VIDEO STAND BY TANDB Y AV MUTE MENU PICTURE SIZE PICTURE SIZE VOLUME VOLUME SOURCE S VIDEO DATA VIDEO AV MUTE OK MENU PICTURE SIZE PICTURE SIZE VOLUME VOLUME SOURCE S VIDEO DATA VIDEO AV MU...

Page 8: ...olume To mute the sound of the projector To correct picture distortion of the vertical keystone type by internal scaling To confirm actions in the menu when the menu is on screen To mute the sound of the projector and to mute the picture To show information on the projector status Source Input Signal Mute A V Mute and Picture Format y Standby 1 Picture size 2 Contrast 3 Brightness 4 E Picture form...

Page 9: ...toggles between the Freeze mode and the display situation Zoom Colour Tracking Freeze Philips Multimedia Projector 9 English User guide bClever SV1 2 Functional overview Remote control OK MENU MUTE ZOOM VIDEO FREEZE STAND BY S VIDEO COLOUR TRACKING CONTRAST BRIGHTNESS DATA PICTURESIZE PICTURE FORMAT AV MUTE INFO KEYSTONE KEY LOCK OK MENU MUTE ZOOM VIDEO FREEZE STAND BY S VIDEO COLOUR TRACKING CONT...

Page 10: ...f a video recorder Laser Disc player video camera DVD player or TV with AV output socket This socket can be connected to Video CVBS output sockets Input sockets to connect to the Audio out sockets of a video recorder laser disc player video camera or TV with A V output socket General Dust filter To connect the projector to the mains To insert an optional locking device Kensington lock To adjust a ...

Page 11: ...jector or any key on the remote control to switch on the projector The Standby indicator starts blinking green When the projection lamp is on the Standby indicator lights up green and the start up screen appears for several seconds 4 Press the y Standby button to switch the projector back into the Power Standby mode The Standby Warning screen will appear for 20 seconds The Standby Warning screen c...

Page 12: ...ranteed This is especially important when the projector is being used together with an intelligent whiteboard Keystone correction allows you to correct picture distortion of the vertical keystone type by internal scaling Use Keystone on the remote control to widen the upper part of the image Use Keystone on the remote control to widen the lower part of the image The keystone slider appears on the ...

Page 13: ...revent accidental damage to the projector When you are hand carrying the projector be sure to use a carrying case like the optional softbag When shipping the projector use the original packaging material if possible If you do not have the original packaging use equivalent materials placing plenty of cushioning around the projector When transporting the projector as freight or checked luggage first...

Page 14: ... available at your PC store is required If your computer is equipped with a 3 row connector no adaptor is needed Video input The projector accepts the input signal of all major video formats Video CVBS S Video Y C NTSC 3 58 4 43 PAL B G D H I N M and SECAM B D G K K1 L Component video via Data input YPbPr RGBsync RGBsog EDTV HDTV SDTV 480p 575p 720p 50 60 1035i 30 1080i 25 30 AUS 1080p 30 The proj...

Page 15: ...r marked Projector 2 of an optional VGA Y cable to the Data socket of your projector 2 Connect the VGA Y connector marked Computer 3 to the VGA cable supplied 1 3 Connect the VGA Y connector marked Monitor 4 to the VGA cable of the external monitor 5 4 Switch on your Computer and projector 5 Press the Data button on the remote control 6 Press Menu The menu bar appears on the screen The Picture ite...

Page 16: ... 9 Switch on the external monitor The image projected is simultaneously shown on the monitor In case of interference problems when connecting to an external monitor applying long VGA cables or interference with certain monitor type s the use of an active splitter is recommended Note Philips Multimedia Projector 16 English User guide bClever SV1 4 Installation Connecting to a computer ...

Page 17: ...TV to the Audio in L R sockets of the projector For this use the audio video connection cable supplied 1b Video CVBS 1 Connect the Scart RCA Audio Video adapter supplied to the Scart connector of the VCR Laser Disc player video camera or TV 2 Plug the video audio connection cable supplied into both the adapter and the Video and Audio in L R sockets of the projector S Video 3 Plug an optional S Vid...

Page 18: ...ction cable 2 Audio information from the Component or HDTV video equipment will be played via the projector speaker When YPbPr connection has been made 1 Press Menu The menu bar appears on the screen The Picture item is highlighted 2 Use Cursor Control left to select Set up 3 Use Cursor Control down to select Auto Component Selection 4 Use Cursor Control right to select YPbPr Component HDTV Philip...

Page 19: ...projector For this use an optional audio connection cable 3 Audio information from the Component or HDTV video equipment will be played via the projector speaker When RGBsog connection has been made 1 Press Menu The menu bar appears on the screen The Picture item is highlighted 2 Use Cursor Control left to select Set up 3 Use Cursor Control down to select Auto Component Selection 4 Use Cursor Cont...

Page 20: ...og S Video Video Source selection can be changed in the Features menu 3 Switch on the computer or start video playback A feedback message appears on the screen indicating the selected source Feedback should be enabled in the Set up menu Direct key feedback Direct key feedback is given when settings adjustments are made directly via the remote control or local keyboard Feedback is given by means of...

Page 21: ...t any time during operation and need immediate action Error messages are displayed in the centre of the screen indicating the problem and its possible solution They are displayed when a temperature error occurs E g the temerature is too high Message will appear together with red blinking Error indicator a fan error occurs E g one of the fans has a failure resolution or refresh rate is too high Dat...

Page 22: ...in 100 max Contrast 0 min 100 max Picture Format 16 9 16 9 enlarged 16 9 in 4 3 4 3 4 3 to 16 9 Colour tracking vivid natural Colour temperature warm normal cool Sharpness 0 soft 5 sharp Features Zoom Off 4 x 9 x 16 x Freeze On Off Key lock Off Start up screen Philips Personal None Source Auto Data RGB sync YPbPr RGBsog S Video Video Menu tree Philips Multimedia Projector 22 English User guide bCl...

Page 23: ...acking vivid natural Colour temperature warm normal cool Sharpness 0 soft 5 sharp Hue NTSC only 0 min 100 max Saturation min max Features Zoom Off 4 x 9 x 16 x Freeze On Off Key lock Off Start up screen Philips Personal None Source Auto Data RGB sync YPbPr RGBsog S Video Video Menu tree Philips Multimedia Projector 23 English User guide bClever SV1 5 Operation On Screen Display Menu ...

Page 24: ...ture size 0 50 x 1 00 x Keystone Monitor out On Off Mirror Auto Component Selection YPbPr RGBsog SmartSave Off 5 minute 60 minutes Feedback Off On Lamp counter Lamp used for 0 System information OK Factory settings OK 3 sec A A B B Menu tree Philips Multimedia Projector 24 English User guide bClever SV1 5 Operation On Screen Display Menu ...

Page 25: ...e shown in one screen this will be indicated by at the bottom of the list Move the cursor down to go to the next list of items Move the cursor up to go back to the first list 4 Adjustments are generally made by setting an on screen slider to the required value For this use Cursor Control left right Confirm the adjustment by pressing OK Settings are generally made by selecting the required item fro...

Page 26: ...arge a part of the picture Freeze to capture a moving picture still picture Key lock to de activate all ocal controls On To disable the Key lock function press Key lock on the remote control to enter the menu and set Key lock to Off Key lock can also be disabled by pressing OK on the remote control or on the projector for 10 seconds Start up screen to display Philips or suppresses Off the default ...

Page 27: ...ollowing the instructions under General explanation and the screen Zoom to enlarge a part of the picture Freeze to capture a moving picture still picture Key lock to de activate all remote and local controls On To disable the Key lock function press Key lock on the remote control to enter the menu and set Key lock to Off Key lock can also be disabled by pressing OK on the projector for 10 seconds ...

Page 28: ...ve to switch off SmartSave mode or select the delay time after which the projector automatically switches to Standby Feedback to suppress OSD feedback messages Warning or error messages however are never suppressed Lamp counter to show the operating time of the lamp which can be reset after a new lamp has been installed System information the System Information sub menu contains an overview of the...

Page 29: ... on the screen 2 Use Cursor Control to select Picture format in the Picture menu 3 Use Cursor Control to select the required picture format 16 9 16 9 enlarged 16 9 in 4 3 4 3 4 3 to 16 9 The picture format has now been set Pressing the Picture Format button on the remote control will immediately bring up the Picture Format selection window step 2 Pressing the Picture Format button again will selec...

Page 30: ...elect Personal You can now enter your personal Start up text with a maximum of 14 characters Use Cursor Control Up Down to select characters Use Cursor Control Left Right to move to a previous next position 4 Confirm with OK 5 Press OK again to return to the main menu Philips Multimedia Projector 30 English User guide bClever SV1 5 Operation On Screen Display Menu ...

Page 31: ...re disconnecting the projector 2 Remove the filter holder from the projector 3 Press clamp A open the holder and remove the filter 4 While firmly holding the filter gently remove any accumulated dust from the dusty side with a vacuum cleaner 5 Press clamp A put the filter back in place and release clamp A Firmly press the filter edges in place 6 Close the filter holder 7 Insert the filter holder i...

Page 32: ...he lamp door cannot be removed 2 Turn the projector over Never place the projector on the side where the connections are located 3 Remove the lamp door using a screwdriver When the lamp door is removed the mains inlet socket will be partly closed The lamp door therefore cannot be removed if the mains lead is not disconnected from the projector 4 Read the caution and warning labels on the lamp hold...

Page 33: ...in 11 Insert the mains lead into both the projector Mains inlet socket and the wall socket 12 Press the Standby button to switch on the projector 13 Reset the lamp life time see Resetting the lamplife time 14 Dispose of the old lamp in special chemical disposal bins 1 Press Menu The menu bar appears on the screen 2 Use Cursor Control to select Lamp counter in the Set up menu 4 Press OK for 10 seco...

Page 34: ...ings in the Set up menu Factory settings Please note that all other projector settings will be reset as well In Data mode Input resolution is too high and keystoning is applied If you wish to keep the keystone correction decrease the input resolution until the image is correctly displayed For this refer to the User Guide or support information of the computer If you wish to keep the input resoluti...

Page 35: ... vice versa Check what source has been connected YPbPr or RGBsog and select this source the Set up menu Auto Component Selection sub menu Image is not focused Adjust focus ring Distance between projector and screen is not correct Adjust the distance between the projector and the screen Please check the Projector Assistant programme on the CD ROM Signal cable is not correctly connected Connect sign...

Page 36: ...r Installation If the VGA Y cable is correctly connected verify whether the input impedance of the monitor is correctly set on 75 Ohm Monitor out has not been enabled but the external monitor is connected the picture on both displays is too dark Enable the Monitor out option Press Menu and use cursor control to go to Set up in the menu bar Select Monitor out and select On The Philips bClever SV1 p...

Reviews: