background image

2 Important

Positioning the TV


Large screen TVs are heavy. 2 people are required to 

carry and handle a large screen TV.


Make sure to hold the upper and 

bottom frames of the Unit firmly as 

illustrated.


Install the Unit in a horizontal and 

stable position.


Do not install the Unit in direct 

sunlight or in a place subject to 

dust or strong vibration.


Depending on the environment, 

the temperature of this Unit may 

increase slightly. This is not a malfunction.


Avoid a place with drastic temperature changes.


Do not place anything directly on top or bottom of the 

Unit.


Depending on your external devices, noise or 

disturbance of the picture and / or sound may be 

generated if the Unit is placed too close to them. In this 

case, please ensure enough space between the external 

devices and the Unit.


Do not insert the AC power cord into the power socket 

outlet before all the connections are made.


Ensure that you always have easy access to the AC 

Power Cord and Outlet to disconnect the TV from the AC 

Outlet.


Before you move the TV, disconnect attached Cables to 

prevent damage to Connectors, especially the TV Tuner.


Be sure to Unplug the AC Power Plug from the AC outlet 

before moving or carrying the Unit.


When moving the TV and then Setting it down, please be 

careful not to pinch the AC Power Cord under the Unit.

Regulatory Notices

Do not place the Unit on the furniture that is capable of being 
tilted by a child and an adult leaning, pulling, standing or climbing 
on it. A falling Unit can cause serious injury or even death.
This apparatus should not be placed in a built-in installation such 
as a bookcase or rack unless proper ventilation is provided.
Make sure to leave a space of 4 inches (10cm) or more around this 
apparatus.
Press     to turn the Unit On and go into Standby mode.
To completely turn Off the Unit, you must unplug the AC power 
Plug from the AC Power Outlet.
Disconnect the AC Power Plug to shut the Unit Off when trouble is 
found or not in use. The AC Plug shall remain readily available.

AC Power Plug

Never use a gas duster on this TV.
The gas trapped inside of this Unit may cause ignition and explosion.

CAUTION:


Danger of explosion if battery is incorrectly replaced. 
Replace only with the same or equivalent type.

WARNING:


Batteries (battery pack or battery installed) should 
not be exposed to excessive heat such as sunshine, 
fire or the like.

WARNING:


To prevent injury, this apparatus must be securely 
attached to the furniture / wall in accordance with 
the instructions. Tipping, shaking or rocking the unit 
may cause injury / death.

Environmental Care

The packaging of this product is intended to be recycled.
Contact your local authorities for information about how 
to recycle the packaging.
For product recycling information, please visit - 

End of Life Directives

Philips pays a lot of attention to produce 
environmental-friendly products in green focal areas. Your 
new TV contains materials which can be recycled and 
reused. At the end of its life, specialized companies can 
dismantle the discarded TV to concentrate the reusable 
materials and to minimize the amount of materials to be 
disposed of. Please ensure you dispose of your old TV 
according to local regulations.

Disposal of Used Batteries

The batteries supplied do not contain the heavy metals 
mercury and cadmium, however in certain localities, 
disposing batteries with household waste is not 
permitted. Please ensure you dispose of batteries 
according to local regulations.

 Batteries usage

Do not mix old and new batteries.

Do not mix alkaline, standard (carbon-zinc) or rechargeable (ni-cad,
ni-mh, Li-ion, etc.) batteries.

Preparing to Move/Ship the Unit

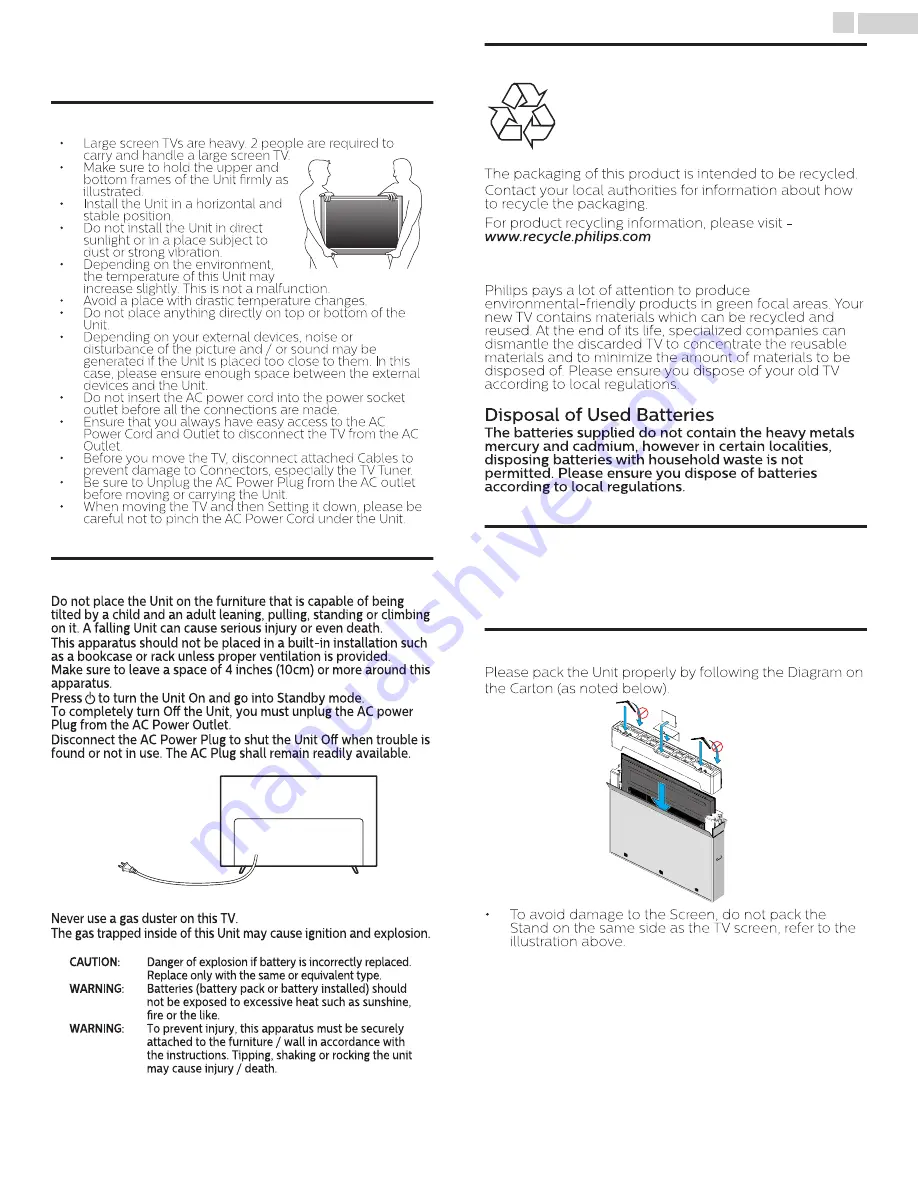
Please pack the Unit properly by following the Diagram on 
the Carton (as noted below).


To avoid damage to the Screen, do not pack the 
Stand on the same side as the TV screen, refer to the 
illustration above.

7

.

English

Summary of Contents for 65PFL6621

Page 1: ... Puerto Rico o en las Islas Vírgenes de los Estados Unidos 1 866 202 5960 México D F y Área Metropolitana 58 87 97 36 Interior de la Republica 01 800 839 19 89 FR Pour obtenir de l aide supplémentaire communiquez avec le centre de service à la clientèle de votre pays Pour obtenir de l aide communiquez avec le centre de service à la clientèle Philips au Dans le États Unis au Canada à Puerto Rico ou...

Page 2: ...ting Volume 21 Switching Channels 21 Watching Channels from an External Device 22 Create a list of favorite channels 22 Changing Picture Format 23 TV Screen information 24 Using Options menu 24 USB 25 5 Making more use with your TV 28 Picture and sound setup 29 TV settings 29 Picture 29 Sound 31 Cast TV settings 32 Features 32 Installation 34 Search for channels 37 Install channels 37 Channel sett...

Page 3: ... are committed to making home entertainment safe and enjoyable As you enjoy your television please note that all televisions new and old must be supported on proper stands or installed according to the manufacturer s recommendations Televisions that are inappropriately situated on dressers bookcases shelves desks speakers chests carts etc may fall over resulting in injury TUNE IN TO SAFETY ALWAYS ...

Page 4: ...articular specifies that the cable ground shall be connected to the grounding system of the building as close to the point of cable entry as practical Example of Antenna Grounding as per NEC National Electric Code ANTENNA LEAD IN WIRE GROUND CLAMP ANTENNA DISCHARGE UNIT NEC SECTION 810 20 ELECTRIC SERVICE EQUIPMENT GROUNDING CONDUCTORS NEC SECTION 810 21 POWER SERVICE GROUNDING ELECTRODE SYSTEM NE...

Page 5: ...t the dealer or an experienced radio or television technician for help Declaration of Conformity Trade Name PHILIPS Responsible Party P F USA Inc Model 65PFL6621 Address PO Box 2248 Alpharetta GA 30023 2248 U S A Telephone Number 1 866 202 5960 Modifications This apparatus may generate or use radio frequency energy Changes or Modifications to this apparatus may cause harmful interference Any Modif...

Page 6: ... Pediatrics discourages television viewing for children younger than two years of age Some features may require an always on broadband internet connection firmware update and or a minimum bandwidth Internet services vary by location P F USA Inc P F MEXICANA S A de C V do not warrant access to the Portal or to any of the services content software and advertising P F USA Inc P F MEXICANA S A de C V ...

Page 7: ...must unplug the AC power Plug from the AC Power Outlet Disconnect the AC Power Plug to shut the Unit Off when trouble is found or not in use The AC Plug shall remain readily available AC Power Plug Never use a gas duster on this TV The gas trapped inside of this Unit may cause ignition and explosion CAUTION Danger of explosion if battery is incorrectly replaced Replace only with the same or equiva...

Page 8: ... HDMI link devices to be controlled by the HDMI cable connected to your TV HDMI Input HDMI DVI Input If your Video Device has a DVI Output jack use an HDMI DVI Conversion Cable to connect the Unit Component Video Input PC Input AV Input Audio and Video Input from an External Device USB terminal The Picture Music and Video files stored on a USB Memory Stick can be played back on this unit Digital A...

Page 9: ...Accessories Caution s DO NOT take the TV set out of the box yet 3 Remove the packing joints from the box 4 Remove the outer slipbox with care 5 Prepare a table and cover the top of it with a table cloth blanket or such to avoid damage to the TV set Support both sides of the TV set and move it onto the table 6 Carefully lay the TV set with the screen side down on the table 9 English Continued on ne...

Page 10: ...etightlyfastened IftheStandisnotproperly attached it could cause the Unit to fall resulting in injuries as well as damage to the Unit To remove the Stand from this Unit unscrew the Phillips head screws by reversing the procedure Be careful not to drop the Stand when you remove it Lifting the TV Set Carefully lift the TV set as shown in the illustration and place it onto a stable level surface Remo...

Page 11: ...O Displays Information about the current program OK Press to decide the command of setting when the Main menu is displayed NAVIGATION buttons Moves the cursor Selects the On screen Menu items OPTIONS Displays a list of menu items applicable to the highlighted object or screen CH Selects a Channel 0 9 NUMBER buttons Used to enter a Channel Program number DOT Use with 0 9 to Select digital channels ...

Page 12: ...jacks signal with Stereo mini 3 5mm plug Audio cable on PC Component Y Pb Pr Composite Video VIDEO Input jack s for VIDEO Composite Video Input VIDEO jack is a shared jack with Component Video Input Y jack Green Yellow color orientation depends on model 75 ohm Cable Antenna connection Signal Input from an Antenna or Cable Satellite Set top Boxes HDMI Input jack s DigitalAudioandVideoInputfromhighd...

Page 13: ...ectors and Analog Audio Do Not place your Recorder too close to the Screen because some Recorders can be susceptible to harmful interference from the TV Cable OUT RF cable IN IN OUT IN OUT IN IN IN OUT OUT RF cable IN Satellite IN Cable Set top Box Video Audio L R cables Video Audio L R cables Video Audio L R cables Video Audio L R cables Blu ray Disc DVD Recorder Note s If you have any question a...

Page 14: ...l Video and multi channel Digital Audio through a single cable HD game console or Blu ray Disc DVD Player or Set top Box OUT OUT OUT HDMI cable HDMI cable HDMI cable IN IN IN Note s If there are issues with picture color and or sound when connecting an external device using the HDMI port please try switching the HDMI mode Refer to HDMI mode p 35 Some HDMI cables and devices may not be compatible w...

Page 15: ...onnection offers Standard Picture quality for Video Devices connected to the Unit If you connect to the Unit s Component Composite Video Y VIDEO Input jack green connect Audio Cables to the Audio L R Input jacks When the Audio is monaural then only connect to the Audio L Input jack DVD Player DVD Player DVD Player OUT OUT OUT IN IN Video Audio L R cables Video Audio L R cables Video Audio L R cabl...

Page 16: ...his Unit can be connected to your PC that has an HDMI terminal Use an HDMI cable for this Digital Connection PC PC PC OUT OUT OUT HDMI cable HDMI cable HDMI cable IN IN HDMI DVI Connection This Unit can be connected to your PC that has a DVI Terminal Use an HDMI DVI Conversion Cable for this Video Digital Connection and it requires Stereo mini 3 5mm Plug Audio Cable for Analog Audio signal as well...

Page 17: ...dio Connections as well and the Audio signals are Output as Analog L R Audio DVI does not display 480i image which is not in compliance with EIA CEA 861 861B USB Memory Stick This unit offers easy playback of Picture Music and Video files Insert the USB Memory Stick into the USB terminal shown below USB p 25 Note s The Unit recognizes only a USB Memory Stick Do Not use a USB hub or an extension ca...

Page 18: ...e à domicile Le mode Retail est optimisé pour la démonstration en magasin avec des réglages fixes Ubicación El modo Home está optimizado para el uso eficiente de energía para uso en casa SelectingLocationtoRetailwilldisplayRetailDemoontheScreen If you wish to turn off this demo in a retail environment please refer to Retail Demo p 35 4 Use to Select the standby mode in the middle of the TV screen ...

Page 19: ...arching Please wait 10Use to Select your preferred picture setting then press OK 2 1 Sports Vivid Standard Skip Please select your preferred picture mode 11 Use to Select your preferred sound setting then press OK 2 1 Sports Vivid Standard Skip Please select your preferred sound mode 12 After TV Initial Setup is completed A message will appear if there is the latest software on the network server ...

Page 20: ...button on your mobile device Cast TVXXXX XXXX XXXX Cast TVXXXX Cast TVXXXX Cast TVXXXX Cast TVXXXX 4 Network Configuration The SET NAME button appears on your mobile device complete settings on this screen and then touch SET NAME to proceed Pressing it moves to the Wireless Network setting screen Select your wireless network name SSID and enter the password to proceed XXXXXXXXXX Cast TVXXXX Cast T...

Page 21: ... sound Switching Channels Remote Control TV To Select Channels by using CH or CH Press CH Up Down on the side panel or press CH on the Remote Control To Select Channels by using the NUMBER buttons Digital TV Operation For Digital channels press a number followed by a dot and the corresponding sub channel number When selecting Digital channel 1 1 1 Be sure to press before entering the subchannel nu...

Page 22: ... Control 4 Use to Select the desired type then press OK T To reset the type Press OPTIONSontheRemoteControlatstep3 thenselectOriginal icon Scan connections You can rescan TV connections and update the source list Before you begin You must set On in Master EasyLink p 36 1 Press SOURCE on the Remote Control 2 Use to move the cursor to any device 3 Press OPTIONS on the Remote Control 4 Use to Select ...

Page 23: ... Super zoom Displays a 4 3 picture at a 16 9 size the picture is stretched horizontally and vertically and its left and right edges are enlarged This crops out some of the top and bottom of the picture 4 3 Displays a 4 3 picture at its original size Sidebars appear on both edges of the screen Movie expand 14 9 Displays a 4 3 picture at a 14 9 size the picture is stretched horizontally and vertical...

Page 24: ...2 Use to Select a desired setting then press OK a b c d Options Options Following settings can be configured Closed captions To choose the Closed captions display setting Closed captions p 32 Digital audio language To Select the language according to your preference It differs depending on the program Digital audio language p 39 Mono Stereo To Select an audio format Mono Stereo p 39 Controls If yo...

Page 25: ...enables you to view Photos listen to Music or watch Video files stored on a USB Memory Stick 1 Press SOURCE and use to Select USB then press OK 2 Use to Select the desired File then press OK Sample picture jpg folder_A folder_B folder_C folder_D folder_E Photo Photo These Recorded Files must meet Specifications shown below Picture JPEG Progressive JPEG JPEG Upper limit 4000x4000 pixels Progressive...

Page 26: ...mit of File Restriction Limit Viewing photos 1 Use to Select Photo then press OK 2 Use to Select the desired item then press OK 3 Press OK or to start a Slide show of the files Press OK or to pause the Slide show The icon appears Press or to move between images Press BACK or to stop the Slide show Press OPTIONS to display the optional menu then use to Select the desired item Repeat 1 Off Sets repe...

Page 27: ...cted files Press OK or to pause then press OK or again to resume Press to fast forward search Press to fast backward search Press to stop playback Press toresumefromthepointatwhichplaybackwasstopped Press OK to play from the beginning of the file Press OPTIONS to display the optional menu then use to Select the desired item Repeat Off Sets repeat playback to Off One Sets repeat playback for a sele...

Page 28: ...u press MENU in Google Cast mode opening screen is not the Main menus but the TV settings Picture and sound setup p 29 Guides you to get the best picture and sound settings TV settings p 29 Accesses menus that allow you to change picture sound and TV usage settings Search for channels p 37 Guides you through channel installation Channel settings p 37 Accesses menus that allow you to change channel...

Page 29: ...picture settings for a cinematic experience Game Optimized for PCs and game consoles Energy saving Eco TV settings for low power consumption Internet video Optimized for low bit rate Internet video When you adjust the following settings Personal picture will be set automatically Cursor Cursor Backlight to Reduce Power Consumption and Brightness to Increase Power Consumption and Brightness Contrast...

Page 30: ...m Medium and Maximum Dynamic contrast to Select the desired setting then press OK Off Minimum Medium and Maximum Gamma to Select the desired setting then press OK Very Dark Room Dark Room Normal Bright Room and Very Bright Room Perfect Motion Rate to Select the desired setting then press OK Off Minimum Medium and Maximum 4K UHD Upscaling to Select the desired setting then press OK Off Minimum Medi...

Page 31: ...Off to set Sonic Emotion to Off On to set Sonic Emotion to On Dialog Enhancement Off to set Dialog Enhancement to Off On to set Dialog Enhancement to On Bass Enhancement Off to set Bass Enhancement to Off On to set Bass Enhancement to On Absolute 3D Sound Off to set Absolute 3D Sound to Off On to set Absolute 3D Sound to On This function keeps a constant Loudness differential between the TV Commer...

Page 32: ...s Cast TV settings Standby mode 3 Adjust the following items Caption settings Closed Captions displays the Audio portion of the Program as Superimposed Text over the Video 1 Use to Select Caption settings then press OK CC w mute On Off Digital caption options Digital caption service Caption service Closed captions Power indicator Digital audio preferences Sleeptimer Caption settings Standby mode C...

Page 33: ...osed Caption shows The captioned programs are usually noted in the TV listings with service marks such as CC NotallcaptioningservicesareusedbyaTVchannelduringthetransmissionofaClosedCaption program Closed Caption will NOT be displayed when you are using an HDMI or a Component connection To show the Closed Caption on your TV screen broadcast signal must contain the Closed Caption data Not all TV pr...

Page 34: ...dby mode ECO standby to set low energy consumption mode Active standby to enable the TV to turn On fast Installation 1 Press MENU and use to Select TV settings then press OK 2 Use to Select Installation then press OK Installation Features Sound Picture Restore default settings Preferences Language Cast TV settings 3 Adjust the following items Language You can set the language for the On screen dis...

Page 35: ...uctions below 1 Press MENU and use to Select TV settings then press OK 2 Use to Select Installation then press OK 3 Use to Select Preferences then press OK 4 Use to Select HDMI mode then press OK 5 Use to Select HDMI1 HDMI2 HDMI3 or HDMI4 then press OK 6 Use to Select Max 4K 60Hz HDR Max 4K 60Hz or Max 4K 30Hz Compatibility depending on the output capabilities of the external device then press OK ...

Page 36: ...t this unit to our brand EasyLink devices and be sure its EasyLink HDMI CEC setting is also set to On 1 Use to Select Preferences then press OK 2 Use to Select EasyLink then press OK 3 Use to Select the item you want to adjust then press OK On Off HDMI ARC RC key forwarding Auto TV On Master EasyLink TV placement EasyLink Location HDMI mode Retail Demo Set the Master EasyLink to On or Off The foll...

Page 37: ...ll channels Installation mode Mono Stereo Digital audio language Change PIN Child lock Channel installation Channel installation Be sure the RF cable is correctly connected to this Unit and you are registered with your Cable TV provider when you Install Cable channels Installation mode 1 Use to Select Channel installation then press OK 2 Use to Select Installation mode then press OK 3 Use to Selec...

Page 38: ...y MPAA TV ratings lock has controlled access to individual programs based on their age ratings and content rating 3 Use to Select TV ratings lock or Movie ratings lock then press OK 4 Use to Select the Desired Rating then press OK Repeatedly to Switch between Block and View indicates that the Rating is Locked Blocked indicates that the Sub Rating is Locked Blocked indicates that the Rating is Not ...

Page 39: ...e used in Movie ratings lock TV ratings lock Canadian English rating or Canadian French rating accordingly unusual results may occur and the Unit may not Receive Emergency Bulletins or other Types of Programming Emergency Bulletins Such as EAS messages Weather Warnings and Others Locally originated Programming News Political Public Service Announcements Religious Sports Weather Change PIN Although...

Page 40: ...o your PC Prepare a blank USB memory stick for Software Update Access www philips com support and download the latest version software to a blank USB memory stick using a PC by following the Directions described on the website Use a blank USB memory stick download the software on your PC and write the software in the root directory of the USB memory stick For more details on how to download the so...

Page 41: ...ailable when updating the firmware When you start up the TV or a net service after executing the software update a message may appear on the screen prompting for software update again In this case please select Update to start USB update or network update For further assistance please contact call center Software settings Software 1 PressMENUanduse toSelectSoftwaresettings thenpress OK 2 Use to Se...

Page 42: ...ble or Set top Box needs to be plugged into the Unit How come there is no image fromtheConnectedExternal Devices Check if the correct Input mode is selected by pressing SOURCE p 22 Check the Antenna Cable or other Input Connection to the Unit When using the Component Video Connection check that the Green Y Blue Pb Cb and Red Pr Cr connectors are connected to their corresponding colored jacks on th...

Page 43: ...r or Lower then the Loudness will Change Make sure Auto volume leveling is set to On p 31 Picture Sound No sound with distorted picture occurs when using the HDMI Digital Connection Some HDMI cables and devices may not be compatible with the TV due to different HDMI specifications No Picture or Sound Check if the Power is on CheckwhetherAllthecablestotheUnitareconnectedtothecorrectOutputjack of yo...

Page 44: ...outer access point from other wireless networks and brand and type of the Wireless Router access point When using the Wireless LAN of the TV it is suggested to place the Wireless Router as close as possible to the Television Wireless LAN connection fails or wireless connection is poor Check the installation location of the TV and Wireless Router access point Signal quality may be affected for the ...

Page 45: ...signal HDR capable products offer greater contrast through an expansionoftherangeoftheimage scolorluminance Thesource cableand display must all support HDR HDTV High Definition TV Ultimate Digital format that produces high resolution and high picture quality PIN code A stored 4 digit number that allows access to Parental control features SAP Secondary Audio Program Second Audio channel delivered s...

Page 46: ...down and PREV CH Previous Channel Connectivity Component Video Input Y Pb Pr 1 Supporting Video Signals 480i p 720p 1080i p 60Hz Composite Video Input Shared Y Green Terminal with Component Video 1 Analog Audio L R Input PC Input Via VGA HDMI and HDMI DVI Analog Audio L R USB 1 Wireless LAN Supporting wireless standards IEEE 802 1 1a b g n ac 2 4GHz 5GHz Ethernet port 1 Digital Audio Output 1 Supp...

Page 47: ...roduct or other additional product or part not covered by this warranty Recovery or reinstallation of programs data or other information is not covered under this Limited Warranty This warranty does not apply a to damage caused by accident abuse misuse neglect misapplication or non supplied product b to damage caused by service performed by anyone other than company approved Authorized Service Loc...

Page 48: ...tta GA 30023 2248 P F USA Inc disclaims any and all warranties and representations with respect to such software and related source code including quality reliability usability and accuracy and further disclaim all express implied statutory or otherwise including without limitation any implied warranties of title non infringement merchantability or fitness for a particular purpose P F USA Inc shal...

Page 49: ... relation to this product The Philips trademark and the Philips Shield Emblem are registered trademarks of Koninklijke Philips N V used under license P F USA Inc PO Box 2248 Alpharetta GA 30023 2248 U S A P F Mexicana S A de C V Av La Palma No 6 Col San Fernando La Herradura Huixquilucan Edo de México C P 52787 A618AUH 䖩䖩䖩䖩䖩 ...

Reviews: