7.5 Supported display resolutions
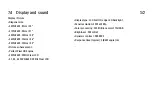
Video formats
Resolution — Refresh rate
• 480i - 60 Hz
• 480p - 60 Hz
• 576i - 50 Hz
• 576p - 50 Hz
• 720p - 50 Hz, 60 Hz
• 1080i - 50 Hz, 60 Hz
• 1080p - 24 Hz, 25 Hz, 30 Hz
• 1080p - 50 Hz, 60 Hz
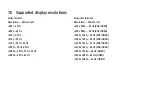
Computer formats
Resolution — Refresh rate
• 640 x 480p — 60 Hz (VGA/HDMI)
• 600 x 800p — 60 Hz (VGA/HDMI)
• 1024 x 768p — 60 Hz (VGA/HDMI)
• 1280 x 768p — 60 Hz (VGA/HDMI)
• 1360 x 765p — 60 Hz (VGA/HDMI)
• 1360 x 768p — 60 Hz (VGA/HDMI)
• 1280 x 1024p — 60 Hz (HDMI)
• 1920 x 1080i — 60 Hz (HDMI)
• 1920 x 1080p — 60 Hz (HDMI)
Summary of Contents for 32PFL8605H
Page 3: ...1 1 1 The remote control 1 12 To adjust the volume ...
Page 4: ...1 1 1 The remote control 2 12 To switch TV channels ...
Page 20: ...1 1 2 The menus 6 6 Go to the Search page to look for any topic in Help ...
Page 32: ...1 2 1 Wall mounting 4 12 Unscrew the bolt in the middle of the bar with the supplied hex key ...
Page 33: ...1 2 1 Wall mounting 5 12 Turn the bar as shown ...
Page 34: ...1 2 1 Wall mounting 6 12 Reposition the bar on the stand and fix the bolt with the hex key ...
Page 35: ...1 2 1 Wall mounting 7 12 Fix the stand to the TV ...
Page 37: ...1 2 1 Wall mounting 9 12 Fix the 2 mounting discs Use screws with a diameter of max 6mm ...
Page 38: ...1 2 1 Wall mounting 10 12 Slide the bottom plate of the stand onto the mounting discs ...
Page 40: ...1 2 1 Table top stand 12 12 Unscrew the bolt and turn the bar in the position shown ...
Page 52: ...1 3 2 Volume Press V Volume or to adjust the volume Or use the or keys on the remote control ...
Page 212: ...3 4 1 Child locks 5 5 Forgotten your code To override the code if you forget it enter 8888 ...
Page 237: ...4 1 4 Ambilight Read the chapter Ambilight in Help Use your TV Ambilight ...
Page 276: ...4 4 3 Wired installation 2 2 Read more about how to connect in Help Connections Network Wired ...
Page 324: ...5 3 1 SoundBar 1 3 Use an HDMI cable to connect the device to the TV ...
Page 327: ...5 3 2 Blu ray Disc DVD player Use an HDMI cable to connect the device to the TV ...
Page 332: ...5 3 4 Recorder 1 2 Use 2 antenna cables to connect the antenna to the device and the TV ...
Page 333: ...5 3 4 Recorder 2 2 Add an HDMI cable to connect the device to the TV ...
Page 344: ...5 3 8 Digital HD receiver 1 2 First use 2 antenna cables to connect the device to the TV ...
Page 345: ...5 3 8 Digital HD receiver 2 2 Use an HDMI cable to connect the device to the TV ...
Page 347: ...5 4 1 Game console 2 3 Use an HDMI cable to connect the device to the side of the TV ...
Page 348: ...5 4 1 Game console 3 3 Or use a Scart adapter to connect the device to the TV ...
Page 353: ...5 4 4 Camcorder 2 3 Use an HDMI cable to connect the camcorder to the side of the TV ...
Page 354: ...5 4 4 Camcorder 3 3 Or use a Scart adapter to connect the device to the TV ...
Page 372: ...5 8 1 3D This TV is prepared for future 3D TV accessories ...
Page 421: ......


