background image

6

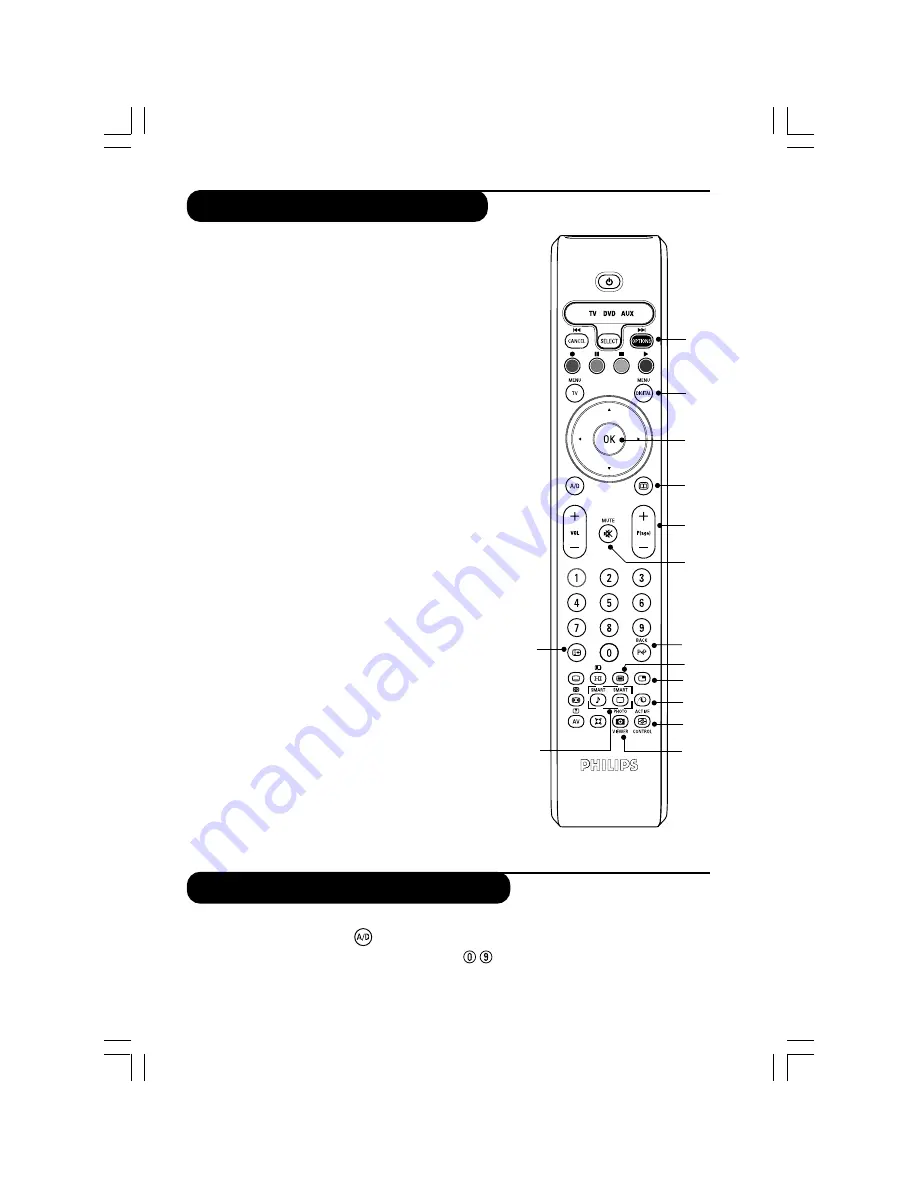
Options menu (refer to page 14).

Digital menu
To display or exit from the digital menus (when TV is in
digital mode).

OK button
Confirms selection.  Also access program list in Analogue

or Digital mode.

TV guide (refer to page 15).

Programme selection
To access the next or previous programme (or page in
digital menus).

Mute
To disable or enable the sound.

Previous programme
To access the previously viewed programme. In Digital
mode, it also used as an edit or back space button.

Teletext (refer to pages 26 - 27)

PIP on/off
Displays PIP screen on TV. Press button repeatedly to
changes size of the window (refer to page 23).
Pixel + (depending on model/version)
Switches the Pixel + demonstration mode on or off.
Active control
Optimises the picture quality depending on the quality of
the incoming signal and ambient light conditions.

Unused button (no function).

Screen information
In Digital mode, press once to display the information
banner,  2

nd

 time to get more information on the

programme and a 3

rd

 time to remove it (refer to page 9).

In Analogue mode, this displays/removes the
programme information (number, name, sound mode).
Hold down for 5 seconds to permanently display the
analogue programme number on the screen.
Picture and sound settings
Accesses a series of picture and sound settings.

The position 

Personal 

coresponds to the settings stored

in the menus.

14

15

16

17

18

19

20

21

22

23

24

25

26

14
15

16

17

18
19
20

21

22

27

24

25

26

To receive TV channels, your television is equipped with 2 tuners. One is for digital channels, the other
is for analogue channels. Use the 

 (A/D) key of the remote control to switch the TV between

analogue and digital mode.Then use the P(age) +/–  or 

 keys to select channels.

27

Digital or Analogue channels

The remote control buttons

23

Summary of Contents for 32PF5520D

Page 1: ...LCDTV 32PF5520D ...

Page 2: ... menu 14 TV guide 15 Recording function 16 Selecting the menu language 17 Automatic tuning of analogue programmes 17 Manual tuning of analogue programmes 18 Sorting of analogue programmes 18 Naming of channel 19 Editing of channel 19 Picture settings 20 Sound settings 20 Feature settings 20 Timer feature 21 Childlock feature 22 Active control feature 22 PIP feature 23 Screen formats 24 Smart Pictu...

Page 3: ...ouch push or rub the surface with hard object When the surface becomes dusty wipe gently with absorbent cotton or other soft materials like chamois Do not use acetone toluene and acohol as it causes chemical damage to the polarizer Wipe off saliva or water droplets as soon as possible Long time contact with polarizar causes deformations and colour fading Be careful of condensation at sudden temper...

Page 4: ...T sockets CVI 1 for connecting equipment with Component Video and Audio output ç TV aerial socket 0 Common interface slot for connecting a CAM conditional access module and a smartcard 1 SPDIF output for connecting equipment with DIGITAL IN input amplifier with coaxial digital input 2 L L L L L Headphone jack 3 REAR SVHS allow for connections for items such as cameras or gaming stations Press the ...

Page 5: ...ayed in red Unused button no function Screen format Teletext When in TV mode functions as screen format feature refer to page 24 and when inTeletext mode use for teletext function refer to pages 26 27 AV Teletext In TV mode displays Source list to selectTV channel or other External sources refer to Quick Guide Surround sound To activate deactivate theVirtual Dolby Surround effect In stereo you can...

Page 6: ...ming signal and ambient light conditions Unused button no function Screen information In Digital mode press once to display the information banner 2nd time to get more information on the programme and a 3rd time to remove it refer to page 9 In Analogue mode this displays removes the programme information number name sound mode Hold down for 5 seconds to permanently display the analogue programme n...

Page 7: ... on To switch on the set press the POWER key A green indicator comes on and the screen lights up Go straight to the chapter Switching on for the first time on page 8 If the television remains in standby mode press the P age key on the remote control The indicator will flash when you use the remote control standby fast rewind fast forward recording pause stop play tv menu cancel navigation and adju...

Page 8: ...me The installation is now complete Switch on for the first time The first time the TV set is switched on a congratulation message will appear on screen The language of which changes every 5 seconds If the menu is not displayed press and hold down the MENU button on the side of the TV set for 5 seconds to display the menu Press the OK button on the remote control the moment your prefered language ...

Page 9: ...isplayed in the one of the colour red green yellow or blue of the activated list Note A white colour s will appear if the programme is stored in one or more of the favourite list which is currently not activated This menu allows you to change the order of the stored digital channels and radio stations From the digital mode press the button to display the setup menu é Use the œ button to select ins...

Page 10: ...Service setup and press É button Press É button to select Add new services and press OK button to activate the installation The search begins and only new channels will be stored and added to the channel list menu The percentage of the installation that has been completed and the number of channels found is displayed When the search is complete select store and press OK button to accept the new se...

Page 11: ...erred language for audio subtitle teletext and menu and make changes to the location country and time zone From the digital mode press the button to display the setup menu é Use the œ button to select preferences and press É button Use œ button to select Languages Location or Digital Audio Output and press Ébutton Use the o or œ button to select a setting and press É button to enter into the sub m...

Page 12: ...e broadcaster provides data with the programme TV channels select the TV channel you want to lock and press OK Radio station select the radio station you want to lock and press OK Change pin code press É button to enter in the menu Follow the on screen instruction to change your access code The default pin code is 1234 If you have forgotten your personal code you can reset to the default pin code ...

Page 13: ...into your favourite list Remove all services press OK button if you want to remove all the service from your favourite list Press the button to leave the menu Your favourite list can be selected using the options menu see next page Setup Provides information on problem reports and Close Favourites Preferences Information Access restrictions Installation 11 46 System software Information This menu ...

Page 14: ...e the o or œ button to select a setting and press É button to enter the sub menu Favourites use the o or œ button to select your favourite list and confirm with OK button The none option deactivate any favourite list To create your own favourite list see page 13 Subtitle language No function not applicable Audio language to temporarily change the audio sound language To permanently change the audi...

Page 15: ...ing another digital channel after setting a timer you can do so by changing channels in the normal way Important In digital mode if you change the channel when recording starts the TV will record the last channel you have selected Record list green button this menu gives the list of recording schedules You can check modify delete or add a new schedule by using the cursor or coloured buttons as ind...

Page 16: ...ess OK button to confirm Note it is only possible to change to a number that is in the currently selected favourite list Enter your pin code if locked enter your secret code only if you have activated the access restriction feature refer to page 11 Press the OK button to confirm Day Month enter the date by using the or P age buttons Press OK button to exit Start time enter the start time End time ...

Page 17: ... button to access the Install menu Language is highlighted Select your language using the ÑorÉ button To exit the menu press the button TV Auto Sort Name Channel Edit É É É É É Selecting the menu language TV Auto Sort Name Channel Edit É É É É é Use the œ button to select Install and press the É button to access Install menu Use the œ button to select Auto Store and press the É button to start aut...

Page 18: ...É button Store Press the É button to store channel To exit the menu press the button Manual tuning of analogue programmes Sorting function allows you to change the channel number to another channel number for a particular TV station Press the TV menu button é Use the œ button to select Install and press the É button to access Install menu Sorting of analogue programmes Use the œ button to select S...

Page 19: ...nnel Edit feature allows you to edit or skip programmes which have bad or weak TV signal or programmes that you do not watch often Press the TV menu button é Use the œ button to select Install and press the É button to access Install menu Use the œ button to select Channel Edit Press the É button to access Channel Edit menu Use the Ñ or É or Digit 0 9 button to select the channel you want to skip ...

Page 20: ... É button to adjust To exit the menu press button Description of the sound settings Equalizer to adjust the sound tone from bass 120 Hz to treble 10 kHz Balance this balances the sound on the left and right speakers DeltaVolume this is used to compensate any volume discrepancies between the different programmes or EXT sockets This setting is available for programmes 0 to 40 and the EXT sockets AVL...

Page 21: ...f Once the set is switched off the timer is disabled Press the TV menu button é Use the œ button to select Features and press the É button to access Features menu Press the É button to access the Timer menu Use the Digit 0 9 o œ Ñand É buttons to select a setting and do the necessary adjustments Time time automatically followsthe time from the Digital Broadcast Note Ensure the Location and Time Zo...

Page 22: ... and do the necessary adjustments è To exit the menu press the button Description of the settings Lock Channel allows you to lock individual programme A keylock symbol F will appear besides the locked programme number Change Code allows you to change to a new four digit code of your choice Clear All allows you to unlock all locked programmes Lock All allows you to lock all programmes This Active C...

Page 23: ...to select your desired PIP size options If you want to move the PIP window horizontally or vertically press the œ button to select Horizontal or Vertical Press the ÑorÉ button to move PIP window horizontally or vertically è To exit the menu press button Note You can also access the PIP window directly via the PIP button on the remote control Press the button to display the PIP window Press the but...

Page 24: ...splayed on either side of the picture Movie Expand 14 9 The picture is enlarged to 14 9 format a thin black band remains on both sides of the picture Movie Expand 16 9 The picture is enlarged to 16 9 format This mode is recommended when displaying pictures which have black bands at the top and bottom letterbox format Subtitle Zoom This mode is used to display 4 3 pictures using the full surface of...

Page 25: ...it room condition and gives cinema like effect when light is switched off DVD VCD Emphasize soft colours Suitable for playing computer games sur ng etc Note The Personal setting is the setting that you set up using the Picture menu in the main menu This is the only setting in the Smart Picture settings that can be changed All the other settings are pre set at the factory Defintion of Sound Setting...

Page 26: ...ther page If the counter continues to search this means that the page is not transmitted Select another number Direct access Coloured areas are displayed at the to the items or bottom of the screen The 4 coloured corresponding buttons are used to access the items or corresponding pages The coloured areas flash when the item or the page is not yet available Contents page This returns you to the con...

Page 27: ...tivate the double page teletext teletext display mode The active page is displayed on the left and the following page is displayed on the right Press f you want to hold a page i e the contents page The active page is then displayed on the right To return to normal mode press è Hidden information To display or hide the concealed games information solutions Enlarge a page This allows you to display ...

Page 28: ...olours cold normal or warm Audio Selection To choose the sound reproduced on the TV PC or TV Features Phase Clock eliminates the horizontal Phase and vertical Clock interfering lines Format to choose between full screen or native format of the PC screens PIP to adjust the size and position of the PIP screen Auto Adjust position is set automatically These adjustments are not available in PC D mode ...

Page 29: ...nition HD High Definition Using the HD High Definition mode Using the HD menus Press the TV MENU button to access the HD menu é Use the o œ Ñ É buttons to select adjust or activate the menu items the settings are automatically saved namely Picture Sound and Features Picture Sound menus The HD Picture Sound settings are the same as the TV Picture Sound settings and function exactly the same way as ...

Page 30: ...d Check that the sound is not muted If it is muted press the Mute button on the remote control to restore sound Good sound but poor Try increasing the contrast and brightness setting colour or no picture Snowish picture and Check antenna connection at the rear of the TV noise Horizontal dotted Possible electrical interference e g hairdryer vacuum cleaner etc line Switch off appliances Double image...

Page 31: ... Clock Adjustment of appears PC Mode Video Noise in the Main PC Menu Horizontal flicker Try eliminating the horizontal bars by using the Phase Adjustment of appears PC Mode Video Noise in the Main PC Menu Screen too bright or Try adjusting the contrast and brightness in the Main Menu dark PC Mode PC and PIP modes Check that you have confiured the computer on a compatible do not work display resolu...

Page 32: ...ban antenna installation consists of 1 separateVHF Ch s 6 12 and UHF Ch s 27 69 antenna s rule of thumb larger antenna s with more elements capture more signal If you live within 5 10Km of DTV transmission towers a combined VHF UHF antenna should be adequate Outside this area separate VHF and UHF antennas provide superior reception performance 2 a shielded diplexer that combines the separateVHF an...

Page 33: ...ad amplifier may be over boosting the antenna signal which is overloading the DTV tuner resulting in poor reception on some or all channels Please contact your local TV antenna installer Picture very infrequently breaks up on some or all channels Electrical atmospheric interference caused by local or distant lighting storms or heavy rain with wind in leafy locations may cause pictures to break up ...

Page 34: ... subject to change without notice Trademarks are the property of Koninklijke Philips Electronics N V or their respective owners 2005 Koninklijke Philips Electronics N V All rights reserved www philips com 3139 125 33781 ...

Reviews: