background image

6

EN

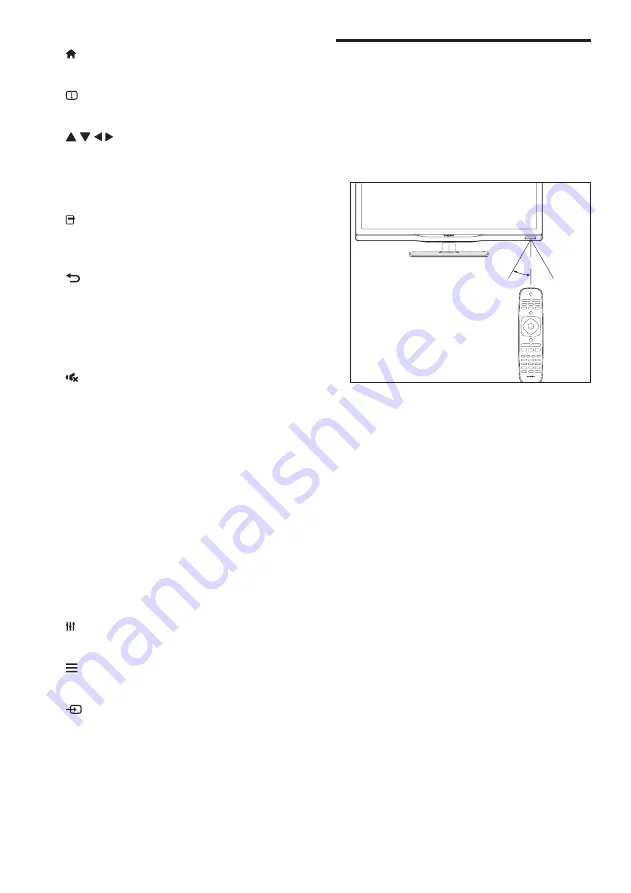
Remote control usage

When you use the remote control, hold it close 

to the TV and point it at the remote control 

sensor. Make sure that the line-of-sight between 

the remote control and TV is not blocked by 

furniture, walls or other objects.


~5m

~30˚

 (Home)

Access the home menu.

 INFO

Display information about current activity.


 (Navigation buttons)

Navigate through menus and select items.

OK

Confirm an entry or selection.

 OPTIONS

Access options for the current activity or 

selection.

 (Back)

Return to the previous menu or exit a 

function.

CH +/- (C/-)

Switch channels.

 (Mute)

Mute or restore audio.

+/- (Volume)

Adjust volume.

Color buttons

Select tasks or options.

0-9 (0-9 Numeric buttons)

Select channel.

TEXT

Enable or disable teletext.

SUBTITLE

Enable or disable subtitles.

 ADJUST

Access the setup menu.

 LIST

Access the TV channel list.

 SOURCE

Select connected devices.

Summary of Contents for 24PHA4309

Page 1: ...24PHA4309 Register your product and get support at www philips com welcome EN User manual ...

Page 2: ......

Page 3: ...15 Restoring the factory setup 15 6 Setting up channels 16 Setting up channels automatically 16 Updating channels 16 Setting channels manually 16 Renaming channels 17 7 TV connections 18 Rear connections 18 Side connections 19 Connecting to a computer 20 Use Philips EasyLink 21 8 Product information 22 Display resolutions 22 Multimedia 22 Sound power 22 Inherent resolution 22 Tuner Reception Trans...

Page 4: ...erty of their respective owners 1 Caution 2014 TPVision Europe B V All rights reserved Specifcations are subject to change without notice Trademarks are the property of Koninklijke Philips N V or their respective owners TPVision Europe B V reserves the right to change products at any time without being obliged to adjust earlier supplies accordingly The material in this manual is believed adequate ...

Page 5: ...re that no part of theTV hangs over the edge of the surface Never place theTV on tall furniture such as a bookcase without anchoring both the furniture andTV to the wall or a suitable support Educate children about the dangers of climbing on furniture to reach theTV 2 Important Read and understand all instructions before you use yourTV If damage is caused by failure to follow instructions the warr...

Page 6: ... product remote control may contain a coin type battery which can be swallowed Keep the battery out of reach of children at all times Risk of overheating Never install theTV in a confined space Always leave a space of at least 4 inches or 10 cm around theTV for ventilation Ensure curtains or other objects never cover the ventilation slots on theTV Risk of injury fire or power cord damage Never plac...

Page 7: ... TV Congratulations on your purchase and welcome to Philips To fully benefit from the support that Philips offers register yourTV at www philips com welcome Control Panel 1 2 3 a VOL Increases or decreases volume b CH Switches to the next or previous channel c Standby Switches between the On and Standby modes To completely cut off power supply the power plug must be pulled out ...

Page 8: ...on buttons Navigate through menus and select items h OK Confirm an entry or selection i OPTIONS Access options for the current activity or selection j Back Return to the previous menu or exit a function k CH Channel Switch channels l Mute Mute or restore audio m Volume Adjust volume n Color buttons Select tasks or options o 0 9 0 9 Numeric buttons Select channel p TEXT Enable or disable teletext q...

Page 9: ...Press OK or LIST 4 Use your TV This section helps you perform basicTV operations Switch TV on or off Standby indicator To switch on Plug in the power plug If the standby indicator is red press Standby On on the remote control To switch to standby Press Standby On on the remote control The standby indicator switches to red Tip Though yourTV consumes very little power when in standby mode energy con...

Page 10: ...rs 2 Press to select a channel and browse the channel list 3 Press OK to watch the selected channel 4 Press to switch to and resume the last watched channel Watch connected devices Note Switch on the device before selecting it as an external signal source Use the Source button 1 Press SOURCE The source list appears 2 Press to select a device 3 Press OK to select TheTV switches to the selected devi...

Page 11: ...s adjustments made can only be saved in personal setup Video contrast Adjusts the intensity and detail of bright areas with dark areas remaining unchanged adjustments made can only be saved in personal setup Color Adjusts the color saturation adjustments made can only be saved in personal setup Tint Adjusts the level of green this option only appears when using the NTSC standard Sharpness Adjusts ...

Page 12: ... a signal when theTV signal is not functioning Auto Sleep Sets the duration the TV may be idle before it automatically switches off Cool Bluish white tint Normal White tint Users can personalize the white tint inPCmode Warm Reddish white tint Advanced control Noise Reduction Filters and eliminates signal noise within the image Backlight Adjusts the screen brightness when the backlight brightness i...

Page 13: ...lay effect Sleep Timer Sets the duration the TV remains idle before it automatically enters standby mode Adjust the time with the sleep button on the remote control Options Off 10 20 30 60 90 120 180 minutes Does not apply in PC mode Power On Status Sets theTV s status when it is connected to an AC power supply Time Setup Sets the system time Freeze Switch Sets the channel freeze switch mode Only ...

Page 14: ...djust Automatically adjusts theTV to synchronize its resolution with that of the PC so that programs are displayed in full screen H Position Adjusts the horizontal position Use timer You can set the timer to switch theTV to standby mode at a set time Tip Before using the timer please set the sleep timer Setting the sleep timer Tip You can turn theTV off earlier or reset the sleep timer before theT...

Page 15: ...2 Press the following buttons to control photo playback or Play or pause CH or CH See the last photo or the next photo V Position Adjusts the vertical position Phase Adjusts the phase frequency of theVGA signal Clock Adjusts the clock frequency of theVGA signal Tip TheVGA menu is only visible when connected to a PC Playing media from USB devices If you have photos music or video files stored on a ...

Page 16: ...ay Start or stop playback Repeat Set the playback mode Shuffle Play the slide show in order or at random Duration Set the length of time that the slide show is played back Effect Set special effects to show during transitions between photos Show Info Displays the photo name resolution file size date and time Listening to music 1 In the USB browser select Music and press OK 2 Select a song or album ...

Page 17: ...ftware Philips constantly strives to improve its products so we recommend that you update your TV software whenever an update becomes available Please visit the website at www philips com support to find out whether there are updates available Restoring the factory setup You can restore yourTV s default picture and sound setup Saved channel setup will not be affected 1 Press ADJUST 2 Press Select ...

Page 18: ...cel them Swapping channels 1 Press ADJUST 2 Press Select TV Channels Channel Edit The Channel Edit menu will be displayed 3 Press Selectthe channel you wish to swap then press the red button 4 Press Selectthe channel you wish to swap then press the red button to confirm 6 Setting up channels This chapter explains how to reconfigure and fine tune channels Setting up channels automatically Automatic...

Page 19: ...hannel Edit The Channel Edit menu will be displayed 3 Press Select the channel you wish to rename then press the OK button 4 Press Select the channel name then press the OK button to enter the editing interface 5 Press Type the new name 6 Select Confirm then OK to finish renaming the channel Tip Channel names can include a maximum of 6 characters ...

Page 20: ...Pb Pr L AUDIO R 7 TV connections This chapter explains how to connect devices with different interfaces Note You can use different connection types to connect devices to theTV Rear connections a HDMI 1 HDMI 2 Digital audio and video input from Blu ray players and other high definition devices b PC inputs VGA and audio VGA AUDIO ...

Page 21: ...output for headphones Note TheTV speakers will automatically be muted when headphones are plugged in d AV input Video L R Y VIDEO Pb Pr L AUDIO R e SPDIF Transmit sound to digital audio signal then connected audio device can play digital audio sound SPDIF f Antenna cable TV Input for an antenna cable or satellite signal ...

Page 22: ... theTV Set the computer screen refresh rate to 60Hz Select a supported resolution on the computer Connect to the computer using one of the following connections Notes A separate audio cable is required when connecting with DVI orVGA HDMI cable DVI HDMI cable AUDIO HDMI cable and HDMI DVI adapter ...

Page 23: ...ontrolled using theTV remote control If you want to turn Philips EasyLink on you must Connect two or more HDMI CEC compatible devices using HDMI connections Confirm that each HDMI CEC compatible device is operating normally Switch to EasyLink Notes The EasyLink compatible devices must be switched on and selected as signal sources Philips does not guarantee 100 interoperability with all HDMI CEC de...

Page 24: ...les and connectors be sure to leave a clearance gap of at least 2 2 inches or 5 5cm between the back of theTV to the wall 8 Product information Product information is subject to change without notice For detailed product information please visit www philips com support Display resolutions Computer Formats Resolution refresh rate 640 x 480 60Hz 800 x 600 60Hz 1024 x 768 60Hz 1360 x 768 60Hz Video F...

Page 25: ...uctions provided with theTV mount TPVision Europe B V bears no responsibility for improper TV mounting that results in accident injury or damage Model No Required Pixel Pitch mm Required Mounting Screws 24PHA4309 75 x 75 4 x M4 recommended length 10 mm ...

Page 26: ...oo big or too small Try using a different picture format The picture position is incorrect Picture signals from some devices may not fit the screen correctly Please check the signal output of the device 9 Troubleshooting This section covers common problems and their accompanying solutions General issues The TV cannot be switched on Disconnect the power cable from the power outlet Wait for one minu...

Page 27: ...al is detected theTV automatically switches the audio output off this does not indicate malfunction Check that all cables are properly connected Check that the volume is not set to 0 Check that the sound is not muted Check that the sound settings are correctly set The pictures are showing but sound comes from one speaker only Verify that sound balance is set to the centre HDMI connection issues Th...

Page 28: ...on or serious damage to human and property During the Environmental Protection Use Period please use this product according to the instructions given in this user manual The Environmental Protection Use Period does not cover consumable parts the battery Suggestive description of the Recycling Administrative Regulations for Waste Electrical and Electronics Products In order to care and protect the ...

Page 29: ......

Page 30: ...PVision Europe B V All rights reserved Document order number Philips and the Philips shield emblem are registered trademarks of Koninklijke Philips N V and are used under license from Koninklijke Philips N V ...

Reviews: