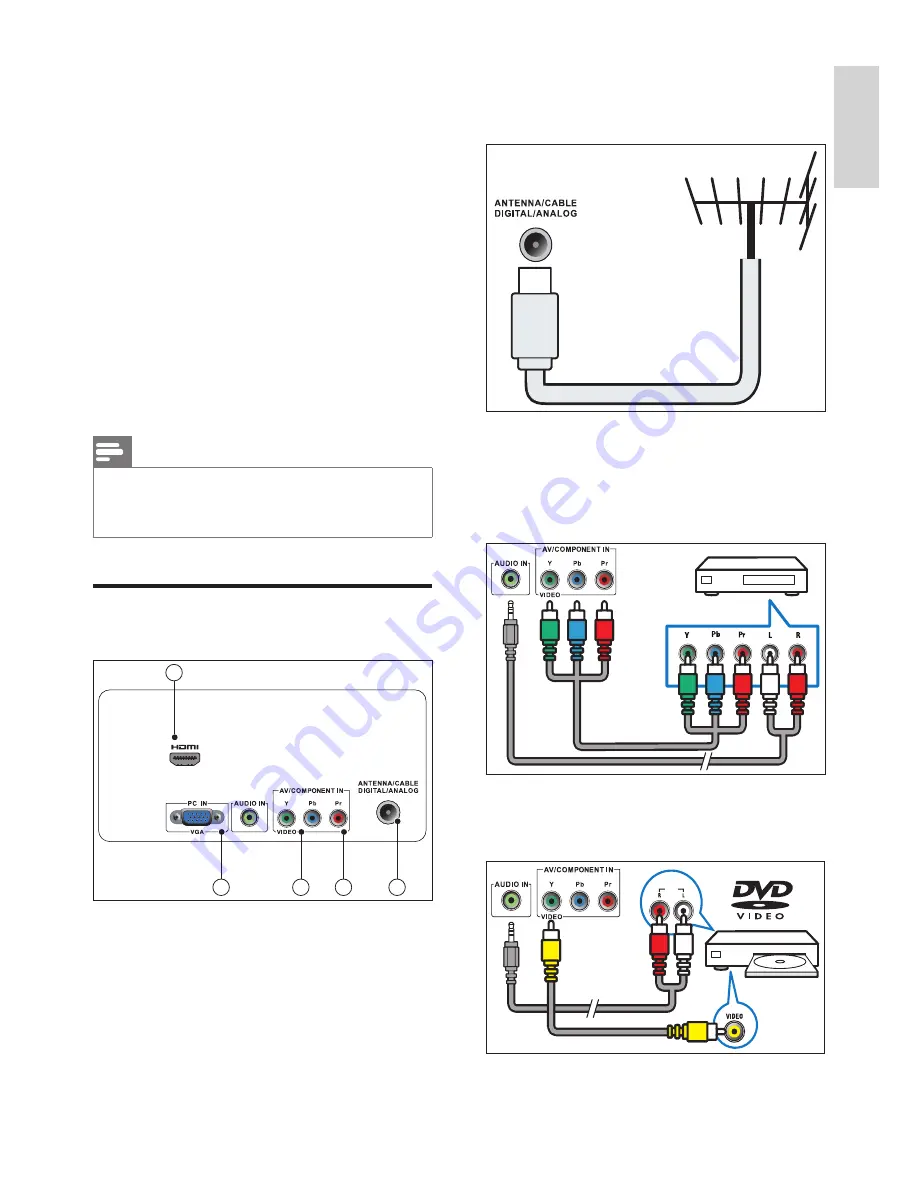
background image

5

EN

English

a

  TV ANTENNA

Signal input from an antenna, cable or 

satellite.

b

  COMPONENT INPUT (Y Pb Pr)

Analogue audio and video input from 

analogue or digital devices such as DVD 

players or game consoles.

c

  AV INPUT

Audio and video input from an AV device.

AUDIO

OUT

3  Get started and 

connect your 

devices

Congratulations on your purchase, and 

welcome to Philips! To fully benefit from the 

support that Philips offers, register your product 

at www.philips.com/welcome.

This section describes how to connect 

various devices with different connectors and 

supplements examples provided in the Quick 

Start Guide.

Note


Different types of connectors may be used to 

connect a device to your monitor, depending on 

availability and your needs.

Back connector

3

4

2

1

5

Summary of Contents for 191TV4L

Page 1: ...E ng li s h 191TV4L www philips com welcome EN Notice important information 2 User manual 5 Troubleshooting 18 ...

Page 2: ...l This information is correct at the time of press For updated information see www philips com support Country Telephone number Argentina 0800 3330 856 Brazil 0800 7254101 Register your product and get support at www philips com welcome ...

Page 3: ...Adjust monitor volume 10 6 Product information 11 Supported display resolutions 11 Tuner Reception Transmission 11 Remote control 11 Power 11 Supported monitor mounts 11 7 TV Channel installation 12 UsingTV signal as the input source 12 8 Settings 13 Adjusting Preset Setting 13 Adjust Picture Setting 13 Adjust Audio Setting 14 Feature Setup 14 9 Pixel policy 16 10 Troubleshooting 18 General monito...

Page 4: ...ies throughout the world 1 Notice 2012 Koninklijke Philips Electronics N V All rights reserved Philips and the Philips Shield Emblem are registered trademarks of Koninklijke Philips Electronics N V and are used under licence from Koninklijke Philips Electronics N V Specifications are subject to change without notice Warranty Risk of injury damage to monitor or void of warranty Never attempt to rep...

Page 5: ...e monitor use only the supplied stand Secure the stand to the monitor tightly Place the monitor on a flat level surface that can support the combined weight of the monitor and the stand When wall mounting the monitor use only a wall mount that can support the weight of the monitor Secure the wall mount to a wall that can support the combined weight of the monitor and wall mount Koninklijke Philips...

Page 6: ...re or power cord damage Never place the monitor or any objects on the power cord To easily disconnect the monitor power cord from the power outlet ensure that you have full access to the power cord at all times When you disconnect the power cord always pull the plug never the cable Disconnect the monitor from the power outlet and aerial before lightning storms During lightning storms never touch a...

Page 7: ...rted and connect your devices Congratulations on your purchase and welcome to Philips To fully benefit from the support that Philips offers register your product at www philips com welcome This section describes how to connect various devices with different connectors and supplements examples provided in the Quick Start Guide Note Different types of connectors may be used to connect a device to yo...

Page 8: ...service only d PC IN VGA and AUDIO IN Audio and video input from a computer VGA The connection viaVGA requires an additional audio cable e HDMI Digital audio and video input from high definition digital devices such as Blu ray players ...

Page 9: ... on Switch the monitor on if the monitor is in standby b SOURCE Select connected devices 4 Controls Side control buttons 1 2 3 4 a USB For service only b POWER Switch the monitor on or off The monitor is not powered off completely unless it is physically unplugged c CH Switch to the next or previous channel d VOL Increase or decrease volume ...

Page 10: ...tions Navigate through the menus h OK Confirm an entry or selection i BACK Return to the previous screen Return to the last viewed channel j P Switch to the next or previous channel k Mute Switch the sound On or Off l 0 9 Numeric buttons Select a channel or setting m Access the services of the current DTV channel n PREV CH Return to the previous screen Return to the last viewed channel o VOL Incre...

Page 11: ...P or enter a channel number using the numeric buttons on the remote control Press the CH button at the side of the monitor 5 Start to use This section helps you perform basic monitor operations Switch your monitor on off or to standby To switch on If the standby indicator is off press Power at the side of the monitor If the standby indicator is red press Standby On on the remote control To switch ...

Page 12: ...onent SOURCE 1 Press SOURCE to display the source list The source list appears 2 Press or to select a device 3 Press OK to confirm your selection Adjust monitor volume To turn up or down the volume Press VOL on the remote control Press VOL buttons at the side of the monitor To mute or restore the muted sound Press to mute the sound Press again to restore the sound ...

Page 13: ...hat results in accident injury or damage Monitor screen size inches Required pitch mm Required mounting bolts 18 5 75 x 75 4 x M4 6 Product information Product information is subject to change without notice For detailed product information go to www philips com support Supported display resolutions Computer formats Resolution refresh rate 640 x 480 60Hz 640 x 480 72Hz 640 x 480 75Hz 720 x 400 70H...

Page 14: ...omatically New channel scan Add channels which are new found Services navigation Shift through the channel services using keys P for primary channels Enable one seg Enable the display of one seg content 7 TV Channel installation This chapter describes the channel installation settings Using TV signal as the input source channels setting picture sound channels list channels and antenna back MENU se...

Page 15: ...vivid mild sport game personal advanced setup back MENU select exit 1 Press MENU 2 Press or to select picture and press 3 Press or to select one of the following options and press OK to enter Standard For standard picture settings Recommended for home entertainment Cinema For viewing film based content Most suitable for viewing in a theater like environment Vivid For Enhances picture contrast and ...

Page 16: ...arental control Set the parental control by ratings Blue Screen Set the blue screen to on or off When there s no signal received the blue screen displayed Sleep Set a preset time to turn off the TV automatically Adjust Audio Setting channels setting picture sound standard voice music theatre personal advanced setup back MENU select exit 1 Press MENU 2 Press or to select sound and press 3 Press or ...

Page 17: ...al automatically or set to HDMI or DVI for switch the signal input manually Closed caption mode Set the closed caption to off on or with mute Analog closed caption Select the analog closed captions from CC1 CC2 Digital closed caption Select the digital closed captions from Subtitle1 Subtitle8 System reset Restore all the default settings ...

Page 18: ...all panels will be free from pixel defects but Philips guarantees that any monitor with an unacceptable number of defects will be repaired or replaced under warranty This notice explains the different types of pixel defects and defines acceptable defect levels for each type In order to qualify for repair or replacement under warranty the number of pixel defects on a monitor panel must exceed these...

Page 19: ...screen when the monitor displays a light pattern These are some types of black dot defects Proximity of Pixel Defects Because pixel and sub pixels defects of the same type that are near to one another may be more noticeable Philips also specifies tolerances for the proximity of pixel defects Pixel Defect Tolerances In order to qualify for repair or replacement due to pixel defects during the warra...

Page 20: ...in your country See the listed countries on the back of the monitor Picture issues The monitor is on but there is no picture Check that the antenna is properly connected to the monitor Check that the correct device is selected as the monitor source There is sound but no picture Check that the picture settings are correctly set There is poor monitor reception from an antenna connection Check that t...

Page 21: ...If no audio signal is detected the monitor automatically switches the audio output off this does not indicate malfunction Check that all cables are properly connected Check that the volume is not set to 0 Check that the sound is not muted There is a picture but the sound quality is poor Check that the sound settings are correctly set There is a picture but sound comes from one speaker only Verify ...

Page 22: ... V All rights reserved Specifications are subject to change without notice Philips and the Philips Shield Emblem are registered trademarks of Koninklijke Philips Electronics N V and are used under license from Koninklijke Philips Electronics N V www philips com ...

Reviews: