background image

8

H

OW TO

U

SE THE

P

ICTURE

A

DJUSTMENT

C

ONTROLS

T

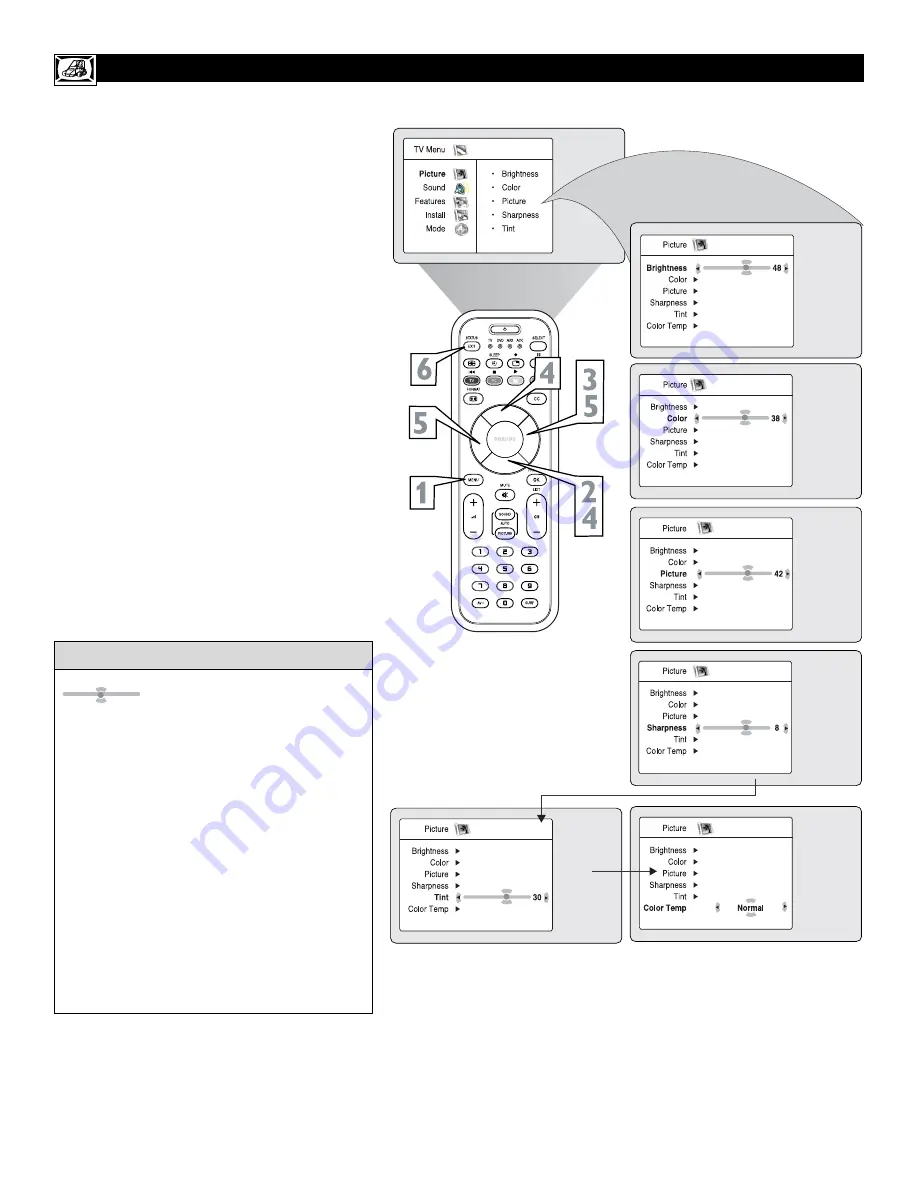
o adjust your TV picture controls, select a channel

and follow these steps.

1

Press the MENU button 

on the remote control

to show the onscreen menu. 

2

Press the CURSOR DOWN button 

to highlight

Picture.

3

Press the CURSOR RIGHT button 

to enter the

Picture menu. Brightness will be highlighted.

4

Press the CURSOR UP or CURSOR DOWN

button 

to select the picture adjustment you want

to change:  

Brightness, Color, Picture,

Sharpness, Tint, 

or

Color Temp..

5

Press the CURSOR LEFT or CURSOR

RIGHT button

to adjust the selected control. 

6

Press the STATUS/EXIT button

when finished

to remove the menu from the screen.

Remember, when the bar scale is centered

, the control settings are at normal,

mid-range levels. 

NOTE:

The Shaprness and Tint Controls will not

be available for adjustments when tuned to the

CVI  Inputs.

Brightness

– adds or subtracts light from the dark-

est part of the picture.

Color

– adds or eliminates color.

Picture

– improves the detail of the lightest parts of

the picture.

Sharpness

– improves the detail in the picture.

Tint

– adjusts the picture to obtain natural skin

tones.

Color Temp. -

offers NORMAL, COOL, or

WARM picture preferences. (Normal will keep the

whites, white; Cool will make the whites, bluish;

and Warm will make the whites, reddish.)

H

ELPFUL

H

INT

Summary of Contents for 17PF9946/37

Page 1: ... Quick Use Guide first for quick tips that make using your Philips product more enjoyable If you have read your instructions and still need assistance you may access our online help at www p4c philips com or call 1 800 531 0039 while with your product 3139 125 31971 LCD TV LCD TV Model No Serial No ...

Page 2: ...rwork will be required from you to obtain warranty service Product Safety Notification By registering your product you ll receive notification directly from the manufac turer in the rare case of a product recall or safety defect Additional Benefits of Product Ownership Registering your product guarantees that you ll receive all of the privileges to which you re entitled including special money sav...

Page 3: ...normally or exhibits a marked change in performance or E The appliance has been dropped or the enclosure damaged 17 Tilt Stability All televisions must comply with recommended international global safety standards for tilt and stability properties of its cabinet design Do not compromise these design standards by applying exces sive pull force to the front or top of the cabinet which could ulti mat...

Page 4: ...turdy base or stand Be sure the stand is strong enough to handle the weight of the LCD TV Try to leave at least 6 of space around each side of the LCD TV cabinet to allow for proper ventilation Do not place the LCD TV near a radiator or other sources of heat Do not place the LCD TV where it can be exposed to rain or excessive moisture RECYCLING PROCEDURE END OF LIFE DISPOSAL To minimize harm to th...

Page 5: ...wn finger tight 6 Plug the television in to the wall outlet and turn the TV on Refer to the TUNER and AUTOPROGRAM features on page 3 of this Quick Use Guide TUNER should be set to the CABLE option AUTOPROGRAM can be set to program all the available channels on your cable signal into the televi sion s memory CABLE TV OUTPUT INPUT b P 5 6 3 4 Direct Cable Connection Cable Box Connection Cable signal...

Page 6: ...t It does not change the other onscreen text features such as Closed Captioning CC with TV shows HELPFUL HINT TUNER MODE The Tuner Mode allows you to change the Tv s signal input to Cable Antenna or Auto Mode It s important for the TV to know what type of sig nal is connected either Antenna or Cable 1 Press the MENU button on the remote control to show the onscreen menu 2 Press the CURSOR DOWN but...

Page 7: ...uick Use Guide for making connections HELPFUL HINT CHANNEL EDIT Channel Edit makes it easy for you to add or delete channels from the list of channels stored in the TV s memory 1 Press the MENU button on the remote control to show the onscreen menu 2 Press the CURSOR DOWN button repeatedly until Install is highlighted 3 Press the CURSOR RIGHT button to enter the Install menu Language will be highl...

Page 8: ... the selected control 6 Press the STATUS EXIT button when finished to remove the menu from the screen Remember when the bar scale is centered the control settings are at normal mid range levels NOTE The Shaprness and Tint Controls will not be available for adjustments when tuned to the CVI Inputs Brightness adds or subtracts light from the dark est part of the picture Color adds or eliminates colo...

Page 9: ... Press the STATUS EXIT button when finished to remove the menu from the screen Equalizer adjusts the sound tones Select 120Hz to 10KHz Balance adjusts the level of sound coming from the left and right speakers AVL Auto Volume Leveler when On AVL will level out the sound being heard when sud den changes in volume occur during commer cial breaks or channel changes Dolby Virtual adds greater depth an...

Page 10: ...to toggle the AM and PM setting Start Time Use the numbered buttons to enter the time you want the TV to turn itself On Use the CURSOR RIGHT and CURSOR LEFT buttons to toggle the AM and PM setting Stop Time Use the numbered buttons to enter the time you want the TV to turn itself Off Use the CURSOR RIGHT and CURSOR LEFT buttons to toggle the AM and PM setting Program No Use the NUMBERED but tons o...

Page 11: ... It contains one or more of the fol lowing violence sexual situations coarse language or suggestive dialogue R Restricted This programming is specifi cally designed for adults Anyone under the age of 17 should view this programming only with an accompanying parent or adult guardian It contains one or more of the fol lowing intense violence intense sexual situ ations strong coarse language or inten...

Page 12: ...ar When Correct appears the AutoLock menu is accessible and you can proceed to change the access code 7 Press the CURSOR DOWN button to highlight Change Code 8 Press the CURSOR RIGHT button to enter the Change Code menu Enter New Code will appear Enter a new four digit code using the number but tons Confirm Code will appear on the screen 9 Using the numbered buttons re enter your new four digit co...

Page 13: ...ou can choose to block individual channels or all channels at the same time For individual channels press the CURSOR RIGHT to enter the Lock Channel menu 8 Using the numbered buttons or the CH or CH buttons enter the chan nel you wish to lock Repeat step 8 for any channels you want to lock 9 To block all channels press the CUR SOR DOWN button until Block All is selected Press the CURSOR RIGHT butt...

Page 14: ...screen and the AutoLock menu will be accessible 7 Press the CURSOR DOWN button to select Lock HD 8 Press the CURSOR RIGHT button to select On to activate the blocking of the HD channel 9 Press the STATUS EXIT button to remove the menu from the screen If a channel is blocked by the Block Channel or Block All option the TV will display the screen shown above To watch the selected blocked channel or ...

Page 15: ...ol 5 Press the CURSOR RIGHT button again to highlight Access Code 6 Enter your four digit Access Code Correct will briefly appear on the screen and the AutoLock menu will be accessible 7 Press the CURSOR RIGHT button to enter the AutoLock menu 8 Press the CURSOR DOWN button to select Clear All Clear will appear on the screen 9 Press the CURSOR RIGHT button to activate the clearing of all channels ...

Page 16: ...t Access Code 6 Enter your four digit Access Code Correct will flash very briefly and the menu will move to the left with the AutoLock menu now accessible 7 Press the CURSOR RIGHT button to display the AutoLock menu 8 Press the CURSOR DOWN repeated ly until Movie Rating is highlighted 9 Press the CURSOR RIGHT button and the Rating menu shifts to the left with G highlighted Press the CURSOR UP or D...

Page 17: ... menu now accessible 7 Press the CURSOR RIGHT button to display the AutoLock menu 8 Press the CURSOR DOWN button repeatedly until TV Rating is high lighted 9 Press the CURSOR RIGHT button to enter the TV RATING menu Press the CURSOR UP or DOWN to select a desired rating TV Y TV Y7 TV G TV PG TV 14 or TV MA Press the CURSOR RIGHT or LEFT to turn the block on the rating On or Off NOTE More specific ...

Page 18: ...dly until Block Options is high lighted 9 Press the CURSOR RIGHT button to enter the Block Options menu Press the CURSOR UP or DOWN buttons to select the desired block option Blocking Might be called the master switch for AutoLock When On ALL blocking censoring will take place When Off ALL blocking is disabled Block Unrated ALL unrated programs based on the Movie Ratings or Parental TV Guidelines ...

Page 19: ...e blocked subratings will not appear in the review The subratings however are still blocked according to your selections 2 After a few seconds the settings will leave the screen automatically or you can press the STATUS EXIT button a third time to remove them from the screen The AutoLock status screen will only appear if the Block option is set to On See previous page for details AutoLock is set t...

Page 20: ...st control is highlighted 5 Press the CURSOR RIGHT or LEFT to tog gle the On or Off option 6 Press the STATUS EXIT button to remove the menu from the screen Tne DNR Dynamic Noise Reduction function helps to diminish signal noise in the picture or what is known as speckled picture 1 Press the MENU button on the remote control to show the on screen menu 2 Press the CURSOR DOWN to highlight Features ...

Page 21: ...IGHT buttonto select the available PIP Size options including Off On Small Medium Large or Side by Side 7 Press the CURSOR DOWN button to high light Horizontal 8 Press the CURSOR LEFT or CURSOR RIGHT button to move the PIP screen hori zontally to the desired position 9 If you want to move the PIP screen vertically press the CURSOR DOWN button to high light Vertical Press the CURSOR LEFT or CURSOR ...

Page 22: ...URSOR RIGHT to access the Mode menu 4 Press the CURSOR DOWN button until the desired Mode TV FM Radio PC or HD is highlighted 5 After you have highlighted the desired mode press the CURSOR RIGHT button to enter the selected Mode NOTE You can also press the dedicated button on the remote control to change the Mode You can change the screen format size to match the type of program you re watching Se...

Page 23: ... ever fallen asleep in front of the TV only to have it wake you up at two in the morning with a test pattern sound screeching in your ears Well your TV can enable you to avoid that discomfort by automat ically turning itself off With the Sleeptimer feature ou can set a timer to automatically switch the TV off after a period of time you choose 15 minute increments up to 60 minutes then 30 minute in...

Page 24: ... the CURSOR UP or DOWN buttons to scroll the list of channel highlighting the one you want to acti vate 3 Press the CURSOR RIGHT button to activate the channel The TV will tune to that channel 4 Press the STATUS EXIT button to remove the menu from the screen The Active Control monitors and adjusts incoming video signals to help provide the best picture quality When you choose to turn the Active Co...

Page 25: ...f the current channel will be shown with ADD to the right 3 While the SURF list message or the SURF channel list appears on the screen press the CURSOR RIGHT button to add the present channel to the SURF list 4 If you want to delete the present channel from the SURF list press the CURSOR RIGHT button again Repeat steps 1 through 3 to add more chan nels up to 10 to the SURF list Along with regularl...

Page 26: ...re options within the onscreen menu are the same This is the only option in AutoPictureTM that can be changed To adjust these settings use the Pictureoptions within the onscreen menu All other settings are set up at the factory during production and cannot be adjusted AutoSound allows you to select from three factory set controls and a personal control that you set according to your own preference...

Page 27: ...e and press the POWER button Does the remote turn the device ON If YES stop and try other function buttons on the remote If they also work the device then the remote is ready and no further steps are needed If NO continue 3 First look up a FOUR DIGIT remote control number for your brand of Device before going through the simple steps on the following page Find your Four Digit Code on pages 30 32 I...

Page 28: ... your desired device The remote is now ready to send commands to the unit 5 Point the remote at the Device Press the POWER button on the remote to turn the unit ON If this works you are finished If it does not work the first time repeat the steps using a different remote code number After a second try and the remote does not operate your device see if there is another four digit code number pages ...

Page 29: ... AUTO SOUND buttons simultaneously and hold them down The remote will con tinue to send programming codes one ever 1 5 seconds 4 The device will begin to change chan nels after the remote identifies the cor rect code When the channels start to change release the RECORD and AUTO SOUND buttons The remote should be ready to operate the device This method can take several minutes to per form Don t let...

Page 30: ...tz 2005 2021 2037 2057 Granada 2025 2035 2037 Grandin 2001 2017 2034 Grundig 2003 2005 2007 2010 2034 2035 2048 2050 2054 2069 2071 2075 Hanseatic 2017 Harley Davidson 2001 Harman Kardon 2018 2035 Harwood 2034 HCM 2034 Headquarter 2025 Hinari 2004 2034 2057 2072 Hi Q 2026 Hitachi 2001 2004 2021 2022 2043 2057 Hughes Network Systems 2022 Hypson 2034 Imperial 2001 Ingersol 2004 Interfunk 2035 ITT 20...

Page 31: ... Telefunken 2021 2047 2058 2064 2074 Tenosal 2034 Tensai 2001 2066 Thomas 2001 Thomson 2021 2064 2074 Thorn 2016 2021 2037 TMK 2051 2057 Toshiba 2021 2023 2024 2035 2074 Totelevision 2017 2057 Towada 2066 Uher 2057 Unitech 2057 Universum 2001 2006 2010 2017 2035 2038 2048 2057 2067 Vector 2024 Vector Research 2018 2020 Victor 2008 2021 2033 Video Concepts 2020 2024 Videosonic 2057 Wards 2001 2015 ...

Page 32: ... 4008 4010 4048 G sat 4009 Hinari 4009 Hirschimann 4008 4032 4039 4040 4049 Hitachi 4037 Houston 4053 Huth 4013 4015 4019 4026 Intervision 4050 Invideo 4061 ITT 4005 Johansson 4022 JVC 4048 Kathrein 4004 4006 4008 4011 4035 4041 Kreiselmeyer 4008 Kyostar 4034 La Sat 4043 4045 Lenco 4034 Lennox 4050 Lupus 4030 Luxor 4005 4049 Manhattan 4037 4045 4050 Marantz 4011 Maspro 4004 4023 Matsui 4024 4048 M...

Page 33: ...er entries in certain onscreen menu feature settings SELECT BUTTON Select the correct mode to send remote commands to the accessory device A light will appear above the selected mode PAUSE BUTTON II Press to temporarily stop the tape dur ing a playback or recording or pause the playback of a DVD Press again to release Pause FAST FORWARD BUTTON Press to rapidly advance a tape or DVD For some access...

Page 34: ...screen menu from the TV screen when fin ished Or let the display time out and the menu will disappear after a few seconds SETTING UP THE FM MODE FM RADIO INSTALL CONTROLS The Mode options allow you to move to other operating modes within the TV When in the FM Radio Mode choose from TV PC or HD Modes 1 If in the FM Radio mode press the MENU but ton on the remote control to display the FM Radio Mode...

Page 35: ...OR RIGHT buttons to toggle the AM and PM setting Start Time Use the numbered buttons to enter the time you want the TV to turn itself On Use the CURSOR RIGHT and CURSOR LEFT buttons to toggle the AM and PM setting Stop Time Use the numbered buttons to enter the time you want the TV to turn itself Off Use the CURSOR RIGHT and CURSOR LEFT buttons to toggle the AM and PM setting Program No Use the NU...

Page 36: ...o when the signal is being received in mono STEREO Select Stereo or Mono If the signal is being received in Mono the control cannot be placed in Stereo AUDIO OUT When using an external stereo for sound reproduction the Audio Out control will allow FIXED or VARI ABLE output options SPEAKERS When using an external speaker system the Speaker control will allow you to turn the TV speakers ON or OFF 5 ...

Page 37: ...sing in one place for a brief moment 6 Press the STATUS EXIT button to remove the onscreen menu from the TV screen when finished Or let the display time out and the menu will disappear after a few second SCREENSAVER CONTROL AutoSound allows you to select from four factory set controls and a personal control that you set according to your own preferences through the onscreen Sound menu within the F...

Page 38: ...picture Select from Normal Cool or Warm 4 Once you have highlighted a selection press the CURSOR LEFT or CURSOR RIGHT button to navigate adjust or activate the specific controls 5 Press the STATUS EXIT button to remove the onscreen menu from the TV screen when finished PC AUDIO SELECTION This TV lets you choose the sound that is heard while in PC Mode You can select TV PC or FM Radio For example y...

Page 39: ... vertical interfer ing lines Format choose between Full Screen and the original format Native of the PC screen PIP call up a PIP window for the TV HD or FM Radio refer to page 40 for additional details Auto Adjustment automatically adjusts the control based on the signal being received to give the best possible picture 5 Press the CURSOR LEFT or CUR SOR RIGHT button to make the desired adjustments...

Page 40: ...on repeatedly to highlight PIP 3 Press the CURSOR RIGHT button to access the PIP menu 4 Press the CURSOR LEFT or CUR SOR RIGHT buttons to select the PIP Size options Off On Small Medium Large or Side by Side 5 If you want to move the PIP screen horizontally press the CURSOR DOWN button again to highlight Horizontal 6 Press the CURSOR LEFT or CUR SOR RIGHT buttons to move the pic ture horizontally ...

Page 41: ...nscreen menu The PIC TURE option will be highlighted 2 Press the CURSOR UP or DOWN buttons until MODE is highlighted 3 Press the CURSOR RIGHT button to access the Mode menu 4 Press the CURSOR UP or DOWN buttons to select the desired mode Choose from Choose from TV FM RADIO or PC 5 Press the CURSOR RIGHT button to activate the highlighted mode control HD SELECT CONTROL SETTING UP THE HD MODE HIGH D...

Page 42: ... detail in the picture TINT This control adjusts the picture to obtain natural skin tones COLOR TEMP Choose from NOR MAL keeps whites white COOL makes whites bluish or WARM makes whites reddish picture prefer ences VIEW FORMAT Choose between the FULL SCREEN or WIDE SCREEN formats 6 Press the CURSOR RIGHT or LEFT buttons to adjust the selected control 7 Press the STATUS EXIT button to remove the on...

Page 43: ...ight any of the HD Mode Sound Controls Choose from EQUALIZER BALANCE or AVL EQUALIZER Allows the listener to change the sound frequencies to their liking BALANCE This controls the sound level balance between the right and left TV speakers AVL Automatic Volume Leveler when ON will keep the volume level at a con sistent level should there be sudden peaks and valleys in sound levels during commercial...

Page 44: ...OWN buttons until BLOCK CHANNEL is highlight ed 4 Press the NUMBERED buttons and enter your four digit Access Code that was setup for the TV AutoLock feature The Block Channel Control will be available for adjustment 5 Press the CURSOR RIGHT button to toggle the control ON or OFF If set to ON the HD1 channel mode will not allow viewing of programs This control would have to be set to OFF to make t...

Page 45: ...y Produces MONO Sound If using a cable box with RF only type connections the signal coming from the cable box will be produced in MONO only Check Sound control setting Change setting to Stereo Remote Does Not Work Check the batteries If necessary replace them with AA Heavy Duty Zinc Chloride or Alkaline batteries Clean the remote control and the remote control sensor win dow on the TV Check the TV...

Page 46: ...e Stock market tickers presented at the bottom of the TV screen Shopping channel logos and pricing displays bright and shown constantly or repeatedly in the same location on the TV screen PLACEMENT OF THE TV To avoid cabinet warping cabinet color changes and increased chance of set failure do not place the TV where temperatures can become excessively hot for example in direct sunlight or near a he...

Page 47: ...ntrols Active Control 24 Audio Out Control 9 AutoLock Controls Access Code 12 Block Channels 13 Blocking Options 18 Clear All Locked Channels 15 Lock HD Channel 14 Movie Ratings 16 Review Screen 18 TV Ratings 17 Understanding the AutoLock Control 12 AutoSound Control 26 Auto Program Control 7 AutoPicture Control 26 AVL Auto Volume Leveler Control 9 Balance Control 9 Channel Edit Add or Delete Chan...

Page 48: ...en improp erly packaged or cost associated with packaging Product lost in shipment and no signature verification of receipt can be provided A product used for commercial or institutional purposes including but not limited to rental purposes Products sold AS IS or RENEWED CARRY IN SHIP IN WARRANTY For Carry In warranty repair take the product to a Philips authorized service center for repair When t...

Reviews: