


Guida rapida PA L 1
04/2020
8/12
086050010
it
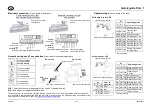
Collegamento elettrico:
(scheda nella parte inf eriore del segnalatore acustico)
Impostazioni della segnalazione visiva
(scheda nella calotta)
Collegamento congiunto di luci f lash e segnala-
zione acustica (alla consegna)
Collegamento separato di luci
f lash e segnalazione acustica
con LED monocolore
Connettore della
scheda della luce flash
Connettore della scheda
della luce flash
Controllo dell’intensità
della luce
Selezione della
modalità operativa
S1
Modalità operativa
1
2
3
OFF OFF OFF Luce flash 1 Hz
*
OFF OFF ON Luce flash
0,75 Hz
OFF ON OFF Luce continua
OFF ON ON
Luce intermittente
1 Hz
ON OFF OFF Luce flash
2 Hz
ON OFF ON Luce intermittente 2 Hz
ON ON OFF Luce flash
0,1 Hz
ON ON ON Luce flash
0,5 Hz
OFF OFF ON
Modalità doppio flash
DFM (opzione)
*
Impostazione di fabbrica
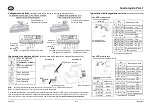
Selezione
esterna dei
toni
(polarità: v.
S1B
)
Collegamento tensione operativa
Selezione
esterna dei
toni
(polarità: v.
S1B
)
Collegamento tensione opera-
tiva segnalatore acustico
Collegamento tensione
operativa luce flash
Impostazioni e selezione dei toni
(scheda nella parte superiore del segnalatore acustico)
con LED multicolore
Diodo non bypassato
Polarità negativa
Impostazione di fabbri-
ca
Diodo non bypassato
Polarità positiva
Diodo bypassato
Polarità negativa
Diodo bypassato
Polarità positiva
Versione cc
Versione ca
Controllo dell’intensità della luce
Selezione della modalità
operativa
S1
Assegnazio-
ne colori
4
5
6
OFF
OFF OFF
Rosso *
OFF ON
Blu
ON OFF
Verde
ON ON
Giallo
S1
Modalità operativa
1
2
3
OFF OFF OFF Luce flash 1 Hz
*
OFF OFF ON Luce flash 0,75 Hz
OFF ON OFF Luce continua
OFF ON ON
Luce intermittente
1 Hz
ON OFF OFF Luce flash 2 Hz
ON OFF ON
Luce intermittente
2 Hz
ON ON OFF Luce flash 0,1 Hz
ON ON ON Luce flash 0,5 Hz
OFF OFF ON
Modalità doppio
flash DFM (opzione)
*
Impostazione di fabbrica
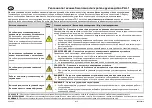
Regolazione volume
S3
Selettore toni
S3
Selettore toni
S1B:
selezione della polarità della tensione di comando per C1 e C2 (controllo esterno)
S1A:
diodo di protezione contro l’inversione di polarità bypassato
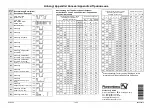
È possibile selezionare il tono desiderato mediante l’apposito interruttore
S3
. Il tono viene emesso una volta atti-
vata la tensione di alimentazione. La tabella toni allegata riporta l'elenco completo di tutti i toni. Per il controllo
esterno di altri toni
, fare riferimento al manuale d’uso in formato digitale: www.pfannenberg.com/manuals
S1B
S1A
S3