7
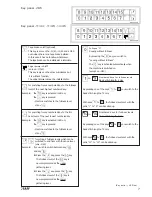
Key panel -2/45
(Key activ = LED on)
Key panel -11/43; -11/45; -13/45
Tape brake
on/off (optional)
This key is also on the -11/43, -11/45 and -13/45
even when there is no tape brake installed.
In this case it has no function whatsoever.
The tape brake can be installed at a later date.
Fullness 0
Sewing without fullness
By pressing the
key you switch to
“sewing without fullness”.
The
key is activated automatically when
the machine is switched on.
(except on -2/45)
Numbered keys for fullness levels
Basic stitch length: 4 mm
By pressing one of the keys
to
you switch to the
basic stitch length of 4 mm.
With keys
to
, the fullness levels set with the
potis “1” to “9” can be called up.
to
Numbered keys for fullness levels
Basic stitch length: 3 mm
By pressing one of the keys
to
you switch to the
basic stitch length of 4 mm.
With keys
to
, the fullness levels set with the
potis “10” to “15” can be called up.
to
Edge trimmer
on/off
(only on -13/45)
This key is also on the other sub-classes but
it is without function.
The edge trimmer cannot be installed later.
for setting 2 fullness levels which can be
switched to and from with the knee lever.
(only -2/45)
Example:
if you wish to switch between key
and key
.
l
Press the
key, press the
key
-
The fullness level of the
key is
now programmed as the upper
gathering level.
l
Press the
key, press the
key
-
The fullness level of the
key is
now programmed as the lower
gathering level.
for switching from a numbered key to the full-
ness level of the
next lowest
numbered key.
Example:
the
key is activated (LED on)
the
key is pressed
- Machine switches to the fullness level
of key
for switching from a numbered key to the full-ness
level of the
next highest
numbered key.
Example:
the
key is activated (LED on)
the
key is pressed
- Machine switches to the fullness level
of key
Bi02-02.CDR
Bi02-03.CDR
Summary of Contents for 3811-11/43
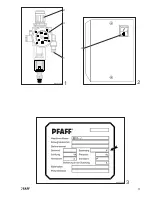
Page 9: ...9 1 1 2 3 1 Bi34 01 CDR 2 4 3 Bi03 03 CDR ...
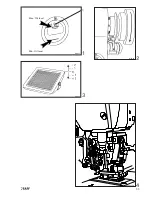
Page 11: ...11 4 1 Min Oil level Max Oil level 1 2 Bi08 01 Bi18 05 Bi08 04 CDR Bi02 01 3 ...
Page 13: ...13 3 2 1 4 1 Bi11 01 CDR 2 3 Bi11 02 Bi11 04 Bi11 03 ca 7cm ...
Page 15: ...15 2 Bi12 02 CDR Bi12 03 CDR 3 6 1 2 4 5 1 3 Bi12 01 CDR ...
Page 17: ...17 4 Bi14 04 5 Bi14 05 Schematic diagram 7 6 Bi14 03 3 6 4 5 7 4 7 5 0 8mm Bi14 02 CDR 2 3 ...
Page 19: ...19 Bi01 01 1 1 2 Bi16 02 CDR 11mm Bi14 03 3 1 2 ...
Page 21: ...21 5 Bi17 03 CDR 3 4 Bi17 04 CDR 2 Bi17 03 3 4 4 Bi17 05x CDR 5 ...
Page 27: ...27 18 Bi17 18 CDR 19 2x 18 17 20 2x 20 Bi17 20 CDR 17 19 2x 18 20 2x 19 Bi01 01 1 ...
Page 31: ...31 Bi18 16 Bi18 05 4 1 4 Bi01 01 16 5mm Bi18 17 CDR 3 2 2 1 3 1 2 ...
Page 39: ...39 Bi14 03 1 Bi14 03B 7mm 2 3 4 2 3 1 9 8 7 11 5 Bi20 03 CDR 10 10 5 1 6 ...
Page 43: ...43 1 Bi01 01 1 3 Bi17 20 CDR Bi20 02 CDR 1 2 1 2 2x ...
Page 49: ...49 Bi21 15 CDR 14 15 Bi21 16 CDR 16 Part No 08 880 137 00 Bi21 17 17 Bi17 04 CDR 20 21 2x ...
Page 51: ...51 Bi21 18 CDR 18 1 0 1 2mm Bi14 03 22 23 20 19 Bi21 19 CDR 0 1mm Hook ...
Page 53: ...53 Bi22 21 CDR Bi21 11 2 1 2 1 1 Bi01 01 3 3 Bi22 04 CDR 4 Bi22 05 5 6 Bi22 06 3 4 6 7 5 ...
Page 55: ...55 Bi24 01 CDR 1 2 Bi22 06 2 1 1 4 3 5 2 Bi24 04 CDR 0 3 0 5mm 3 4 1 ...
Page 57: ...57 0 3mm Bi25 01 1 1 2 Bi26 01 Bi26 02 2 3 3 1 3 4 Bi27 01 4 5 ...
Page 59: ...59 Bi29 04 CDR 5 4 1 3 4 Bi29 03 CDR 8mm 3 Bi28 01 1 1 2 5 4 3 6 Bi01 01 1 2 29mm ...
Page 63: ...63 7 6 5 Tastenfeld von 11 43 11 45 13 45 Bi31 02 CDR Bi19 04 CDR ...
Page 69: ...69 1 Bi33 01 CDR 3 1 2 4 Tastenfeld 11 43 11 45 13 45 2 Bi02 03 CDR ...

