3.
Brake Systems
A
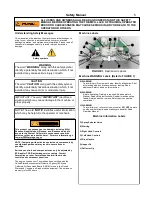
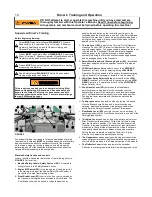
Front Brake System.
Components: Brake Lever with Lock, Front Brake Cable 1,
Front Brake Cable 2, Band Brake, Brake Drum, Band Tension
Spring, Sheath Brake pin, Rod Brake pin, 1 washer, Lock Nut.
Park a fully loaded machine on level ground free from
obstructions and bystanders. Start engine.
While in
NEUTRAL
, push the machine forward. No unusual
drag should be felt.
Pull and release the Front Brake Lever several times.
Ensure that the lever operates smoothly and snaps back
completely when released. The operating force on the
Lever must not exceed
25 POUNDS
of force.
Shift into
HIGH GEAR
, accelerate to full speed, and pull
the Front Brake Lever. Confirm that
the machine stops smoothly in less than
8 FEET
and the
Brake does not lock up. Brake band must not over
heat
nor cause unusual drag.
B
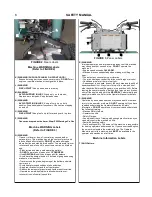
Rear Brake System. Components: Brake
Lever with Lock, Rear Brake Cable, Band Brake (2), Brake
Drum (2), Band Tension Spring (2), Sheath Brake pin (2), Rod
Brake pin (2), washer (2), Lock Nut (2).
Pull and release the Rear Brake Lever several times.
Confirm that the lever operates smoothly and snaps back
completely when released. The operating force on the Lever
must not exceed
25 POUNDS
of force.
While in
NEUTRAL
, push the machine forward. No unusual
drag should be felt. Shift into
HIGH GEAR
, accelerate to full
speed, and pull Rear Brake Lever.
Confirm that the machine stops smoothly in less than
8
FEET
. Confirm that both Brakes drag equally without
causing a change of course, left or right. Brake band must
not over heat nor cause unusual drag.
C Both Front and Rear Brake Systems
Shift into
HIGH GEAR
, accelerate to full ground speed and
pull both brake levers. Confirm that the machine stops in less
that the length of the machine.
D Parking Brake System. Components: Front
Brake System and Rear Brake System.
Drive the fully loaded machine up a
17 DEGREE
slope, stop
and lock both Brake Levers. Confirm that
brakes hold the machine in place.
Drive the fully loaded machine down a
17 DEGREE
slope,
stop and lock both Brake Levers. Confirm
that the brakes hold the machine in place.
4
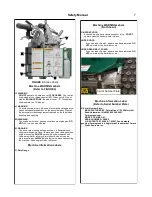
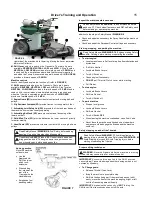
SmartSteer Brake Assist Steering.
Components: SmartSteer Handle Assembly, Steering Brake
Cable (2), Band Brake (2), Brake Drum (2), Sheath Brake pin
(2), Rod Brake pin, Cable (2), Lock Nut (4),.
Park the fully loaded machine on level ground free from
obstructions and bystanders. Start engine.
Check right and left Steering Cable condition. Confirm that
both cables are tight.
Check SmartSteer Handle assembly by moving the Handles
in opposite directions. Make sure Handles
move smoothly and only in opposite directions of each other
with minimal free play and that Rubber Mounts are intact.
Shift into
HIGH GEAR
and drive straight forward..
Confirm that the machine travels in a straight line without
pulling right or left and no unusual noise is detected.
Shift into
HIGH GEAR
and maneuver through a series of
lock-to-lock figure eights. Confirm that
the machine steers out of the turns with no more than
30
POUNDS
of force required and the Brake Band
temperature does not exceed
115 DEGREES
Fahrenheit
(46 degrees Celsius), and that the machine does not make
any unusual noises.
Phase X: Additional Service Training
Trainee should be instructed on any additional service he will be
required to perform on the Triumph such as, changing Engine and
Clutch oil, greasing, etc. Refer to Service Manual for scheduled
service requirements and details.
Phase IX: Loading and unloading the machine on a Transport.
Trainee must be instructed how to safely load and unload the
Triumph from a transporting vehicle.
Read Safety Manual
WARNING 16
, Transporting before
attempting to load or unload the Triumph from a transport.
Phase XI: Testing Safety Devices.
If any Safety Device fails a test, adjust, repair or replace the
component before operating the machine.
1.
Throttle/Clutch/ Operator Presence Control
Components: Throttle Lever, Throttle Cable, Auxiliary Throttle
Return Spring, Multifunction Display (Tachometer), Drive Belt,
Idler Pulley, Idler Tension Spring, Transaxle, Honda Engine
and components: Honda carburetor and linkage, Honda
Governor Spring, Honda Throttle Spring, Honda Throttle
Return Spring, and Honda Clutch. All components must be in
place and functioning normally.
Park on level ground free from obstructions and bystanders.
Lock both Brake Levers.
Pull and release Throttle Lever several times. Ensure
that the lever moves smoothly and easily and snaps back
when released.
Start engine and verify that the engine speed increases and
decreases rapidly and the clutch engages and disengages
quickly.
Engine idle. Ensure the engine idles
smoothly without dying and the idle speed on the
Multifunction Display does not exceed
1650 RPM
.
Engine Top end speed. Pull and hold Throttle/Clutch Lever.
Confirm that the top end speed is
3450 RPM
.
Clutch engagement. Shift into
LOW GEAR
and gradually
accelerate engine. Confirm that the
machine does not move when shifted, or creep at Idle
speed. The Clutch shall engage smoothly as the engine is
accelerated and propel the machine forward at
3.5 MPH
at
full acceleration. No unusual noise should be detected.
2.
Neutral Safety Switch System (NSSS)
Components: NSSS Module, Kill Switch, Neutral Switch, Honda Kill
Wire, Ground wire, Wire Harness and terminals.
Park on level ground free from obstructions and
bystanders .
Lock both Brake Levers, shift into
NEUTRAL
and start
engine.
Turn Engine off with Kill Switch.
Confirm that the engine starts and Kill Switch works.
Shift into LOW GEAR and repeat the previous test.
Confirm that the engine does not start in gear.
Read Safety Manual
WARNING 19
, Maintenance and Service
before starting or operating the Triumph.
Read Safety Manual
WARNING 5
, Safety Devices before
starting or operating the Triumph.
Driver’s Training and Operation
18


