


72 .
RamanMicro 300 Getting Started Guide
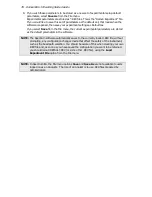
Figure 24 Adjusting the height of the motorized stage
5.
Manually move the stage down so that you can replace the objective nosepiece.
6.
Replace the objective nosepiece, and then select the longest objective.
7.
Carefully, move the stage up manually until it is at the highest position possible without
the sample touching the objective.
CAUTION
Be very careful not to touch the objective.
NOTE: When using long working-distance objectives (for example, Long Working Distance
Objective Lens Kit, L1323347), the working distance depends on the objective
(usually, 2–10 mm). Set the highest position of the stage to approximately 2 mm
below the objective.
8.
Re-secure the hexagonal fixing screw to fix the height of the stage.
9.
Ensure the instrument is switched on by following SOP-1.
10.
Open the Scan and Instrument Setup dialog, and select the Set-up tab.
11.
Click Stage Control.
12.
Click Reset Stage, and then follow the prompts on-screen.
You will need to repeat this process every time you adjust or install the stage.
Position of
fixing screw
Summary of Contents for RamanMicro 300 Series
Page 1: ...RamanMicro 300 Series Getting Started Guide MOLECULAR SPECTROSCOPY...
Page 5: ...Introduction...
Page 10: ...10 RamanMicro 300 Getting Started Guide...
Page 11: ...Safety Practices...
Page 21: ...Raman History Theory and Instrumentation...
Page 29: ...Preparing Your Facility...
Page 35: ...Installing Your RamanMicro 300...
Page 68: ...68 RamanMicro 300 Getting Started Guide...
Page 69: ...Using the RamanMicro 300...
Page 90: ...90 RamanMicro 300 Getting Started Guide...


