background image

Page 16

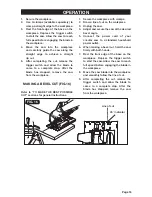
FIG. 16

Line of cut

45° indicator

OPERATION

1.  Secure the workpiece.
2.  Use C-clamps (available separately) to 

clamp a straight edge to the workpiece.

3.  Rest the front edge of the base on the 

workpiece. Depress the trigger switch 
to start the saw. Allow the saw to reach 
full speed before engaging the blade in 
the workpiece.

4.  Move the saw into the workplace 

and carefully guide the saw along the 
straight edge to achieve a straight 


rip cut.

5.  After completing the cut, release the 

trigger switch and allow the blade to 
come to a complete stop. After the 
blade has stopped, remove the saw 
from the workpiece.

MAKING A BEVEL CUT (FIG.16)

Refer to “TO MAKE THE BEST POSSIBLE 
CUT” sections for general instructions.

1.  Secure the workpiece with clamps.
2.  Draw a line of cut on the workpiece.
3.  Unplug the saw.
4.  Adjust and secure the saw at the desired 

bevel angle.

5. Connect the power cord of your 

circular saw to a standard household  
power outlet.

6.  When making a bevel cut, hold the saw 

firmly with both hands.

7.  Rest the front edge of the base on the 

workpiece. Depress the trigger switch 
to start the saw. Allow the saw to reach 
full speed before engaging the blade in 
the workpiece.

8.  Move the saw blade into the workpiece 

and smoothly follow the line of cut.

9.  After completing the cut, release the 

trigger switch and allow the blade to 
come to a complete stop. After the 
blade has stopped, remove the saw 
from the workpiece.
Summary of Contents for 241-0987

Page 1: ...ents technical assistance or repair parts Please Call Toll Free 1 866 858 2664 M F 8 30am 5 00pm Est OPERATOR S MANUAL CAUTION To Reduce The Risk Of Injury User Must Read And Understand Operator s Manual Save These Instructions For Future Reference ...

Page 2: ...TABLE OF CONTENTS Safety Symbols Page 2 Safety Instructions Page 3 Overview Page 8 Specifications Page 9 Assembly Page 9 Operation Page 10 Maintenance Page 17 Troubleshooting Page 17 Warranty Page 18 ...

Page 3: ...s II construction Double insulated construction min Per minute Revolutions strokes surface speed orbits etc per minute Wear safety goggles WARNING The operation of any power tool can result in foreign objects being thrown into your eyes which can result in severe eye damage Before beginning power tool operation always wear safety goggles or safety glasses with side shields and a full face shield w...

Page 4: ...re using this tool Failure to following all instructions listed below may result in electric shock fire and or serious personal injury SYMBOL MEANING SAFETY ALERT SYMBOL Indicates DANGER WARNING OR CAUTION May be used in conjunction with other symbols or pictographs DANGER Indicates an imminently hazardous situation which if not avoided will result in death or serious injury WARNING Indicates a po...

Page 5: ... or unplugging the power tool Keep cord away from heat oil sharp edges or moving parts Damaged or entangled cords increase the risk of electric shock 5 When operating a power tool outdoors use an extension cord suitable for outdoor use Use of a cord suitable for outdoor use reduces the risk of electric shock 6 If operating a power tool in a damp location is unavoidable use a ground fault circuit i...

Page 6: ... by poorly maintained power tools 6 Keep cutting tools sharp and clean Properly maintained cutting tools with sharp cutting edges are less likely to bind and are easier to control 7 Use the power tool accessories and tool bits etc in accordance with these instructions taking into account the working conditions and the work to be performed Use of the power tool for operations different from those i...

Page 7: ...saw motionless in the material until the blade comes to a complete stop Never attempt to remove the saw from the work or pull the saw backward while the blade is in motion or kickback may occur Investigate and take corrective actions to eliminate the cause of blade binding 3 When restarting a saw in the workpiece centre the saw blade in the kerf and check that saw teeth are not engaged into the ma...

Page 8: ...tions and duration of use noise from this product may contribute to hearing loss 5 All vistors and bystanders must wear the same safety equipment required for the operator 6 Always check the tool for damaged parts Before further use of the tool a guard or other part that is damaged should be carefully checked to determine if it will operate properly and perform its intended function Check for misa...

Page 9: ...e Lower blade guard lever Lower blade guard Edge guide locking knob Depth of cut adjustment lever Bevel adjustment locking knob Bevel scale Auxiliary handle Spindle lock button Edge guide Depth scale On off trigger switch FIG 1 ...

Page 10: ...modification is misuse and could result in a hazardous condition leading to possible serious injury WARNING Your tool should never be connected to the power source when you are assembling parts making adjustments installing or removing blades cleaning or when it is not in use Disconnecting the tool will prevent accidental starting which could cause serious personal injury CONTENTS Circular saw bla...

Page 11: ...Any part of your body coming in contact with a moving blade will result in serious injury CAUTION Never use the saw when the guard is not operating properly The guard should be checked for correct operation before each use If you drop your saw check the lower blade guard and bumper for damage at all depth settings before using SAW BLADES All saw blades need to be kept clean sharp and properly set ...

Page 12: ...njury TO LESSEN THE CHANCE OF KICKBACK FOLLOW THESE DIRECTIONS 1 Keep the blade at the correct depth setting The depth setting should not exceed 1 4 inch below the material being cut FIG 5 2 Inspect the workpiece for knots or nails before cutting Never saw into a knot or nail 3 Make straight cuts Always use a straight edge guide when rip cutting This helps prevent twisting of the blade 4 Use clean...

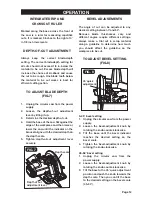
Page 13: ... the depth scale 5 Tighten depth of cut adjustment lever securely FIG 7 Depth of cut adjustment lever Depth scale BEVEL ADJUSEMENTS The angle of cut can be adjusted to any desired setting between 0 and 52 Because blade thicknesses vary and different angles require different settings always make a trial cut in scrap material along a guideline to determine how much you should offset the guideline on...

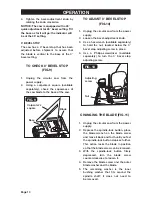
Page 14: ...e power supply 2 Loosen the bevel adjustment knob 3 Use a hex wrench available separately to hold the nut located below the 0 bevel stop adjusting screw in place 4 Use a Philips screwdriver available separately to turn the 0 bevel stop adjusting screw FIG 10 Adjusting screw Nut CHANGING THE BLADE FIG 11 1 Unplug the circular saw from the power supply 2 Depress the spindle lock button place the bla...

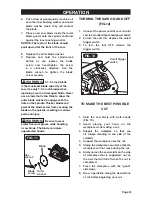
Page 15: ... on the spindle resulting in serious personal injury WARNING Be sure to wear protective work gloves while handling a saw blade The blade can injure unprotected hands FIG 11 Outer washer Hex wrench Blade Blade screw TURNING THE SAW ON AND OFF FIG 12 1 Connect the power cord of your circular saw to a standard household power outlet 2 To turn the saw ON depress the on off trigger switch 3 To turn the...

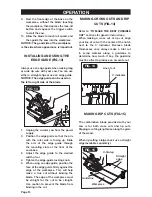
Page 16: ...ed width of cut 4 Tighten the edge guide locking knob 5 When using an edge guide position the face of the edge guide firmly against the edge of the workpiece This will help make a true cut without binding the blade The edge of the workpiece must be straight for the cut to be straight Use caution to prevent the blade from binding in the cut MAKING CROSS CUTS AND RIP CUTS FIG 14 Refer to TO MAKE THE...

Page 17: ...e MAKING A BEVEL CUT FIG 16 Refer to TO MAKE THE BEST POSSIBLE CUT sections for general instructions 1 Secure the workpiece with clamps 2 Draw a line of cut on the workpiece 3 Unplug the saw 4 Adjust and secure the saw at the desired bevel angle 5 Connect the power cord of your circular saw to a standard household power outlet 6 When making a bevel cut hold the saw firmly with both hands 7 Rest th...

Page 18: ...tion or noise occurs turn the circular saw off immediately and have the problem corrected before further use WARNING Do not allow brake fluids gasoline petroleum based products penetrating oil etc to come into contact with plastic parts These substances contain chemicals that can damage weaken or destroy plastic TROUBLESHOOTING PROBLEM CAUSE OF THE PROBLEM SOLUTION The motor does not start The too...

Page 19: ...xpendable parts including but not limited to blades brushes belts bits light bulbs and or batteries 2 shall be void if this tool is used for commercial and or rental purposes and 3 does not cover any losses injuries to persons property or costs This warranty does give you specific legal rights and you may have other rights which vary from state to state Be careful tools are dangerous if improperly...

Page 20: ...05 2015 2015 Menard Inc Eau Claire WI 54703 ...

Reviews: