


Calibración del Cygnus Pro
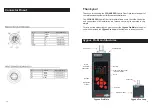
CALIBRATE:
It indicates the calibration status, as well as the option to calibrate
or clear the former calibration to make a new one. For the device recalibration,
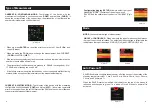
you must connect the Cygnus Pro Loop at the Cygnus Pro Main and press
ENTER (Picture 8).
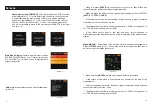
To erase the actual calibration, just press DOWN (Picture 9). For recalibrating
the Cygnus Pro, it´s necessary to erase the existing one and calibrate as usual.
The device cannot be calibrated if the attenuation is over 4 dB.
The calibration is associated to the model and serial number of the SFP with the
head. When we change the head with the device switched off or we make a hot
swapped and the SFP serial number has changed, the status will be “not
calibrated” if the SFP inserted is correct; otherwise it will inform the user to insert
a correct SFP.
After the calibration, the display shows the attenuation of the system once
deducted the attenuation of the calibration.
7
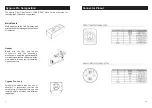
Cambio de Cabezal ( cambio conector)
The Cygnus Pro allows one main module and several headers with the most usual
connectors.
The assembling system follows the design of the rack cases with expansion cards.
The system consists of assembling the head in the main module through a slot and
fixing it with two captive ribbed screws. The screws can be comfortably tightened
manually for a standard fixation or use a standard screwdriver for a stronger
fixation.
The Cygnus Pro is composed by a main module, head and loop.
If you require different connectors, you will receive a head and a loop with the
connectors. You can use the Cygnus Pro Main with the connectors you require
without buying the complete system.
Remember to keep the headers protected in case that you have several Cygnus
Pro Systems.
8
Cygnus Pro Calibration
Change of connector ( head and loop)
Picture 8
picture 9


