background image

2

Getting Started

30

Take pictures in 

R

 mode in which the camera automatically 

selects the optimal capture mode. 

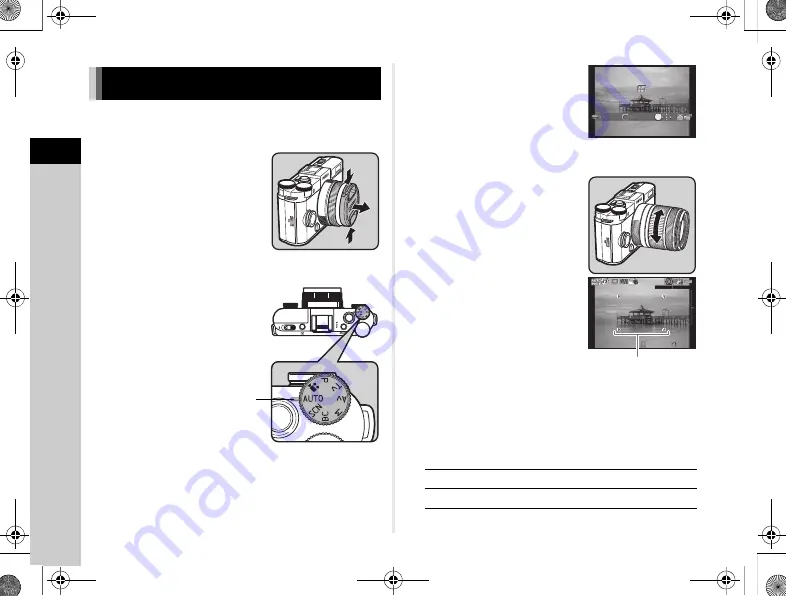
1

Remove the front lens cap by 

pushing the top and bottom 

portions as indicated 

in the illustration.

2

Turn the camera on.

3

Set the mode dial to 

R

 . 

The selected capture mode is 

displayed on the monitor (Guide 

Display).

4

View the subject on the monitor.

5

When using a zoom lens, 

turn the zoom ring to the right 

or left to adjust the 

composition of the image.

6

Position the subject inside 

the AF frame and press 

the shutter release button 

halfway.

The AF frame turns green 

and you will hear a beep when 

the subject comes into focus.

y

Setting the Sound Effects (p.20)

7

Press the shutter release button fully.

The captured image is displayed on the monitor 

(Instant Review).

Available operations

y

Setting the display for Instant Review (p.17)

Basic Shooting Operation

Dial indicator

L

Deletes the image.

J

Saves the RAW image.

Auto Picture

Auto Picture

OK

1/

2000

1/

2000 F2.8

F2.8

1600

1600

37

37

AF frame

e_kb560_om.book  Page 30  Friday, August 22, 2014  7:35 AM

Summary of Contents for QS-1

Page 1: ...angley Slough Berks SL3 8PN U K http www ricoh imaging co uk RICOH IMAGING AMERICAS CORPORATION 633 17th Street Suite 2600 Denver Colorado 80202 U S A http www us ricoh imaging com RICOH IMAGING CANAD...

Page 2: ...D LI68 Battery charger D BC68P AC plug cord USB cable I USB7 Software CD ROM S SW151 Start Guide Lenses that can be used with the PENTAX Q S1 Lenses that can be used with the camera are Q mount lense...

Page 3: ...1 1 2 3 4 5 6 Introducing the PENTAX Q S1 Getting Started Taking Pictures Playback Functions Changing the Settings Appendix e_kb560_om book Page 1 Friday August 22 2014 7 35 AM...

Page 4: ...aching a Lens p 23 Using the Battery and Charger p 24 Inserting a Memory Card p 27 Initial Settings p 28 Basic Shooting Operation p 30 Reviewing Images p 31 3 Taking Pictures p 32 Once you ve confirme...

Page 5: ...Computer p 61 Editing and Processing Images p 62 5 Changing the Settings p 69 Explains how to change other settings Camera Settings p 69 File Management Settings p 73 6 Appendix p 77 Provides various...

Page 6: ...Card 30 Initial Settings 31 Turning the Camera On 31 Setting the Display Language 32 Setting the Date and Time 32 Formatting a Memory Card 33 Basic Shooting Operation 33 Reviewing Images 35 Taking Pic...

Page 7: ...s 70 Creating a Composite Image Index 71 Editing Movies 72 RAW Development 73 Changing the Settings 75 Camera Settings 75 Setting the M V Functions 75 Saving the Settings of a Captured Image 77 Displa...

Page 8: ...uced by equipment such as radio transmitters could interfere with the monitor damage the stored data or affect the camera s internal circuitry and cause camera misoperation The liquid crystal panel us...

Page 9: ...lf timer lamp Microphone Card cover Strap lug Lens mount index red dot Lens information contacts Speaker Card access lamp Monitor Battery cover Hot shoe Remote control receiver Strap lug PC AV termina...

Page 10: ...ure mode 4 Quick dial You can save your preferred shooting settings and then retrieve them easily later on p 54 5 Lens unlock button Press to detach the lens on the camera p 23 6 Playback button 3 Swi...

Page 11: ...the display on the monitor p 9 p 11 When the camera enters capture mode the subject and the current shooting function settings are displayed on the monitor This state is referred to as standby mode P...

Page 12: ...sitivity p 38 26 ND Filter p 17 27 Memory card 28 Image storage capacity 29 Face detection frame when Autofocus Method is set to Face Detection p 41 1 7EV 1 7EV 1 2000 1 2000 F2 8 F2 8 1600 1600 99999...

Page 13: ...t date and time 23 Memory card 24 Number of recordable still pictures movie recordable time Shooting Info Display Standard Information Display An image and the current shooting function settings are d...

Page 14: ...y p 38 14 EV Compensation 15 Highlight Correction p 51 16 Shadow Correction p 51 17 Distortion Correction 18 Smart Effect p 55 19 Flash Mode p 39 20 Flash Exposure Compensation 21 File Format p 48 22...

Page 15: ...togram 3 Protect setting 4 Folder number File number 5 Save RAW Data 6 File Format 7 Shutter speed 8 Aperture value 9 Sensitivity 10 EV Compensation 11 Histogram R 12 Histogram G 13 Histogram B 100 00...

Page 16: ...9999 99999 99999 99999 OK MENU Aspect Ratio Aspect Ratio Cancel Cancel Aspect Ratio Aspect Ratio OK OK Use ABCD to select an item Use V to change settings Press F to cancel setting operation Press E t...

Page 17: ...tion Correction Distortion Correction Exit Exit MENU 1 2 3 ND Filter ND Filter High ISO NR High ISO NR Shake Reduction Shake Reduction Input Focal Length Input Focal Length 50mm 50mm D Range Settings...

Page 18: ...ze of images saved in JPEG format q JPEG Quality 1 Sets the quality of images saved in JPEG format m AF MF Settings Focus Method 1 Selects the autofocus or manual focus mode v p 40 Autofocus Method 1...

Page 19: ...onic Level Displays the camera angle horizontal and vertical in standby mode On p 10 Grid Display Displays the grid in standby mode Off Histogram Display Displays the histogram in standby mode Off Hig...

Page 20: ...ilter HDR Capture p 73 Movie Menu Menu Item Function Default Setting Page C1 Exposure Setting 1 Sets whether to adjust the shutter speed and aperture value manually Program AE p 37 Digital Filter 1 Ap...

Page 21: ...Off Auto Movie Playback Plays back movies during the slideshow On Quick Zoom Sets the initial magnification when magnifying images Off Highlight Alert Bright overexposed portions blink red in Standard...

Page 22: ...usts the brightness and the color of the monitor 0 D2 Flicker Reduction Cuts down on screen flicker by setting the power frequency 50Hz Interface Options Video Out Sets the output format when connecti...

Page 23: ...p 29 Firmware Info Options Displays the camera s firmware version Custom Setting Menus Menu Item Function Default Setting Page E1 1 Lens Shutter Options Sets whether to use the lens shutter and or the...

Page 24: ...sh when retracted Discharge Flash p 39 12 Release While Charging Sets whether to release the shutter while the built in flash is charging Off p 40 E3 13 Color Space Sets the color space to use sRGB 14...

Page 25: ...lens down with the lens mount side facing upward 3 Align the lens mount index red dots 3 on the camera and the lens and secure by turning the lens clockwise until it clicks To remove the lens Attach...

Page 26: ...rmation contacts Dirt dust or corrosion may damage the electrical system Please contact your nearest service center for professional cleaning We assume no responsibility nor liability for accidents da...

Page 27: ...camera or battery may become hot after the camera has been used continuously for a long period of time Remove the battery when you will not use the camera for a long time The battery may leak and dama...

Page 28: ...down the connection cable cover 1 on the bottom side of the battery chamber and insert the DC coupler into the battery chamber To remove the DC coupler push the battery lock lever in the direction of...

Page 29: ...the memory card in once to remove 4 Close the card cover and slide it in the direction of 4 uCaution Do not remove the memory card while the card access lamp is lit If the card cover is opened while...

Page 30: ...The F Hometown screen appears 3 Use CD to select a city Use V to change the region Refer to List of World Time Cities p 91 for cities that can be selected as a hometown 4 Press B to select DST daylig...

Page 31: ...amaged Formatting deletes all data both protected and unprotected tMemo When a memory card is formatted the volume label Q S1 is assigned to the card When the camera is connected to a computer the mem...

Page 32: ...o adjust the composition of the image 6 Position the subject inside the AF frame and press the shutter release button halfway The AF frame turns green and you will hear a beep when the subject comes i...

Page 33: ...at Save RAW Data Reviewing Images C Displays the previous image D Displays the next image L Deletes the image V to the right Magnifies the image up to 16 Use ABCD to change the area to display Press M...

Page 34: ...optimal capture mode from a Standard b Portrait c Landscape d Macro f Night Scene Portrait g Sunset h Blue Sky or i Forest p 30 S Scene modes Offers you various scene modes to choose from p 33 U Blur...

Page 35: ...ortrait For capturing portraits For capturing portraits Reproduces a healthy Reproduces a healthy and bright skin tone and bright skin tone Cancel Cancel OK OK OK MENU k Night Scene HDR Takes three co...

Page 36: ...ng objects Small objects Objects at the edge of the screen Backlit scenes When a special filter is used Far off objects x Available Restricted Not available 1 You can set the value to be changed in Gr...

Page 37: ...value In L mode the difference from the proper exposure is displayed on the EV bar scale while the shutter speed or aperture value is adjusted You can set the function of the M button for when the cam...

Page 38: ...lease button fully Movie recording starts R blinks at the top left of the screen When Focus Method is set to v press E to perform autofocus 4 Press the shutter release button fully Movie recording sto...

Page 39: ...ntrol unit to record a movie Select Q in the Drive Mode screen p 45 1 Display the movie to play back in single image display of the playback mode Available operations tMemo In Movie Edit of the playba...

Page 40: ...to ISO 12800 Auto Applies Noise Reduction at optimally calculated levels throughout ISO range Low High Applies Noise Reduction at constant chosen level throughout ISO range Cancel Cancel OK OK OK MEN...

Page 41: ...flash B Auto Flash Red eye Reduction Discharges a pre flash for red eye reduction before an automatic flash C Flash On Discharges a flash for each picture D Flash On Red eye Reduction Discharges a pr...

Page 42: ...MF Settings of the A1 menu tMemo In v mode when the subject is in a dark location the AF assist light is used when the shutter release button is pressed halfway To change the setting set AF Assist Lig...

Page 43: ...e Autofocus Method v A1 e Face Detection Detects and tracks faces of people The main face detection frame for AF and AE is displayed in yellow Autofocus continues while the shutter release button is p...

Page 44: ...camera is in standby mode 4 Turn the focus ring The image on the monitor is magnified Available operations tMemo When Focus Peaking is set to On in the control panel or AF MF Settings of the A1 menu t...

Page 45: ...ressed Q Remote Control The shutter is released immediately after the shutter release button on the remote control unit is pressed R Remote Control 3 sec delay The shutter is released about 3 seconds...

Page 46: ...ng in the E2 menu tMemo The focus position is locked in the first frame 1 Press D in standby mode The Drive Mode screen appears 2 Use CD to select O and press B 3 Use CD to select O or P and press E T...

Page 47: ...f the E2 menu When using the Remote Control Waterproof O RC1 the autofocus system can be operated with the q button The r button cannot be used 1 Press D in standby mode The Drive Mode screen appears...

Page 48: ...lti exposure L Discards pictures taken up to that point and takes pictures again from the first picture F Saves pictures taken up to that point and returns to standby mode Number of Shots Number of Sh...

Page 49: ...e Drive Mode screen appears 2 Use CD to select Y and press B 3 Use ABCD to set the shooting conditions Interval Movie Record Interval Select from 3 sec 5 sec 10 sec 30 sec 1min 5 min 10 min 30 min or...

Page 50: ...Capture Settings of the A1 menu uCaution When File Format is set to RAW or RAW some functions are not available RAW and RAW cannot be selected for some capture modes p 77 tMemo When File Format is set...

Page 51: ...usting the Color and Brightness of Images White Balance X White Balance Color Temperature g Auto Approx 4 000 to 8 000K h Daylight Approx 5 200K i Shade Approx 8 000K j Cloudy Approx 6 000K k q Fluore...

Page 52: ...n fully Adjust the white balance as necessary The operation could not be completed correctly appears when measuring is unsuccessful Press E to remeasure the white balance 4 Press E The camera returns...

Page 53: ...s function cannot be used in some capture modes or in combination with some other functions p 77 During HDR Capture multiple images are combined together to create a single image so it will take time...

Page 54: ...ions 5 Press E The screen of Step 2 reappears 6 Press E 7 Press F The camera returns to standby mode Controlling the Image Finishing Tone Custom Image Sets the image finishing tone such as Bright and...

Page 55: ...electing one of the Favorite settings 1 to 3 for the parameter 1 Select Digital Filter in the control panel and press E The Digital Filter setting screen appears 2 UseABCD to select a filter Select No...

Page 56: ...the position 1 4 of the quick dial 5 Use CD to select the desired setting Select a Smart Effect setting from those listed below 6 Press E The screen of Step 4 reappears Repeat Steps 4 to 6 to save th...

Page 57: ...e position 0 The camera returns to the original settings uCaution You cannot use the menus to change the settings when taking pictures with the quick dial To change the settings of the quick dial save...

Page 58: ...ex image with them p 65 Y Protect Protects images from being accidentally erased p 73 Z Slideshow Plays back images one after another p 59 Image Rotation Image Rotation Rotates captured images Rotates...

Page 59: ...press E tMemo You can select up to 100 images at a time Protected images cannot be selected Changing the Playback Method Displaying Multiple Images ABCD Moves the selection frame G Shows the display...

Page 60: ...rations 3 Press E The selected image appears in single image display uCaution Calendar Filmstrip Display is not available when there are more than 100 000 image files saved on the memory card Displayi...

Page 61: ...cedure below 1 Display the image to edit in single image display 2 Select S in the playback mode palette The selected image is rotated in 90 increments and the four thumbnail images are displayed 3 Us...

Page 62: ...o Check the operating manual of the AV device and select a suitable input terminal for connecting the camera If you intend to use the camera continuously for a long period use of the AC adapter kit op...

Page 63: ...mputer 7 Disconnect the camera from the computer uCaution The camera cannot be operated while it is connected to a computer To operate the camera terminate the USB connection on the computer then turn...

Page 64: ...t Save as and press E Crops out only the desired area of the selected image and saves it as a new file 1 Display the image to edit in single image display 2 Select W in the playback mode palette The c...

Page 65: ...Select T in the playback mode palette The screen to select a filter appears 3 Use ABCD to select a filter Use V to select a different image Proceed to Step 6 if you do not need to change the paramete...

Page 66: ...n to return to the previous screen 5 Press E The image selection screen appears 6 Use V to select an image for applying the same filter effects and press E You can only select an image that has not be...

Page 67: ...E The index image appears 7 Select Save or Reshuffle and press E When Reshuffle is selected you can reselect the images to be included in the index and display a new index image tMemo The file name fo...

Page 68: ...screen of Step 3 reappears 7 Press E The save confirmation screen appears 8 Select Save as and press E tMemo Select dividing points in chronological order from the beginning of the movie When canceli...

Page 69: ...gital Filter press D to display the setting screen 6 Press E The save confirmation screen appears 7 Select Save as and press E When Develop a single image is selected select Continue or Exit and press...

Page 70: ...op multiple images or Develop images in folder is selected in Step 2 a xxxR_JPG folder with a new number is created and the JPEG images are stored in it With the provided software Digital Camera Utili...

Page 71: ...of the File Format setting You can set whether to apply the setting to only one image or not and select the file format when M is pressed Green Button Green Button Preview Preview Green Button Green...

Page 72: ...ion in M TAv Mode P SHIFT P SHIFT P P P P Tv Tv Av Av OFF OFF Green Button Green Button Shifts combination of the Shifts combination of the aperture and shutter speed aperture and shutter speed to obt...

Page 73: ...en appears 5 Select a USER mode number and press E The selected image along with the settings used in that image are saved in USER1 to 3 Saving the Settings of a Captured Image AB Changes the function...

Page 74: ...save images time stamped with the local date and time 1 Select World Time in D1 menu 2 Select the time you wish to display in Time Setting Select F Hometown or G Destination 3 Press B to select G Des...

Page 75: ...ues You can protect images from being accidentally deleted uCaution Even protected images are deleted if the inserted memory card is formatted 1 Select Y in the playback mode palette The screen for se...

Page 76: ...r number reaches 999 you cannot capture new images if you attempt to change the folder name or create a new folder or when the file name number reaches 9999 Each file name consists of a string of 4 ch...

Page 77: ...battery level is low It may take time to transfer a large number of images The camera may turn off if the internal temperature of the camera becomes high For precautions on the Eye Fi card refer to Ab...

Page 78: ...nd press E The image selection screen appears When Select a folder is selected proceed to Step 7 5 Select the image s to transfer Images that have already been transferred and movies cannot be selecte...

Page 79: ...O 1 AUTO 1 AUTO 1 AUTO 1 AUTO 1 AUTO 1 ISO 1600 Flash AJ 2 AJ 2 AJ 2 AJ 2 AJ 2 AJ 2 AJ 2 Drive Mode Single Frame Shooting Continuous Shooting MN 3 MN 3 MN 3 Self timer Remote Control 0 sec 3 sec Q 2 C...

Page 80: ...g interval is 10 sec 5 Focus methods other than e and f can be selected 6 Specific settings are used Shake Reduction White Balance g 1 g 1 g 1 g 1 g 1 g 1 g 1 g 1 g 1 g 1 g 1 g 1 Custom Image Digital...

Page 81: ...ure Bracketing Multi exposure Interval Shooting Digital Filter Smart Effect HDR Capture Flash Drive Mode Continuous Shooting Self timer Remote Continuous Shooting Exposure Bracketing Multi exposure In...

Page 82: ...used the use of the built in flash may be limited Functions Available with Various Lenses A group 01 STANDARD PRIME 02 STANDARD ZOOM 06 TELEPHOTO ZOOM 08 WIDE ZOOM B group 04 TOY WIDE 05 TOY TELEPHOTO...

Page 83: ...he Input Focal Length screen appears 3 Set the lens focal length Available operations When using a zoom lens select the actual focal length which the zoom is set to 4 Press E The camera returns to sta...

Page 84: ...our tripod using the tripod screw To use an AF160FC flash with the camera a commercially available step up ring or similar accessory is needed Functions when Using an External Flash Flash Camera Funct...

Page 85: ...he same distance as your subject then aim at the target and take a picture Alternatively use w p 42 The subject is too close Move away from the subject and take a picture The focus cannot be locked Au...

Page 86: ...sert a new memory card or delete unwanted files No image There are no images that can be played back on the memory card This image cannot be displayed You are trying to play back an image in a format...

Page 87: ...al Filter or RAW Development function This image cannot be processed Appears when you try to perform Resize Cropping Red eye Edit Digital Filter Movie Edit RAW Development Save as Manual WB or Save Sm...

Page 88: ...2304 2304 o 2M 1440 1440 RAW w q 12M 4000 3000 Quality Level RAW 12 bit DNG JPEG m Best l Better k Good RAW and JPEG simultaneously recordable Color Space sRGB AdobeRGB Storage Media SD Memory Cards...

Page 89: ...d Bulb When using a lens that has no lens shutter shooting at 1 8000 2 seconds with the electronic shutter is available while Bulb shooting is not available Aperture From wide open to F8 Aperture is f...

Page 90: ...ss Processing Digital Filter Toy Camera High Contrast Shading Tone Expansion Invert Color Extract Color Unicolor Bold Water Color Posterization Slim Fish eye Interval Movie Record Recording interval 3...

Page 91: ...sted in compliance with CIPA standard using a new rechargeable lithium ion battery at a temperature of 23 C Actual results may vary depending on the shooting conditions circumstances Connection Port U...

Page 92: ...subject shooting conditions selected capture mode and memory card etc Approximate Image Storage Capacity and Playback Time Battery Temperature Normal Shooting Flash Photography Playback Time 50 Use 1...

Page 93: ...AL Budapest PAL Warsaw PAL Athens PAL Helsinki PAL Moscow PAL Africa West Asia Dakar PAL Algiers PAL Johannesburg PAL Istanbul PAL Cairo PAL Jerusalem PAL Nairobi PAL Jeddah PAL Tehran PAL Dubai PAL K...

Page 94: ...Software Windows OS Windows 8 1 32 bit 64 bit Windows 8 32 bit 64 bit Windows 7 32 bit 64 bit or Windows Vista 32 bit 64 bit CPU Intel Core 2 Duo or higher RAM 2 GB or more HDD For installing and star...

Page 95: ...ocus 41 Autofocus Method 41 AV device 60 J mode 34 AWB in Tungsten Light 22 B Backlight Silhouette s 33 Base Parameter Adj Digital Filter 63 Battery 24 Battery cover 7 U mode 34 Bleach Bypass Custom I...

Page 96: ...ocus Method 40 Focus Peaking 42 Focus ring 42 Focus Ring in AF Mode 40 Focusing 40 Focus priority 22 Folder Display 58 Folder Name 74 Food m 33 Forest i 33 Format 29 Framerate 49 Function Restrictions...

Page 97: ...yback mode 31 Playback mode palette 56 Portrait Custom Image 52 Portrait b 33 Posterization Digital Filter 53 63 Power 28 Power Saving 21 Preview 36 69 Program Automatic Exposure 34 Protect 73 Provide...

Page 98: ...Surf Snow q 33 Switch 8 T K mode 34 Terminal cover 7 Thumbnail display 31 57 Tone Expansion Digital Filter 53 63 Tone Expansion Smart Effect 54 Toy Camera Digital Filter 53 63 Tracking Autofocus Metho...

Page 99: ...camera and get medical attention immediately Warning Always use the battery charger and AC adapter exclusively developed for this camera with the specified power and voltage Using a battery charger or...

Page 100: ...move the battery from the camera immediately if it becomes hot or begins to smoke Be careful not to burn yourself during removal Keep wires hairpins and other metal objects away from the and contacts...

Page 101: ...ature changes will cause condensation on the inside and outside of the camera Place the camera in your bag or a plastic bag and remove it after temperatures of the camera and surroundings are equalize...

Page 102: ...at deleting data stored on an SD Memory Card or formatting an SD Memory Card does not completely erase the original data Deleted data can sometimes be recovered using commercially available software I...

Page 103: ...owners This product supports PRINT Image Matching III PRINT Image Matching enabled digital still cameras printers and software help photographers to produce images more faithful to their intentions S...

Page 104: ...to the complicated customs procedures required If the camera is covered by warranty repairs will be made and parts replaced free of charge and the camera will be returned to you upon completion of ser...

Page 105: ...unications However there is no guarantee that interference will not occur in a particular installation If this equipment does cause harmful interference to radio or television reception which can be d...

Page 106: ...Customer Service Manager Date and Place August 2014 Colorado Information for Users on Collection and Disposal of Old Equipment and Used Batteries 1 In the European Union These symbols on the products...

Page 107: ...or the correct method of disposal For Switzerland Used electrical electronic equipment can be returned free of charge to the dealer even when you don t purchase a new product Further collection facili...

Page 108: ...r D BC68P Netledning USB kabel I USB7 Software cd rom S SW151 Startvejledning Objektiver der kan bruges med PENTAX Q S1 Der kan bruges objektiver med Q montering sammen med dette kamera Der kan monter...

Page 109: ......

Page 110: ...angley Slough Berks SL3 8PN U K http www ricoh imaging co uk RICOH IMAGING AMERICAS CORPORATION 633 17th Street Suite 2600 Denver Colorado 80202 U S A http www us ricoh imaging com RICOH IMAGING CANAD...

Reviews: