background image

70

5

Recording/Playback

Recording/Playback

Recording Sound (Voice Recording Mode)

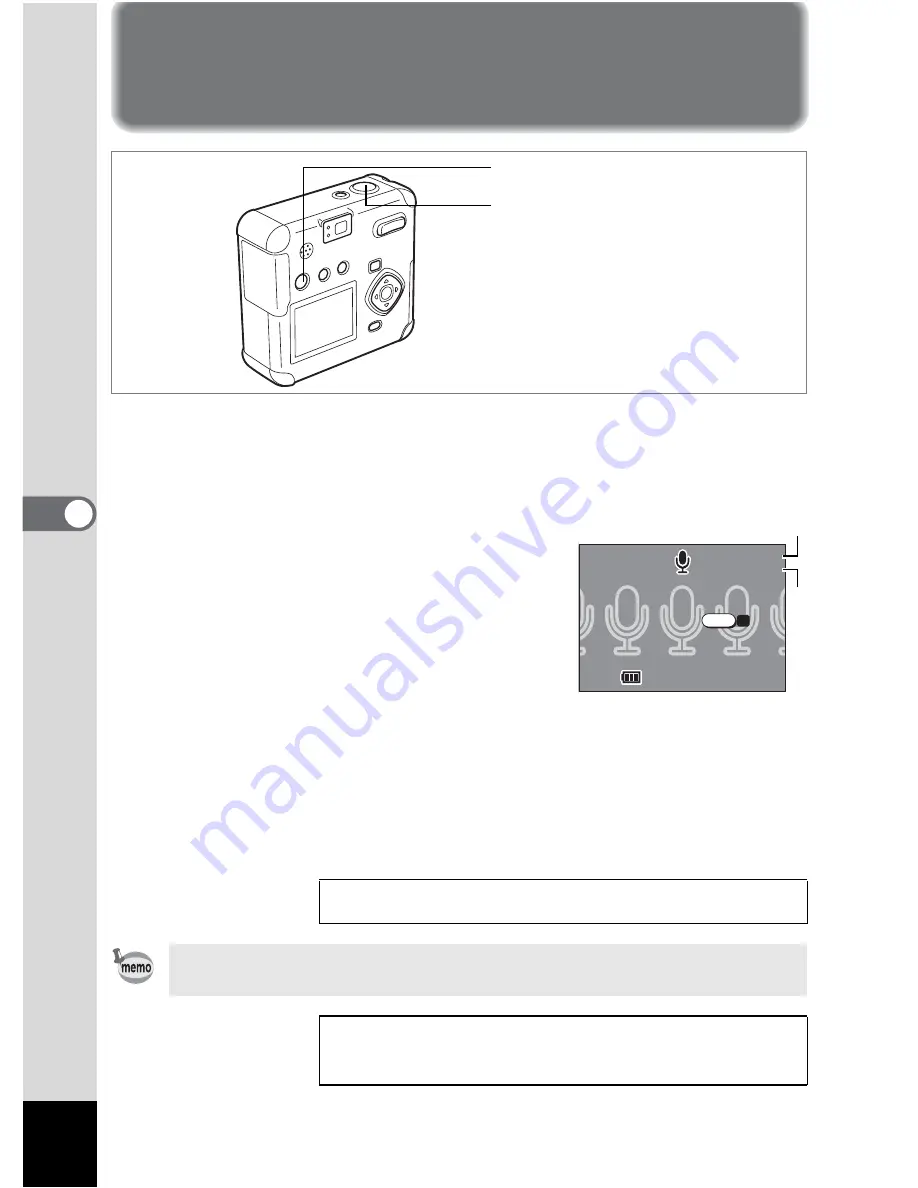
This mode is for recording sound. The recordable time is displayed on 
the LCD monitor according to how much memory is available on the SD 
Memory Card.

1

Press the 

O

 button in Capture 

mode.

The recordable time is displayed on the 
LCD monitor.
1. Remaining time  2. Recording time

2

Press the shutter release button down fully.

Recording starts. 

O

 flashes during recording.

3

Press the shutter release button down fully.

Recording stops. The remaining available recording time is displayed.

Playing Back Sound 

1

p.71

Sound is saved as a monaural WAVE file (PCM method).

The recorded sound can be set to Start-up, Shutter, 
Operation and Self-timer sound. (

1

p.99)

Voice button

Shutter release button

4/10/2004

4/10/2004

4/10/2004

Start

Start

Start

11:20

11:20

11:20

10:16

10:16

10:16
00:00

00:00

10:16
00:00

SHUTTER

REC

1

2

Summary of Contents for Optio 43WR

Page 1: ...Digital Camera Operating Manual To ensure the best performance from your camera please read the Operating Manual before using the camera...

Page 2: ...orts PRINT Image Matching II When used in combination PRINT Image Matching II enabled digital still cameras printers and software help photographers to produce images more faithful to their intentions...

Page 3: ...eries or the AC adapter and contact your nearest PENTAX service center Continued use could cause a fire or electric shock During thunderstorms unplug and discontinue use of the AC adapter Continued us...

Page 4: ...Remove from case and store in a dry and well ventilated location Do not subject the camera to strong vibrations shocks or pressure Use a cushion to protect the camera from vibrations of motorcycles a...

Page 5: ...to large amounts of dirt or salt water make sure that the power is off and the terminal cover and battery card cover are securely closed and then carefully rinse off the camera under slowly running ta...

Page 6: ...s 22 Setting the Display Language 22 Setting the Home Town 23 Setting the D S T Mode 23 Setting the Date and Time 24 Quick Start 26 Taking Still Pictures 26 Playing Back Still Pictures 28 Playing Back...

Page 7: ...ls Setting When Taking Moving Pictures 64 Changing the Color Mode Setting When Taking Moving Pictures 65 Changing the Frame Rate When Taking Moving Pictures 66 Taking Fast Forward Moving Pictures Fast...

Page 8: ...nging the Sound Settings 98 Changing the Date Style and Date Time 100 Setting World Time 101 Changing the Display Language 102 Setting Transfer Mode When a USB Connection Is Used 102 Changing the Star...

Page 9: ...to capture images and how to set the relevant functions such as setting the Virtual mode dial to change Capture modes and selecting the right Picture mode for the current scene 5 Recording Playback E...

Page 10: ...e page number explaining a related operation Shows information useful to know Shows precautions to take when operating the camera e H J M N I C F Icons for functions available in a Capture mode are sh...

Page 11: ...onal Accessories p 118 Checking Package Contents Camera Optio 43WR Strap O ST5 Software CD ROM S SW18 AV cable I AVC7 USB cable I USB7 AA Alkaline batteries 2 SD Memory Card 16 MB Operating Manual thi...

Page 12: ...er switch Self timer lamp Flash Lens Microphone Strap lug Battery card cover Water resistant packing Tripod socket LCD monitor DC input terminal Viewfinder Speaker USB AV output terminal Water resista...

Page 13: ...perating Parts Four way controller 2 2 Zoom f y button Digital zoom and magnified playback only y Four way controller 3 3 Four way controller 4 4 Four way controller 5 5 i button MENU button Z button...

Page 14: ...12 1 Getting Started Getting Started Attaching the Strap Pass the narrow end of the strap through the strap lug and attach as shown...

Page 15: ...Close the battery cover and push horizontally to lock Installing the Batteries When using for a prolonged period please use the AC adapter D AC5 p 15 AA alkaline battery and the CR V3 battery are not...

Page 16: ...them warm in your pocket Battery performance will return to normal when returned to room temperature Owing to the characteristics of AA alkaline batteries the camera may not deliver optimal performan...

Page 17: ...ord to the AC adapter 4 Plug the AC plug cord into the power outlet Using the AC Adapter Make sure the camera is turned off before connecting or disconnecting the AC adapter Make sure connections are...

Page 18: ...2 With the label or 2 symbol of the SD Memory Card toward the lens insert the card into the card slot until the card clicks 3 Close the battery card cover When removing the card press down on the car...

Page 19: ...lt setting Selectable Image Quality and Suitable Applications Standard compression rate is selected as the default setting Recorded Pixels and Image Quality Selecting the Recording Pixels 1p 40 Select...

Page 20: ...SD Memory Card used Qualitylevel Best C Better D Good E Voice recording Recorded Pixels 2048 1536 5 10 15 30 min 1600 1200 11 20 27 1024 7680 25 45 56 640 480 53 82 100 Frame rate 30 frames sec 15 fr...

Page 21: ...ee Formatting an SD Memory Card p 97 Do not remove the SD Memory Card while the card is being formatted The card may be damaged and become unusable Data stored on an SD Memory Card may be erased under...

Page 22: ...amera is turned on the camera automatically checks for a card If there is no SD Memory Card inside the camera h appears on the LCD monitor If the write protect switch is set to LOCK h appears on the L...

Page 23: ...21 1 Getting Started...

Page 24: ...e menus error messages etc are displayed from the following English French German Spanish Italian Russian Chinese and Japanese 1 Turn the camera on 2 Use the four way controller 45 to select the displ...

Page 25: ...er 45 to select Y on or Z Off The default setting is Z Off 2 Press the four way controller 3 The screen for setting the next item will be displayed Setting the Home Town See p 111 for the list of citi...

Page 26: ...24 hour display or 12h 12 hour display 4 Press the four way controller 5 23 is displayed above and below the month 5 Press the four way controller 23 to change the month Setting the Date and Time Date...

Page 27: ...using the MENU button you will return to the Menu screen Press the Playback OK button again If you press the MENU button before initial settings are complete your settings will be cancelled but you ca...

Page 28: ...Subject becomes smaller You can check the size of the subject by looking through the viewfinder 3 Lightly Press Halfway the Shutter Release Button When the subject is in focus the LCD monitor s focus...

Page 29: ...ct is in a condition shown below Lock the focus on something that is the same distance away as the subject press the shutter release button halfway and press the shutter release button fully when you...

Page 30: ...ures cycling through one at a time 1 Press the Playback button after taking a picture The captured image is displayed on the LCD monitor 2 Press the four way controller 45 Displays the previous image...

Page 31: ...es the camera ready to capture images Deleting a Displayed Image When you switch to the playback screen the image with the highest file number is shown first You can enlarge the image displayed on the...

Page 32: ...p 37 4 Zoom button Changes the sizeof thesubject ontheLCDmonitor or viewfinder 1p 60 5 Playback button Switches to Playback mode 1p 36 6 Four way controller 45 Changes the EV compensation 1p 62 7 Four...

Page 33: ...ess y in Normal Playback mode to change the size of the Zoom Display image displayed on the LCD monitor 1p 75 5 Playback Q button Switches to Capture mode 6 Four way controller 45 Plays back previous...

Page 34: ...to moves the selection frame up and down 4 Press the four way controller 45 to change the setting Press the four way controller 5 to move to a Select screen if available When finished press the OK but...

Page 35: ...ultiple 2288 1712 Recorded Pixels Quality Level White Balance Focusing Area AE Metering Rec Mode OK OK Exit MENU AWB Multiple 2288 1712 Recorded Pixels Quality Level White Balance Focusing Area AE Met...

Page 36: ...gital Zoom Takes digital zoom pictures On p 61 Interval Shoot Takes pictures at a specified interval of time p 58 Movie Sets the recorded pixels of the moving picture Color mode and Fast Fwd Movie p 6...

Page 37: ...used p 102 Screen Setting Sets the start up screen background color and the brightness of the screen p 103 Video Out Sets the video output format p 105 Quick Delete When this option is turned on the D...

Page 38: ...The camera automatically sets the shutter speed and aperture for taking still pictures p 50 H Picture mode Landscape Enhances your landscape photos Night Scene Mode Enables you to take dark scenes suc...

Page 39: ...irtual mode dial cannot be displayed Press to select the Autofocus mode or other mode then use the four way controller 3 to change the mode Changing Focus Settings No icon Autofocus mode Focuses on ob...

Page 40: ...focus Once the focus is set press any button other than the four way controller 23 or take your finger off of the four way controller for about 2 seconds The camera will switch to the standard Captur...

Page 41: ...cally d Flash On red eye reduction Reduces red eye in the picture caused by the flash reflecting from the subject s eyes The flash discharges regardless of lightingconditions The flash is always off w...

Page 42: ...lecting the Recorded Pixels 2288 1712 Suited for printing on A4 paper 1600 1200 Suited for printing on paper stock slightly larger than postcard size paper 1024 7680 Suited for printing on postcard si...

Page 43: ...on The camera is ready to take the picture e H J M N I F Selecting the Quality Level C Best Lowest compression rate Suited for printing photographs D Better Standard compression rate Suited for viewin...

Page 44: ...I F Adjusting the White Balance F Auto The camera makes the adjustment automatically G Daylight For taking pictures outside in sunlight H Shade For taking pictures outside in the shade I Tungsten Lig...

Page 45: ...to fill the screen 3 Press the OK button Adjusting is displayed on the LCD monitor After white balance has been automatically adjusted Complete is displayed and the camera returns to the Menu screen...

Page 46: ...e the picture e H J M N I F Setting the Focusing Area Multiple Normal range Spot The autofocus range becomes smaller The focus frame lights green when focused by pressing the shutter release button ha...

Page 47: ...Setting the Light Metering Range L Multi segment Detailed measurement of entire screen to determine exposure M Center weighted Measures mainly the center of the screen to determine exposure N Spot Mea...

Page 48: ...ically 50 The lower the Sensitivity smaller number the smaller the noise and sharper the image The shutter speed will be slower in low light conditions The higher the Sensitivity larger number the fas...

Page 49: ...3 Press the four way controller 45 to select x Normal z Hard or y Soft 4 Press the OK button The camera is ready to take the picture e H J M N I F Setting Image Sharpness AWB Multiple 2288 1712 Recor...

Page 50: ...s the four way controller 45 to select x Normal z High or y Low 4 Press the OK button The camera is ready to take the picture e H J M N I F Setting Color Saturation AWB Multiple 2288 1712 Recorded Pix...

Page 51: ...ss the four way controller 45 to select x Normal z High or y Low 4 Press the OK button The camera is ready to take the picture e H J M N I F Setting the Image Contrast AWB Multiple 2288 1712 Recorded...

Page 52: ...he OK button The camera is ready to take the picture 4 Set the functions you want to use See Setting the Capture Functions p 36 p 49 for instructions 5 Lightly Press Halfway the Shutter Release Button...

Page 53: ...ne Portrait Enables you to take portraits in dark conditions J Portrait Enhances your portrait photos M Surf Enhances photos taken against bright backgrounds such as sandy beaches N Snow Enhances phot...

Page 54: ...er Release Button When the subject is in focus the LCD monitor s focus frame turns green 5 Press the shutter release button down fully The picture is taken In Picture mode the EV compensation saturati...

Page 55: ...e mode The Virtual mode dial is displayed 2 Press the four way controller 45 to select F Panorama Assist 3 Press the OK button 4 Press the four way controller to select the joining direction 4 joins t...

Page 56: ...third photo and subsequent photos repeat Steps 5 and 6 and shoot To change the direction for joining images begin again from Step 1 To cancel Panorama Assist mode switch to any other mode The camera c...

Page 57: ...mer lamp lights The picture is taken about 3 seconds after the self timer lamp begins to blink e H J M N I C F Using the Self Timer The number of seconds until the picture is taken will be displayed o...

Page 58: ...e shutter release button ispressed Recording stops when you release the shutter release button e H J M N I Continuous Shooting Continuous Shooting Multi Continuous Shooting aj Continuous Shooting Imag...

Page 59: ...sh will not discharge in Continuous Shooting or Multi Continuous Shooting mode Continuous Shooting and Multi Continuous Shooting cannot be used in Moving Picture Panorama Assist Night Scene Night Scen...

Page 60: ...terval 00min10sec Number of Shot 02 Start Time 00hr00min When shooting is finished the camera turns off automatically 1 Press the MENU button in Capture mode The A Rec Mode menu will be displayed 2 Se...

Page 61: ...e the four way controller 23 to change the number of minutes then press the four way controller 5 7 Press the OK button 2 times Playing Back Still Pictures1p 28 Interval shooting can be set at interva...

Page 62: ...oom function is disabled the optical zoom can be used to enlarge the subject up to 2 8 times When the digital zoom function is enabled you can further enlarge the subject up to 11 2 times e H J M N I...

Page 63: ...dy to take the picture Enabling the Digital Zoom Function Saving the Digital Zoom Function Setting 1p 70 Only the digital zoom can be used to change the size of the image in Moving Picture mode Use th...

Page 64: ...to over expose side 4Adjusts the exposure to under expose side The EV Compensation setting is displayed on the LCD monitor e H J M N I C F EV Compensation When you press the four way controller 45 onc...

Page 65: ...The Virtual mode dial is displayed 2 Press the four way controller 45 to select C Movie 3 Press the OK button 1 Flash OFF icon 2 Moving Picture mode icon 3 Recording time 4 Press the shutter release...

Page 66: ...Playing Back Moving Pictures 1p 79 The flash will not discharge in Moving Picture mode Continuous shooting and interval shooting are not possible in Moving Picture mode The focus is fixed in Moving P...

Page 67: ...displayed 4 Press the four way controller 45 to change the recorded pixels 5 Press the OK button 2 times The camera is ready to record a movie C Changing the Recorded Pixels Setting When Taking Moving...

Page 68: ...roller 5 The movie setup screen will be displayed 4 Select Color Mode with the four way controller 3 5 Press the four way controller 45 to change the Color mode 6 Press the OK button 2 times The camer...

Page 69: ...he A Rec Mode menu will be displayed 2 Select Movie on the A Rec Mode menu 3 Press the four way controller 5 The movie setup screen will be displayed 4 Press the four way controller 3 to select Frame...

Page 70: ...Use the high speed type 10 MB S SD memory card when taking moving pictures after selecting 640 x 480 pixels of p 65 and 30 fps frame rate If the normal type 2 MB S card is used the taking moving pictu...

Page 71: ...0 6 Press the OK button 2 times The camera is ready to record a movie C Taking Fast Forward Moving Pictures Fast Fwd Movie Taking Moving Pictures 1p 63 Off x1 is the normal moving picture setting 15 f...

Page 72: ...pensation settings P Digital Zoom Saves the Digital Zoom settings on the Rec mode menu O AE Metering Saves the AE Metering settings on the Rec mode menu P Sensitivity Saves the Sensitivity settings on...

Page 73: ...l be displayed 4 Press the four way controller 23 to select the item 5 Press the four way controller 45 to select O On or P Off 6 Press the OK button 2 times The camera is ready to take a picture On A...

Page 74: ...cording time 2 Press the shutter release button down fully Recording starts O flashes during recording 3 Press the shutter release button down fully Recording stops The remaining available recording t...

Page 75: ...ur way controller 4 Rewinds and plays back the recorded sound Four way controller 5 Advances and plays back the recorded sound Zoom f y button x Increases the volume Zoom f y button w Decreases the vo...

Page 76: ...ed on the LCD monitor 3 Press the O button Recording stops 4 Press the four way controller 3 The recorded voice memo will be played back 5 Press the four way controller 3 Playback stops A voice memo c...

Page 77: ...oice message from the images with voice memos added U is displayed on images withvoice memos added 2 Press the O button Set to message is displayed 3 Using the four way controller 2 select Set 4 Press...

Page 78: ...t using the four way controller 5 Press the OK button A voice message has been set is displayed the O button flashes and the camera goes into Standby mode You can play back a voice message 1 Press the...

Page 79: ...om f y button The image will be magnified 1 to 8 times Continue to press to magnify the image even greater The following operations can be performed while the magnified image is displayed Four way con...

Page 80: ...76 6 Playback Deleting Moving pictures cannot be magnified...

Page 81: ...images will be displayed and if you press the four way controller 4 while the top left image is selected the previous nine images will be displayed Similarly if you press the four way controller 2 whi...

Page 82: ...se from the following 3 sec 5 sec 10 sec 20 sec or 30 sec 5 Press the OK button Playback will start at the set interval Using Slideshow for Continuous Playback If you press the four way controller or...

Page 83: ...troller 5 Forward playback Four way controller 2 Pauses playback Zoom f y button x Increases the volume Zoom f y button w Decreases the volume The following operations can be performed while Pause is...

Page 84: ...with the four way controller 2 4 Press the OK button Deleting Data one by one Deleted images or sounds cannot be recovered Protected images or sounds cannot be deleted You can also delete images duri...

Page 85: ...2 Press the i button The Sound Delete screen will be displayed 3 Select Sound Delete with the four way controller 2 4 Press the OK button Deleting a Voice Memo Select Delete in step 3 above to delete...

Page 86: ...ll with the four way controller 2 3 Press the OK button Deleting All Data Once deleted images sounds cannot be restored You cannot delete protected images sounds Setting the Quick Delete option on the...

Page 87: ...en will be displayed 3 Select Protect with the four way controller 2 4 Press the OK button The image or sound is protected Z is displayed during playback of protected images and sounds Protecting Imag...

Page 88: ...ton twice The Protect All Images Sounds screen will be displayed 3 Select Protect with the four way controller 2 4 Press the OK button Protect All Images Sounds Select Unprotect in step 3 above to can...

Page 89: ...cable 2 Connect the sound terminal white and image terminal yellow of the AV cable to the sound terminal white and image input terminal yellow of the TV 3 Turn the TV and camera on Selecting the Video...

Page 90: ...ted on the print or not 1 Enter the Playback mode and use the four way controller 45 to select the image for which you want to make DPOF settings 2 Press the four way controller 2 The DPOF screen will...

Page 91: ...ettings If DPOF settings have already been made for an image the previously set number of prints and On Off date setting will be displayed To cancel DPOF settings set the number of prints to 00 and pr...

Page 92: ...O The date will be imprinted P The date will not be imprinted 6 Press the OK button Prints can be made according to the settings Printing All Images When the setting to print all images is made the se...

Page 93: ...yed 3 Press the four way controller 23 to select USB Connection 4 Use the four way controller 45 to select PictBridge 5 Press the OK button The camera is ready to connect the printer 6 Connect the cam...

Page 94: ...witches between On and Off 6 Press the OK button The printer prints with the specified settings The message Continue printing is displayed after the image has been printed To continue printing press t...

Page 95: ...the date Repeated pressing of the Playback button switches between On and Off 5 Press the OK button The printer prints with the specified settings The message Continue printing is displayed after the...

Page 96: ...ng press the OK button to return to the screen displayed before printing 5 When you have finished printing press the MENU button The Safely remove USB cable message is displayed 1 Turn the camera off...

Page 97: ...the MENU button The Q Playback menu will be displayed 2 Press the four way controller 23 to select Resize 3 Press the four way controller 5 The Resize screen will be displayed 4 Use the four way cont...

Page 98: ...s the four way controller 45 to select Quality Level 9 Press the OK button 10 Press the four way controller 23 to select Overwrite or Save as 11 Press the OK button The image will be resized Moving pi...

Page 99: ...ming screen Zoom f y button Changes the size of the image b button Rotates the trimming frame Four way controller 2345 Moves the trimming position up or down and left or right MENU button Returns to t...

Page 100: ...epia red pink violet blue green and yellow are provided for the color filters When you select a color filter in the Digital Filter mode the display on the LCD monitor is filtered with the selected col...

Page 101: ...o edit 5 Press the four way controller 23 to select the desired digital filter The filtered image will be displayed on the LCD monitor Operations available with the brightness filter Zoom f y button x...

Page 102: ...Card Do not open the card cover while the SD Memory Card is being formatted The card may be damaged and become unusable SD Memory Cards formatted on a PC or device other than the camera cannot be used...

Page 103: ...he volume 4 Press the OK button 2 times The camera is ready for capture or playback Changing the Sound Settings Changing the volume English On Format Sound Date Adjust World Time Language Set up OK OK...

Page 104: ...sounds or self timer sound 1 Select Sound on the B Set up menu 2 Press the four way controller 5 The Sound screen will be displayed 3 Press the four way controller 23 and select the type of sound you...

Page 105: ...5 The Date Adjust screen is displayed See Initial Settings p 22 for instructions on setting the date and time Changing the Date Style and Date Time English On Format Sound Date Adjust World Time Langu...

Page 106: ...New York is selected as the world time city then the cross shaped line is located in New York on the world map and then X indicates the current time in New York NYC 5 Use the four way controller 45 t...

Page 107: ...USB connection is used 1 Select USB Connection on the B Set up menu 2 Use the four way controller 45 to switch between PC and PictBridge 3 Press the OK button The camera is ready to capture or play ba...

Page 108: ...ller 45 to select O On or P Off O Displays the start up screen P Does not display the start up screen 5 Press the b button 6 Use the four way controller 45 to select the image you want to display as t...

Page 109: ...y controller 45 to select the background color You can select from 6 colors 5 Press the OK button twice The camera is ready for capture or playback Setting the Background Color English On Format Sound...

Page 110: ...ect the output format NTSC or PAL for capturing or playing back images on a TV monitor 1 Select Video Out on the B Set up menu 2 Press the four way controller 45 to select NTSC or PAL to match your TV...

Page 111: ...ake pictures in Snap mode simply by pressing the shutter release button 1 Select Quick Start up on the B Set up menu 2 Use the four way controller 45 to switch between On and Off 3 Press the OK button...

Page 112: ...capture or playback This resets all settings other than Date Time Language Video Out Date Style and World Time 1 Select Reset on the B Set up menu 2 Press the four way controller 5 The Reset screen i...

Page 113: ...ayed 3 Press the four way controller 23 to select Alarm 4 Press the four way controller 5 The list of alarms will be displayed Active alarms are indicated by O 5 Press the OK button twice If any alarm...

Page 114: ...ot ring 8 Press the four way controller 5 9 Press the four way controller 23 to set the time hour the alarm will ring 10 Repeat steps 8 and 9 above to set the alarm time minute and set S Snooze to O O...

Page 115: ...1 To stop the alarm ringing press any button The alarm will stop Turning the Alarm Off To cancel the Snooze function press the MENU button and OK button at the same time The alarm will not ring when t...

Page 116: ...I Vancouver YVR Kabul KBL San Francisco SFO Male MLE Los Angeles LAX Delhi DEL Calgary YYC Colombo CMB Denver DEN Kathmandu KTM Mexico City MEX Dacca DAC Chicago CHI Rangoon RGN Miami MIA Bangkok BKK...

Page 117: ...ory Card Data error Displayed when the printer was unable to process the data in PictBridge mode Deleting An images or sound on the SD Memory Card is being deleted Formatting The SD Memory Card is bei...

Page 118: ...isplayed when a printer error occurs in PictBridge mode Setting being recorded The image sound protect settings or DPOF settings are being changed Settings not stored The SD Memory Card is full and no...

Page 119: ...ed to PC with USB cable The LCD monitor is always turned off when the camera is connected to a PC Camera is connected to TV The LCD monitor is always turned off when the camera is connected to a TV Im...

Page 120: ...e your picture as desired and press shutter release button fully Subject is too close Set the Focus mode to q p 37 The Focus mode is set to q When the Focus mode is set to q normal range pictures will...

Page 121: ...JPEG about 15 fps 30 fps sound added possible to switch between full color sepia and black and white Quality Level Best Better Good Storage Medium SD Memory Card Quality Level Recorded Pixels Best Be...

Page 122: ...ed eye reduction function Flash Modes Auto Flash Off Flash On Auto Red eye reduction Flash On Red eye reduction Capture Range Wide Approx 0 1m 2 9m w Sensitivity AUTO Tele Approx 0 5m 2 1m w Sensitivi...

Page 123: ...al Accessories The following optional accessories are available for this camera AC Adapter D AC5 USB Cable I USB7 AV Cable I AVC7 Strap O ST5 Products marked with an asterisk are the same as items inc...

Page 124: ...be returned to the dealer from whom you purchased the equipment or to the manufacturer If there are no representatives of the manufacturer in your country send the equipment to the manufacturer with...

Page 125: ...statutory rights The local warranty policies available from PENTAX distributors in some countries can supersede this warranty policy Therefore we recommend that you review the warranty card supplied...

Page 126: ...e instructions may cause harmful interference to radio communications However there is no guarantee that interference will not occur in a particular installation If this equipment does cause harmful i...

Page 127: ...ards Records maintained continue to reflect the equipment being produced can be expected to be within the variation accepted due to quantity production and testing on the statistical basis as required...

Page 128: ...ion 61 F Fast Forward Movie 67 Flash 10 39 Flash button 30 Flash status lamp 10 27 Flash Protect button 11 Focus button 30 Focus frame 27 Focus Mode 37 Focus status lamp 27 Focus Delete button 11 Focu...

Page 129: ...S Saturation 48 Screen Brightness 105 SD Memory Card 16 19 Self Timer 55 Self timer lamp 10 Self timer sound 98 Sensitivity 46 Setting the Menu 32 Set up Menu 35 Sharpness 47 Shutter Release Button 2...

Page 130: ...Memo...

Page 131: ...ive Langley Slough Berks SL3 8PN U K http www pentax co uk PENTAX France S A S 12 14 rue Jean Poulmarch 95106 Argenteuil Cedex FRANCE PENTAX Benelux B V for Netherlands Spinveld 25 4815 HR Breda NETHE...

Reviews: