background image

77420    - 85/107 - 

⑦ 

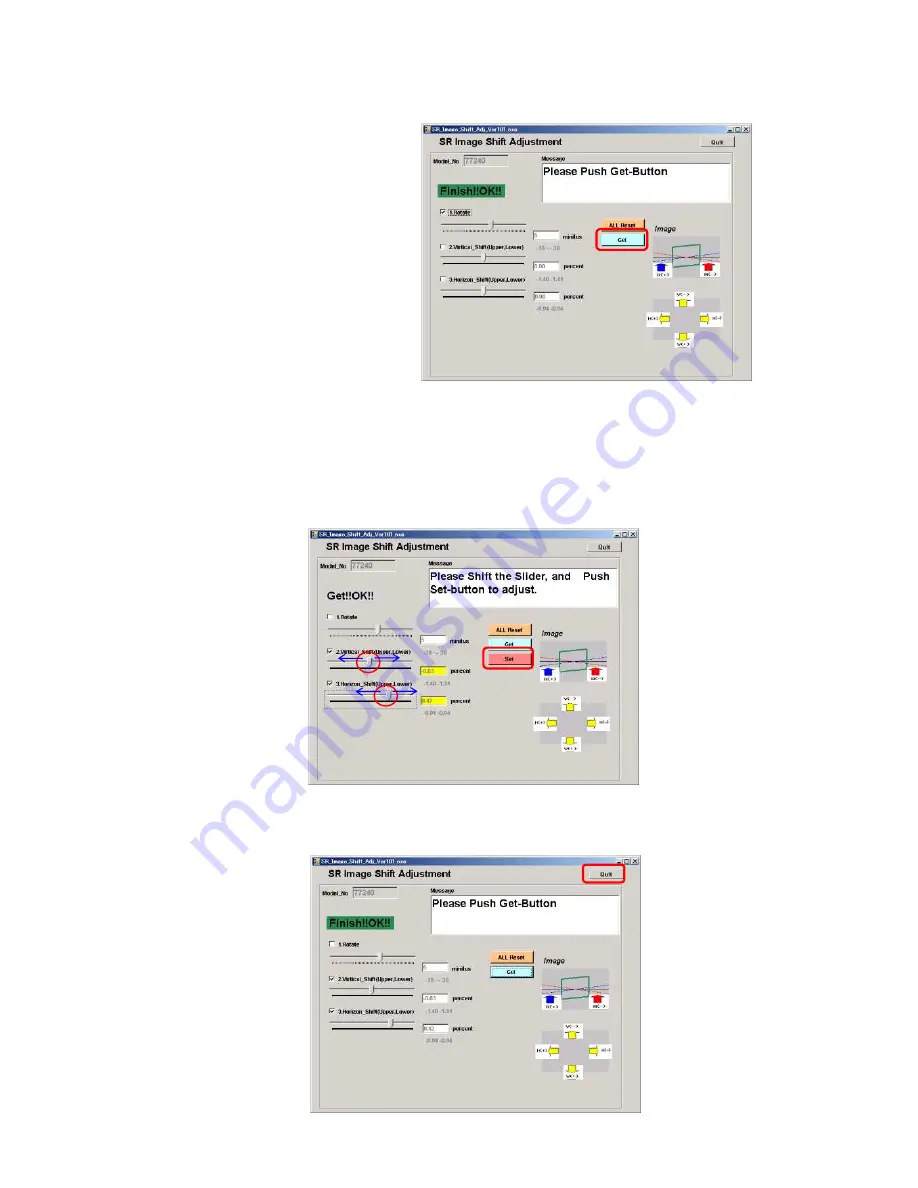
Click [Get]. 


⑧ 

Next, Adjust 2. Top and bottom and 2. Right and left by slider.   

If adjustment value is zero, go to next step.(EX: Top and bottom -0.03 (- : Image shift to topside), 

  Right and left+0.42

%(

+:Image shift to left side


⑨ 

Click [Set]. 


⑩ 

When adjustment is completed, [OK] will be displayed.


⑪ 

Click [Quit] to finish adjustment. 


Summary of Contents for 77420

Page 1: ...HOYA CORPORATION PENTAX Imaging Systems Division Technical Service Group 11 10 N T Product No 77420 TM ENGLISH ...

Page 2: ...RE 95 1 Method for Checking FW version 95 2 Method for Updating Firmware Version 95 TECHNICAL INFORMATION 97 Battery consumption current 97 Block diagram 98 Table of Error Code 1 SR unit adjustment 100 Table of Error Code 2 SR gain adjustment 100 Table of Error Code 3 Uniformity AF adjustment 101 Table of Error Code 4 FI AF adjustment 101 Table of Error Code 5 for Digital adjustment 102 Table of E...

Page 3: ...re SD card 5pcs 1 For Product FW Firmware 2 For writing Initial Data 3 For Initial set Initialize Product shipment 4 For test mode ON OFF For confirming full version 1 pcs each 2 Installing procedure of the Adjustment Software Setting of the Computer Set programmed software for 77420 CD R to CD ROM drive Copy the 77420 folder from the programmed software contained in the CD ROM to C drive Copy the...

Page 4: ...r 76700 for details 4 Calibration of light source for Digital adjustment Important Execute Calibration of light source before 77420 Digital adjustments When replaced the program software replaced light source or replaced AE master lens it is required calibration Refer to the service manual for 76830 K10D for calibration procedure Required equipment K10D Master body for calibration HOYA Corporation...

Page 5: ... with USB cable Turn ON the power and confirm that the camera is recognized by PC Set the light source to LV12 Surely set the camera and lens toward center of light window and cover the whole camera and light window by using a dark curtain Double crick the adjusting software K r_ SLR_MTest exe in K r_ MTest folder to start up On first screen select Adjust All and input the lens ID number correctly...

Page 6: ...tion Confirm the light source is set at LV12 then click OK to execute Shutter will be released 15 times When calibration is completed OK screen will be displayed Click X button or Quit to finish adjustment software If adjustment is NG refer to table of error code ...

Page 7: ...art for assembling body and Front housing III Assembling body 1 E100 Shutter block 2 A13 Battery chamber 3 0 A101 Front housing block 4 A6 A19 Left upper plate other 5 T700 Upper flex circuit board 6 A4 Q200 Right front plate Flash board 7 T901 Low flex board 8 A3 bottom plate 9 0 A51 Tripod plate 10 Lead wires bottom 11 Conf Height of SR block Base Plate Support Pillar 12 0 C000 SR Block 13 Adj H...

Page 8: ...by histogram K r_PDCAdj Initial setting Initialize Set WDC adjustment K r_ MTest 9 Writing Warranty Record When replace T100 or serial number Warranty_Record 1 Battery consumption check 4 Function Check 1 AF check Exposure mode Shutter release Capture Playback Flash Adj Flash retract position Diaphragm control CMOS surface 10 Function check 2 Metering Exposure WB AF check by taking picture SR Func...

Page 9: ...flash For removing top cover install the batteries to the camera and turn on the camera then pop up the flash by pressing pop up button If the camera does not pop up the flash Preparation Use flash pop up tool as shown in follow The same tool as MZ 7 Use such as thin magnetic card and processes it as follow Procedure for pop up Unscrew U2 x2 CNL D 1 7x4 0 5 10 1 2 ...

Page 10: ...t place a screw or magnetic card near the camera after outside cover is removed Open the battery cover Unscrew U4 1 7x7 0 Unscrew A34 x3 1 7x5 0 Unscrew A255 x2 1 7x4 5 Unscrew A185 x2 1 7x3 5 Unscrew A191 x2 1 7x6 0 A401 CAUTION Do not make impact to SR CCD block on bottom side as shown in figure below ...

Page 11: ...AUTION Be careful the electric shock where flash circuit board is inside the cover Discharge the main capacitor Rift up the A301 and discharge the main capacitor by using 100Ω 1kΩ resistor Discharge between Blue and Black soldering land on T750 Disconnect T50 Flip lock and peel off the double stick tape Unsolder lead wire x6 A301 100 1kΩ Black Blue Green Brown Yellow White ...

Page 12: ...x2 Peel off the G rubber A151 and unscrew TY CNL D 1 7x4 5 x2 The bottom side of camera unscrew TY CNL D 1 7x4 0 Unsolder lead wire x2 Red Black A150 Remove A150 while lifting side of grip part as shown in figure below A201 Remove A201 while lifting side of both as shown in figure below Disconnect T920 Plug in Red Black ...

Page 13: ...e A38 3 8x10 Disconnect flexible board 2 positions Flip lock Disconnect flexible board 4 positions Plug in CAUTION The flex from CCD block should be taken care no stress no bend otherwise it will affect the performance of CCD Unsolder lead wire x24 Unscrew CNL D 1 7x2 5 x3 Unscrew TY CNL D 1 7x3 5 T100 ...

Page 14: ...ed and also don t apply the external pressure to a movable part CAUTION 3 The flex from SR block should be taken care otherwise it will affect the performance of SR function Disconnect T640 with care Plug in Do not damage on T640 Remove the glue with using tools 3 Points Peel off part of glue by tool then turn screw A31 Adjusting screws x3 by using Hexagon wrench 1 5mm 0 C000 Do not scratch on sur...

Page 15: ... 14 107 7 Removing T700 Disconnect O100 flex from connector Flip lock Peel off PI tape T89 Unsolder lead wires x12 Unsolder flex 4 lands on T71 G100 Unscrew CNL D1 7x1 6 x2 Unscrew TY CNL D1 7x2 5 T700 DT3x4 ...

Page 16: ...7 8 Removing A6 A19 Unscrew TY CNL D1 7x4 0 x2 A19 Unscrew TY CSM1 7x4 0 x4 Unscrew CNL D1 7x2 5 A6 9 Removing T750 Strobe flex board Unscrew CNL D 1 7x3 0 Unsolder flex 7 lands on O170 Unsolder lead wires x4 T750 ...

Page 17: ...front plate Strobe circuit block Unscrew TY CNL D1 7x4 0 Unscrew CNL D1 7x2 5 Unscrew CNL D 1 7x1 6 Unscrew CNL D 1 7x2 2 Unsolder flex 6 lands Q200 11 Unsolder lead wires Bottom side Peel off BT Unsolder lead wires x6 Unsolder flex 4 lands ...

Page 18: ...assy Unscrew CNL D1 7x2 2 x3 0 A51 Unscrew CNL D1 7x1 6 x3 13 Removing A3 Bottom plate Unscrew CNL D1 7x2 5 x2 Unscrew TY CNL D1 7x4 0 x3 A3 14 Removing T901 Lower flex board Unsolder flex 22 lands T301 M100 T901 Unscrew TY CNL D1 7x3 5 A141 X58 ...

Page 19: ...ore removing G100 Apply DC 2V to 0 S250 and set the mirror seat at top position Red lead wire with Unscrew TY CNM2 0x5 0 x5 0 A101 16 Removing A13 and related parts Unscrew TY CNL D1 7x4 0 x2 A13 and related parts 17 Removing E100 Shutter block Unscrew A70 x3 E100 Master plate Not supply ...

Page 20: ...ious model but basic structural is the same as K r Assembly 1 Front housing block B65 B41 0 M120 DT 4x15 M7 Confirm that the surface of lens is clean 2 A104 0 A121 A133 TY CNL F1 4x4 0 0 A126 and related parts Apply G134 as shown in figure TY CNL D1 7x3 0 A105 Apply G134 as shown in figure A110 0 A108 Apply G134 to two shaft part Bond M7 G134 G134 0 M120 B41 G134 G134 B65 ...

Page 21: ...n in figure below B59 TY CNL G1 7x2 0 0 B52 mirror sheet B66 shaft Apply L115 at both side of B66 as shown in figure below Apply Daia bond black to fix 0 B52 as shown in figure below B63 B57 B62 spring Apply screw lock 4 B11 B20 Apply G126 5 positions and L115 2 positions as shown in figure Install B20 to B11 G126 L115 Bond L115 10mm SL L115 ...

Page 22: ...he 1st mirror angle 45 adjusting tool on the camera and then adjust the mirror seat so that the adjusting tool touches the mirror without gap Tolerance X axis 10 許容範囲 Y axis 10 Positioning 2nd mirror Attach the mirror positioning scope and the 2nd mirror angle adjusting tool to the camera and then adjust the mirror angle while looking through the eyepiece lens Tolerance X axis 0 3mm 許容範囲 Y axis 0 ...

Page 23: ... and confirming apply Super glue as shown in figure B71 B72 Surely affix without any gap 6 0 G100 Apply G126 8 points as shown figure CAUTION Caution for come off spring B10 B21 Install B17 to B9 Install B18 and B9 Super glue G126 ...

Page 24: ...7 Apply G126 to surface of cam on both sides Align the both hole of 0 B8 and B7 B3 B4 B5 B6 Turn B7 clockwise until the arrow indicated in figure right Clean code plate by solvent and apply G151 Latch the lever of G100 while pushing down the sliding plate ...

Page 25: ...64 on the mirror motor by DT 5x7 and apply super X B U3 DT 7x10 S364 Super X B DT 5x7 Pink 45mm Purple 50 Red 65mm Black 75 Notice for disassembly Set the mirror sheet at top position before removing 0 G100 1 As shown in a figure a gear is turned and it sets to a mirror up position Mirror up Shutter charge lever 1 and mirror sheet 2 and sliding plate 3 must be top end position 2 Latch the lever of...

Page 26: ...1 5V Fine adjustment is possible when turn white gear at behind of G100 Mirror down mirror sliding lever shutter charge lever at down position White gear must be positioned as shown in figure Both mirror seats 1st and 2nd must be returned smoothly to the original position when both mirror seat are passed inward about 3mm by finger pressure Set the mirror seat to the down position 8 0 S300 Arranged...

Page 27: ...unt surface Adjust 0 A121 by turning an eccentric screw and apply the screw lock 10 0 L101 CAUTION Confirm there is neither dust nor scratch on 0 L101 M3 0 L101 Apply Super X black to three places M9 M12 x2 CAUTION Confirm that three legs are not bent TY CNL D1 7x3 0 x3 SL Super X Black Note of Disassembly 1 Three screws which hold M9 Penta cover are removed 2 The glue between M9 and three leg tip...

Page 28: ...th avoiding scratch on mirror M21 In first put positioning post in the Front housing block TY CNL D1 7x3 5 Unlock of M4 M22 In the case of temporary adjustment using with the M22 010E 0 35 Put the focusing screen L2 on the frame and then push it back until it locks in place 12 M301 Eyepiece M301 L7 and other TY CNL D1 7x4 0 x2 ...

Page 29: ...firmation Confirm a viewfinder focus One scale for focus master lens is 0 03mm Standard 0 0 07 mm Adjustment Exchanges for M22 of other thickness The tolerance lever at the time of adjustment is 0 0 04 mm M22 00A 00B 00C 00D 00E 00F 00G 00H 00I 01J t 0 15 0 20 0 25 0 30 0 35 0 40 0 45 0 50 0 55 0 10 14 O100 Apply small amount of Daia bond black as shown in figure M2 prism Make sure that there is n...

Page 30: ...5 2 Adjustment Confirmation Check whether the position of the display is straight Adjustment Loosen the screw and change the position After adjustment is done apply screw lock 16 0 M100 Preparation Hexagonal screwdriver 1 5mm M100 CAUTION There is no dust and stain on the surface of lens TY CNL D1 7x4 0 x3 Adjustment Temporary adjustment of AF block Screw in 3 adjusting screws until they stops the...

Page 31: ... Do not damage on flexible board 18 M51 O170 SI Block Confirm that there is neither dust nor scratch on inside prism and mirror SI block M51 M52 M53 L11 L12 O170 and other TY CNL F1 7x4 5 x2 Install SI block to the pentaprism side as shown figure Apply screw lock Caution Disassembly 1 Set the diopter lever to the left side 2 TY CNL G1 7x5 0 and washer x2 3 Remove the glue which is around the J100 ...

Page 32: ... Do not stress to the lands of O170 Apply DC3 2V to O170 and confirm the positioning and lighting of SI LED 11 points ADJ Loosen 2 screws and then adjust the position of O170 Remove the adhering screw lock two positions Tighten the screw and confirm the position After adjustment is done apply the screw lock to 3 positions and remove the read wires from O170 SL ADJ SL ...

Page 33: ...order of number as shown in figure Arrange 5 lead wires by DT 5x5 After install 0 E000 has little movement 2 A13 Battery case and related parts Confirm Each parts are installed correct position A13 and related parts TY CNL D1 7x4 0 x2 DT 5x25 A16 TY CNS 2 0x4 0 A75 W113 A76 screws x4 T950 DT 5x10 T960 A23 A18 A14 ...

Page 34: ...nch lead wires and flexible board TY CNM2 0x5 0 x5 Tighten screw in order of number as shown in figure Apply Voltage to the mirror motor and set mirror down position CAUTION Do not scratch on eyepiece lens during working 4 A6 and A19 L upper plate and others Install A6 while arranging the lead wires and flexible board TY CSM1 7x4 0 x4 CNL D1 7x2 5 A19 TY CNL D1 7x4 0 x2 ...

Page 35: ...rcuit block T700 TY CNL D1 7x2 5 CNL D1 7x1 6 x2 Hold T71 G100 flex by DT 3x4 then solder 4 lands Solder 12 lead wires then arrange lead wires T960 G100 E100 A105 Affix T89 PI tape Connect O100 flex Flip lock A25 DT DT 5x5 DT 5x5 DT3x4 ...

Page 36: ...77420 35 107 Arrangement of lead wire Arrangement when replacing T700 Arrange the T700 by DT as shown in figure DT 10x12 DT 3x4 DT 5x5 ...

Page 37: ...e Flash P C board and related parts Install A4 and 0 Q200 to 0 A101 Do not pinch lead wires TY CNL D1 7x4 0 CNL D1 7x2 5 7 T901 Lower flex board X58 Arrange lead wires as shown in figure A141 TY CNL D1 7x3 5 T901 Solder 22 lands for T301 and M100 ...

Page 38: ...e there are 3 parts are installed Install A3 while arranging flex TY CNL D1 7x4 0 x3 CNL D1 7x2 2 CNL D1 7x2 5 x2 9 0 A51 Tripod plate assy Install T901 flex as shown in figure The screw hole is matched CNL D1 7x1 6 x4 0 A51 CNL D1 7x2 5 x3 ...

Page 39: ...R block base support pillar Required equipment Block gauge for 35mm Dial gauge comparator etc same as K100D Measure height of 0 C000 base support pillar 3 places from the mount surface as shown in the figure Tolerance In common with 77310 50 1 0 17 0 13 mm Using block gauge for 35mm 45 46mm 4 51 4 81 mm 0 51 4 0 81 4 4 G100 T72 T940 AF SW S300 T31 DT 7x10 ...

Page 40: ...ount cover then put downward Install A22 x3 to pillar Confirmation Center plate must move up and down and right and left by own weight 0 C000 Align with two guides post while arranging lead wire and flex then press 0 C000 against the body CAUTION Confirm that A22 is not stick on the magnet A31 x3 Tighten three screws until stop while press 0 C000 against the body Adjustment A31 x3 Screw back two t...

Page 41: ...adjustment is 6 38 Maximum and minimum difference is within 0 01 You must finish the adjustment with turning A31 tighten direction Clockwise direction After adjusting clean A31and around A31 then apply Super X on screw as shown in figure Caution Do not touch it until Super X becomes hardened Connect T640 Plug in Do not give too much force Not disassembled parts When adjusting Tolerance Only for 77...

Page 42: ...1 107 14 0 T100 Main P C B Install T100 with avoiding pinch lead wires and flex CNL D1 7x2 5 x2 TY CNL D1 7x3 5 Affix T67 If T67 is new part make a hole for screw hole CNL D1 7x2 5 Apply screw lock SL SL SL SL ...

Page 43: ...aken care no stress no bend otherwise it will affect the performance of SR function Solder 6 lead wires Connect flex 4 positions Plug in Connect flex 3 positions Flip lock Affix A38 PVF tape 3 8x10 Solder 18 lead wires Arrange lead wire by BT 6x15 Affix A61 PI tape 13x17 Confirm to A26 x2 ...

Page 44: ...ching brighter lens is advisable to assist better visibility Ex FA 50mm f 1 4 Lens The photo sensor must be positioned at the AF frame and there is no inclination as shown in the figure Adjust Loosen the screw a little move J100 to adjust whole position Tighten screw and ensure position is not changed After adjustment is completed apply the Daia bond to J100 4 places as shown in the figure ADJ Bon...

Page 45: ...er adjustment lever viewfinder must be engaged 18 A150 and A201 Front cover and Back cover Connect T920 flex Plug in Install A201 from connect side while opening the connecter cover as shown in figure Set the AF mode lever to AF both of body and A157 Solder 2 lead wire To T750 flex A150 ...

Page 46: ...off A151 grip rubber Install screw TY CNL D 1 7x4 5 x2 Peel off A161 grip rubber install screw CNL D 1 7x4 0 x2 Confirm the installation condition of each cover Grip rubber other Confirm M16 and A26 position Red Black M16 A26 Left side Between A201 and A16 Upper J100 part ...

Page 47: ...oldered unsolder main switch land Apply G151 on main switch contact Confirm that there is no dust or no damage on contact The contact must be the same height Solder 6 lead wires from A301 Connect flex Flip lock the fix DT 5x5 Pop up the flash by releasing the lever as shown in figure following page Main SW land G151 Black Blue Green Brown Yellow White ...

Page 48: ...n Install temporary bottom cover at this point After adjustment apply screw lock to M100 adjustment screw 3 screws then install original bottom cover Install battery cover and shaft to bottom cover then install to body with opening battery cover A191 x2 TY CNS 1 7x6 0 A185 x2 TY CNL D 1 7x3 5 A255 x2 TY CNL D 1 7x4 5 A34 x3 CNL D 1 7x5 0 U4 TY CNL D 1 7x7 0 Confirm that the battery cover is closed...

Page 49: ...egulated DC power supply 8 3V 3A DC cable Am meter DC coupler AC adaptor 21 1 Check Power Connect DC cable to Regulated DC power supply and set DC8 3V 3A Turn OFF the camera then connect DC cord to the camera With this condition make sure there is a no short circuit or no battery leak Caution If there is over current disconnect the power immediately Pay attention to the flash board Turn on the pow...

Page 50: ...ect AC adaptor to the camera Connect the camera to PC by USB cable then turn ON the power 21 3 Adjustment Kr PDCAdj Double click D_SLR_M100_3point exe in the Kr_CCD_Adj_ Folder to start up software Below screen will be displayed AF Focus Adjustment Sensor Angle Adjustment ...

Page 51: ... camera Attach the AF position jig Cross to the camera and set the Light source toLV12 Set the camera with AF position jig to center of Light source window and click OK Turn the adjustment screw No 1 or No 3 by HD driver until green is indicated on Value window OK When green OK is displayed press Stop SCREW No 1 SCREW No 2 SCREW No 3 OK ...

Page 52: ...position jig Square to the camera and set the Light source toLV12 Set the camera with AF position jig to center of Light source window and click OK Turn the adjustment screw No 3 or No 1 by HD driver HD M1 5 until green is indicated on Value window OK When green OK is displayed click Stop OK ...

Page 53: ...k Display wave Click Start Set the camera Set the 2m AF chart No 1 and attach the 2m AF master lens to the camera Set the chart with blow condition 1 Distance between camera mount and chart 1 954 5mm 1 9545m 2 Chart should be set center of lens axis and horizontal and vertical following page ...

Page 54: ...m When match the center of red line with center of waveform click STOP Click Display focus data Click START Turn the adjustment three screw No 1 3 evenly by HD driver HD M1 5 until green is indicated on Value window OK When green OK is displayed click STOP AF_Chart No 1 OK Tolerance 0 3 You can select the range ...

Page 55: ...ustment confirm other two adjustment If you readjust one adjustment confirm other two adjustment again Carry out adjustment and confirmation repeatedly until all adjustment become OK After finish the all adjustment click Close to finish adjustment Apply screw lock to three adjustment screw for M100 Alpha CROSS Beta SQUARE FOCUS OK OK OK ...

Page 56: ...wer supply 8 3V For confirming External power supply AC adaptor Lithium ion battery Use DC coupler with affix insulation tape condition Using AA batteries Set the power supply 6 0V Method for checking Caution Be sure to set the correct voltage Do not mistake to set type of power source Connect DC cable to the power supply and set DC6 0 or 8 3V 3A Install DC coupler into battery chamber Connect DC ...

Page 57: ...ting It takes approx 90sec for loading firmware Caution Do not turn OFF the power Display and main power will turn off automatically when FW installation is finished Confirm that the FW is installed finish 2 2 Data initialization Caution All EEPROM data will be initialized Execute only replacing T100 Turn OFF the power Insert SD card for initialization to the camera Turn ON the power while opening...

Page 58: ...reparation Set focus mode to MF Attach the SR adjustment stand to the camera Put the camera on the stable table with lens downward 3 2 Procedure for adjustment Start up the computer Connect the camera to the computer via USB cable and connect the AC adapter Power ON Confirm that the camera is recognized by computer Hot plug icon Double click SR Operation exe in the SR_Operation ver1 03 folder Adju...

Page 59: ...ustment is passed If you stop the adjustment click Stop button When below screen is displayed the adjustment is completed Confirm OK SUCCESS is displayed then click X button to complete the adjustment If adjustment is NG green color display will be changed red color display and indicate error code Refer to the technical information for The table of error code ...

Page 60: ... lens ID number Diaphragm set ring F8 KA 0 1A For battery level adjustment Battery check level DC coupler for K r with custom with affix insulation tape DC cable Regulated DC power supply 8 3V 3A and above AGC adjustment M100 auto gain control AF master lens for 2m Light source LV12 4 1 Preparation Set focus mode to MF Set the Mode dial to M Connect AC adaptor and DC coupler to the camera Connect ...

Page 61: ...able to the camera Set the connected DC power supply to DC6 0V 3A Click OK to execute adjustment When adjustment is completed OK will be displayed Disconnect DC cable and connect the AC adaptor to the camera 4 2 2 BV adjustment Attach F8 set ring to the camera and set D20 D20 01 at full open Caution Set the camera at center of Light source window Caution Cover the camera and Light source window by...

Page 62: ...the message on screen and change the Light source and set plate When adjustment is completed OK will be displayed EX display Selected BV and AGC Go to the next page F5 6 Set Plate How to attach F5 6 set plate to 95901 D20 ...

Page 63: ...message on screen Attach the AF master lens for 2m to the camera Set the focus mode SW at MF Click OK Set the Light source at LV12 Click OK to execute adjustment When adjustment is completed OK will be displayed Confirm Unconnected is displayed then click X button to finish adjustment ...

Page 64: ...ust exe in 77420_BVAdjust folder to start up software Click BC Check button Click CHECK button Attach the customize DC coupler and DC cable to the camera Set the connected DC power supply to DC6 0V 3A Turn ON the camera Click OK to execute chinking Go to the next page ...

Page 65: ...setting voltage will be displayed Confirm the difference between Saved data and setting voltage If there is a big difference execute BC level adjustment Click CLOSE to finish checking Saved data in camera Setting voltage Tolerance ...

Page 66: ... SP2 with USB port equipped USB cable I USB17 AC adaptor kit D FA FA Macro 50mm F2 8 Light source LV12 AF chart for 2m x2 kinds AF master lens for 2m 5 1 AF Uniformity and related adjustment Required equipments D FA FA Macro 50mm F2 8 Light source LV12 Lens cap and ME finder cap Set the mode dial at M and Focus mode switch at MF Attach the lens to the camera and set focus ring at infinity Set the ...

Page 67: ...ght source and set the camera and lens to the Light source Click OK to continue the adjustment When adjustment is completed OK is displayed Click X button to finish the adjustment If adjustment is NG NG and error code will be displayed Refer to the technical information for The table of error code ...

Page 68: ...er100 folder to start up software Following adjusting screen is displayed Input temperature and press Enter key a Select Celsius or Fahrenheit by cursor In case of NG there is possibility that the temperature is difference more than 2 between room temperature and temperature for inside of camera Adjust the camera after the camera fit in the room temperature When temperature adjustment is completed...

Page 69: ...When horizontal sensor adjustment is completed right screen is displayed Replace AF chart No 2 horizontal line then press OK Align the camera and chart Up and down then adjust When adjustment is completed OK screen will be displayed as shown in below Click X button to finish adjusting software If adjustment error is displayed NG and error code will be displayed Refer to Table of error code Positio...

Page 70: ...MTest Light source EX LB3300 A light PC Windows Xp SP2 with USB port equipped Master lens D20 or D20 01 and Diaphragm set ring F8 KA 0 1A Use the same master lens as the ID number printed on CD ROM USB cable I USB17 AC adaptor kit Dark curtain Color temperature tester for calibration LV meter for calibration 6 1 Setting the computer and Light source Set mode dial to M and Set focus mode lever to M...

Page 71: ...ting screen is displayed click Execute to start adjustment Follow the screen for adjustment Middle of adjustment Please set LV message will be displayed set the light value to LV8 LV11 or LV12then click OK Go to the next page ...

Page 72: ...or is displayed NG and error code will be displayed Refer to Table of error code When starting adjustment if ID error is displayed 1 Select Manual on Serial ID screen and Input correct CMOS ID number 2 Click START to execute adjustment 3 If still displaying error message even input correct ID number contact PENTAX Global Service Department and inform the ID number ...

Page 73: ...ation can be adjusted by adjust repeatly Required equipments Programmed software for 77420 K r CS_MTest Set mode dial to M and Set focus mode lever to MF Connect the camera and PC with USB cable and turn ON the camera Double click K r SLR_ MTest exe in adjustment folder to start up software Select WDC and click Execute to start adjustment When adjustment is completed OK will be displayed Click END...

Page 74: ... Controller stage speed meter Chart for SR gain adjustment Attached in service manual for 76700 Personal computer Windows Xp PS2 which equipped USB port DA 50 200mm lens USB cable Enough capacity of Battery 7 1 Setting the SR adjustment tools Set the SR adjustment equipment on the desk Desk must be stability and sturdy Set the chart 2m away from the camera stand Setting the stage controller and sp...

Page 75: ...n the power of the controller ON and adjust the meter to 1 000 rpm 1 000 turn min by turning controller dial Then turn OFF the controller Connect the camera and computer via USB cable and then turn ON the camera 7 3 Adjustment procedure Double click K r_SR_Gain_ver exe in K r_SR_Gain folder to start up software Adjustment screen will be displayed Press Execute button to start adjustment Go to the ...

Page 76: ...r and Press OK button next adjustment will be started Turn OFF the controller Change the position of camera and stage for Y adjustment Caution The weight of the stage is very heavy so pay attention the handling Do not hold black stand parts Set the chart 2 00m from tripod screw on camera stand and match the chart with frame of spot measurement in the view finder Go to the next page ex K10D ...

Page 77: ...ent The same procedure as X adjustment Turn OFF the controller and click OK button Next adjustment will be started When all adjustment is completed OK screen will be displayed Click to finish adjustment software If adjustment error is displayed NG and error code will be displayed Refer to Table of error code ...

Page 78: ... EV Steps 2 1 2 EV 2 Sensitivity steps 2 As AV steps 22 Using Aperture Ring 2 Permitted When attached master lens Setting for Light source Tv and ISO LV8 LV9 Shutter speed ms 1 250 1 4000 1 500 1 4000 ISO sensitivity ISO200 ISO3200 ISO200 ISO1600 Set lens aperture full open F1 4 8 2 Procedure for taking picture Set the light value at LV8 or LV9 and Set lens aperture full open F1 4 Set ISO sensitiv...

Page 79: ... Confirms it from the position of the front to the LCD monitor and do not make scratch on LCD monitor Example Select the histogram zone A D of the peak position of Tv 4000 from the below In the case of above the histogram zone is B Obtain the shutter speed ms referring the conversion table In the case of above difference of peak position is 1 0mm and histogram zone is B Therefore the shutter speed...

Page 80: ... 0 020 3 0 0 282 0 301 0 321 0 340 6 5 0 161 0 121 0 078 0 036 3 5 0 289 0 311 0 334 0 356 6 0 0 167 0 130 0 090 0 052 4 0 0 295 0 320 0 346 0 372 5 5 0 174 0 140 0 103 0 068 4 5 0 302 0 330 0 359 0 388 5 0 0 180 0 149 0 116 0 084 5 0 0 308 0 339 0 372 0 404 4 5 0 186 0 159 0 129 0 100 5 5 0 314 0 349 0 385 0 420 4 0 0 193 0 168 0 142 0 116 6 0 0 321 0 358 0 398 0 436 3 5 0 199 0 178 0 154 0 132 6...

Page 81: ...nput 0 26 and click Input Data become effective When completed the adjustment click in order to Close Cl Unconnect end to finish the program software Confirm confirm the deviation by histogram again and confirm the shutter speed should be within below tolerance Tolerance for adjustment 0 224 0 290mS Standard 0 265mS Tv4000 Confirm confirm Tv6000by histogram There is no big difference from Tv4000 L...

Page 82: ...status AF focus shift function for individual lens If fine adjustment is necessary for AF focus on lens side it came be compensated by camera with this adjustment It cam be adjusted 20 kind of AF lens Basically the same as K10D Refer to T07 005 Start up PDCAdj_v204 exe Below main screen will be displayed The set up information of a present camera appears to the left of the screen when the Execute ...

Page 83: ... control F 9 1 Confirm image Execute confirmation without connecting with PC To avoid camera shaking and misalignment with chart set the drive mode to Remote Control and set Instant Review to 5sec Align the viewfinder frame between red square and blue square as shown in figure below And set the camera at center of chart Caution1 Direction of eye should be center of viewfinder Camera should be set ...

Page 84: ... should be evenly for right left top and bottom and there is no tilting at center of image Tolerance Pal lax top and bottom right and left 0 1mm or less on image screen Tilt Within 30 minutes When adjusting image shift adjust as close as zero If it is not within tolerance calculate shift amount Ratio and tilted amount then execute following adjustment ...

Page 85: ... up software When adjustment screen is displayed click Get button Caution If value is indicated other than zero click ALL Reset to clear adjusted value At first adjust tilt by moving slide If adjustment value is zero go to next step EX 5 minutes Tilt image to counterclockwise Click Set When adjustment is completed OK will be displayed ...

Page 86: ...d 2 Right and left by slider If adjustment value is zero go to next step EX Top and bottom 0 03 Image shift to topside Right and left 0 42 Image shift to left side Click Set When adjustment is completed OK will be displayed Click Quit to finish adjustment ...

Page 87: ...0 Caution Execute this adjustment when replaced T100 or change the serial number Required equipments Warranty Record software PC USB cable AC adaptor kit Connect the camera and PC by USB cable then turn ON the power Double click Warranty_Record_SoftVer_ exe in adjustment software folder Put check mark in BarCode by mouse pointer Input serial No then push the Execute button EX 1234567 When OK is di...

Page 88: ... picture AF master lens for D SLR AF checking stand If fine adjustment is necessary execute 8 5 AF sift adjustment Confirm SR function If already adjusted confirmation is not necessary Confirm image sensor and cleaning Caution Do not wipe with strong force otherwise it will affect SR performance Use cleaning stick 11 2 AF check Attach the lens A position and set AF lever to AF Confirm AF function ...

Page 89: ...sh is pushed down by finger If flash does not retract properly or too much gap follow the Adjustment of flash retract position Confirm that must be indicated and discharged when an external flash is attached 11 6 Adjustment of Flash retract position Preparation Hexagonal driver 0 9mm HD M0 9 If flash does not retract properly or too much gap more than 0 3mm execute below adjustment Adjustment Turn...

Page 90: ... USB cable FA50mm F1 4 Aperture must be within standard Light source EX LB 3300 A light SD Card for taking picture Image viewing software Required indicate brightness level by Histogram EX Adobe Photo shop etc Attach the lens FA50mm to the camera and set the aperture to the A position Set the camera as follows Image Natural Capture mode Program mode Metering Method Multi Segment metering Focus mod...

Page 91: ...Sharpness Normal Contrast Normal Color Space sRGB Default setting Put the Color checker on the Gray chart as shown in the figure below Light up the Color checker by the A light Set the WB White Balance mode to Tungsten Light Position the camera so that the Color Checker and Gray Chart are framed in the viewfinder as shown in the figure below while looking through the viewfinder Take a picture of t...

Page 92: ...lamps Attach the lens to the camera and set the lens aperture to A position Set the camera as follows Capture mode AV Aperture priority mode Focus mode SW AF Focus point Spot White Balance Daylight color Recorded pixels Default setting Quality Level Default setting Color Saturation Normal Image Sharpness Normal Contrast Normal Set the aperture to open position by Av dial of camera Set the chart an...

Page 93: ... to OFF and capture 10 images Camera is set on Horizontal Vertical position Set the SR switch to ON and capture 10 images Camera is set on Horizontal Vertical position CAUTION Release the shutter about 1 second later after hand shake indication is ON in the view finder Open the image with Image viewing software Compare the images SR ON SR OFF and confirm that whether SR function is effective CAUTI...

Page 94: ... to make clear the position of dust with such as coordinate If you see dust clearly on image there is possibility that the dust enters into the inside of CMOS Disassembly and cleaning or replace CMOS Cleaning method of dust CAUTION 1 Do not wipe with strong force otherwise it will be affect performance 2 For safety use AC adapter or full capacity of battery 3 Do not use a brush less blower and a s...

Page 95: ...ible 12 Adjustment each setting 12 1 Default setting If necessary This setting is initialize camera as condition of product shipment Required equipment SD card For default setting for 77420 AC adaptor Turn OFF the camera and connect AC adaptor to the camera Insert the SD card For default setting into the camera Turn ON the camera while opening SD card cover When full version of DSP and CPU are dis...

Page 96: ...ra Or you can select DEBUG MODE DISABLE from test menu and cancel the test mode Execute above and Turn the main switch to ON while pressing Menu button and confirm VER x xx is displayed If Full version of DSP and CPU are displayed execute from above 2 Method for Updating Firmware Version 2 1 Method for Updating Firmware version for customer Required equipment Latest product Firmware for customer S...

Page 97: ...ng SD card cover Right screen is displayed on LCD monitor If you cancel the update disconnect the power first then remove SD card Remove the SD card when the message EJECT SD CARD is displayed then starting updating It takes approx 90sec for loading firmware CAUTION Do not turn OFF the camera When POWER OFF is displayed Turn OFF the camera Updating is completed automatically DETECTED BOTH F W FILE...

Page 98: ...Meter ON 2 200mA 2 500mA 2 500mA 2 800mA 2 800mA 2 800mA 6 Driving AF motor phase difference AF SDM 1 500mA 1 200mA 1 200mA 2 800mA 2 800mA 2 800mA 7 Driving AF motor Contrast AF SDM 1 800mA 1 600mA 1 600mA Releasing shutter 3 600mA 3 600mA 3 600mA 8 3 600mA 3 600mA 3 600mA 9 Recording image after release the shutter 600mA 600mA 600mA 10 Bulb 1 000mA 1 000mA 1 000mA 11 Displaying menu LCD 600mA 60...

Page 99: ...77420 98 107 Block Diagram 77420 Circuit Block Diagram 1 2 ...

Page 100: ...77420 99 107 77420 Circuit Block Diagram 2 2 ...

Page 101: ...ge 10 Center Over ERROR 11 Obit Core ERROR Weak connector contact Bending flexible board 12 Obit Center ERROR Corner_Obit 13 Obit Corner ERROR 15 4HZ ERROR 16 6HZ ERROR Frequency 17 10HZ ERROR Gyro 14 GYRO VALUE ERROR Miss arranging gyro board lead wire 22 Reverse ERROR Coil is reversed 7 23 0HZ ERROR No use Table of Error Code2 SR unit adjustment SR gain adjustment Table of Error Code 7 bb Error ...

Page 102: ...stment need lens cap 35 Lens cap error during FPN adjustment need to take out the lens cap 36 Not yet adjust monitor offset 37 FPN video dump data is too hi 38 FPN video dump data is too low 39 FPN Flag error 40 Camera temperature is out of standard 41 Uniformity data error in adjustment 42 Uniformity data error in check 43 V saturation data is out of standard Table of Error Code 4 for FI AF adjus...

Page 103: ...ictor data is too hi 51 H D2 predictor data is too low 52 H D2 predictor data is too hi 53 V D1 predictor data is too low 54 V D1 predictor data is too hi 55 V D2 predictor data is too low 56 V D2 predictor data is too hi 57 H D value data is too low 58 H D value data is too hi 59 V D value data is too low 60 V D value data is too hi Table of Error Code 5 for Digital adjustment Digital adjustment ...

Page 104: ... data error Under 37 Still ISOG minus Light source setting NG or others 38 Still ISOG over 39 Still ISOG under 40 Temperature too hi 41 Temperature too low 42 Too much SW Pixel Defect 43 Too much SW Black Pixel Defect 44 Act OB level is too low 45 Bv data over 46 Bv data under 47 Exposure data over 48 Exposure data under 49 Through PPG data error 50 Through PPG data error 51 Through ISOG minus Lig...

Page 105: ...Cause 0 SUCCESS 1 Comport Error 2 Camera Communication Error 3 Barcode read Communication Error 4 Barcode Read Error 5 Barcode Date Error 6 UID Error 7 Verify Error 8 Time Out Error 9 Remove Drive Error 10 Write Date Error 11 Read Date Error 12 Model Error Not mach Model number and software 13 FW Version Error FW version is not correct 14 Barcode Size Error ...

Page 106: ...or 76830 K10D Master body for calibration PENTAX will rend the master body Please contact with us F5 6 Set plate for D20 95901 D20 If you have D20 01 you do not need set plate F5 6 Set plate A For Lens ID No 101 130 No 95901 D27 00A F5 6 Set plate B For Lens ID No 1 99 No 95901 D27 00B DC code connect with power supply or DC adaptor Battery consumption check No 95901 D25 For 76700 76700 SR adjusti...

Page 107: ...6 107 Chart for SR Gain adjustment 1 When print the chart set the printer to high quality and use high quality paper or glossy paper 2 part must be 17mmx17mm actual size 3 Use either chart according to setting ...

Page 108: ...77420 107 107 0 1 2 3 4 5 6 7 8 9 10 10 9 8 7 6 5 4 3 2 1 0 10 9 8 7 6 5 4 3 2 1 0 0 1 2 3 4 5 6 7 8 9 10 AF confirmation chart and scale Ver 2 Chart Scale ...

Reviews: