

1620 HAWKINS AVE., SANFORD, NC 27330 • (919) 566-8000
10951 WEST LOS ANGELES AVE., MOORPARK, CA 93021 • (805) 553-5000
WWW.PENTAIRPOOL.COM
All Pentair trademarks and logos are owned by Pentair or by one of its global affiliates
.
IntelliConnect™ and
Link
2
O™
are trademarks of Pentair
Water Pool and Spa, Inc. and/or its affiliated companies in the United States and/ or other countries. Unless expressly noted, names and brands
of third parties that may be used in this document are not used to indicate an affiliation or endorsement between the owners of these names and
brands and Pentair Water Pool and Spa, Inc. Those names and brands may be the trademarks or registered trademarks of those third parties.
Because we are continuously improving our products and services, Pentair reserves the right to change specifications without prior notice.
Pentair is an equal opportunity employer.
© 2018 Pentair Water Pool and Spa, Inc. All rights reserved. This document is subject to change without notice
.
P/N 523323 Rev. A 8/15/18
Removing the Old IntelliConnect from Your Account
Once an IntelliConnect
™
Control and Monitoring System is paired to a Pentair Link
2
O
account, that device’s PIF number must be erased from the account before it can be
assigned to a new or separate account. This can be performed within the Pentair Link
2
O
™
Technology App.
1. Before removing the old IntelliConnect from your account, take note of all device
settings so they can be repeated when the new control board is added to the account.
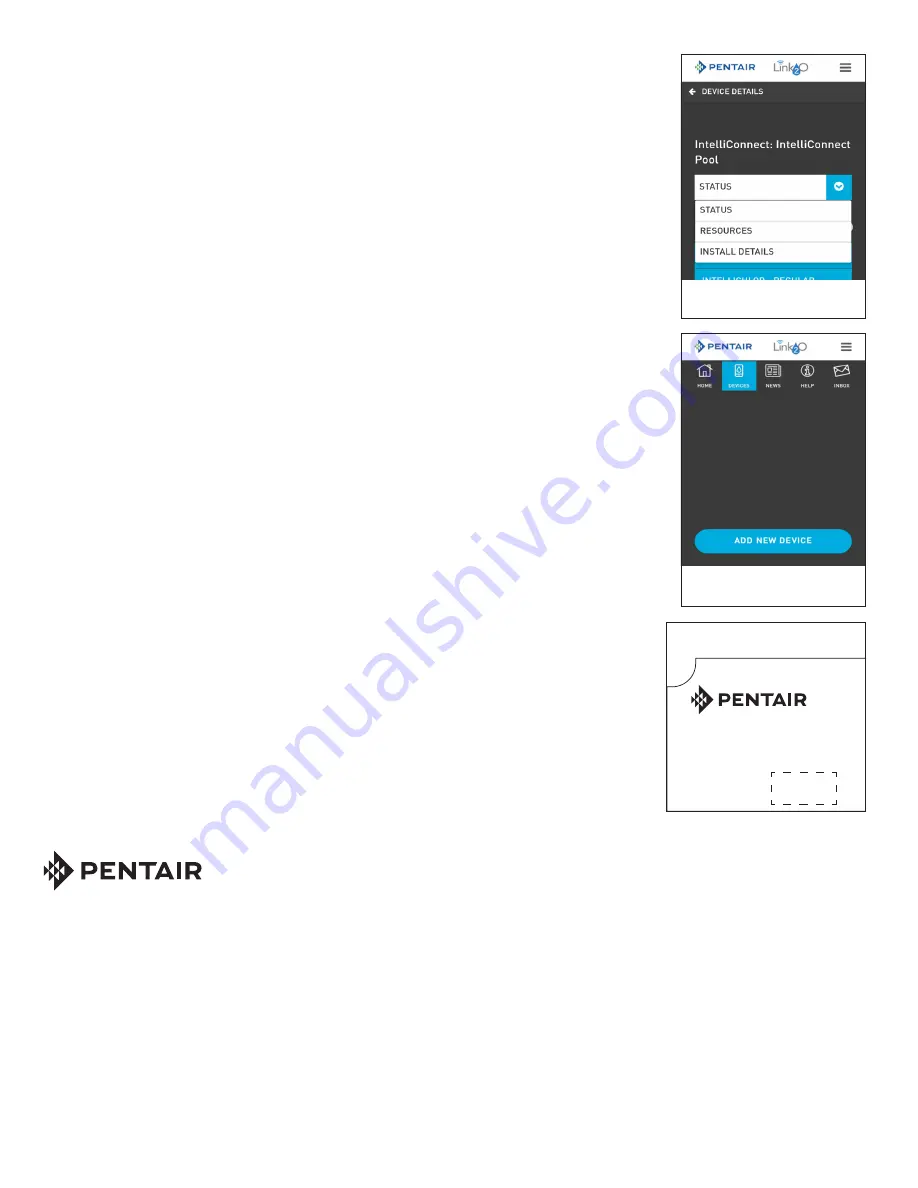
2. While signed into the app, navigate to the dashboard screen and open the Status drop
down menu. See
Figure 3
.
3. Select “Install Details” from the drop down menu. See
Figure 3
.
4. Press the “Cancel Equipment” button at the bottom of the Install Details page to
remove the the old IntelliConnect from your Pentair Link
2
O account.
Pairing the New IntelliConnect to Your Account
After removing the previous IntelliConnect control board from your Pentair Link
2
O
account:
1. Log in as a customer via the Pentair Link
2
O Technology app.
2. After logging in, the Home Screen and welcome message will display.
3. Tap the Devices tab at the top of the screen. See
Figure 4
.
4. Press the Add New Device button at the bottom of this screen. See
Figure 4
.
5. The Product Information screen will display. This screen allows you to input your
system information.
Enter all the required information for your IntelliConnect system. Your specific Device
ID can be found inside the enclosure on the bottom left of the control panel overlay
(see the dashed box in
Figure 5
).
6. Tap the Save Changes button at the bottom of the Product Information screen. The
new IntelliConnect control board is now paired to your Link
2
O account.
7. Referring back to the previous system settings and programs noted before removing
the old control board from your account, reprogram all necessary relays and system
components accordingly.
Refer to the
IntelliConnect Contol and Monitoring System Installation Guide
(P/N
523338) and the
Link
2
O Technology App User’s Guide
(P/N 523325) for specific
instructions regarding individual system component setup within the Link
2
O app.
Figure 4
LINK
DEMAND
RESPONSE
AU
TO
TIMEOUT
SER
VIC
E
INTELLICONNECT
™
CONTROL AND MONITORING SYSTEM
RELAY 1 ON/OFF
MODE
RELAY 2 ON/OFF
Figure 5
Figure 3
*523323*


