Rev. C 10-31-02
3
P/N 520044
SECTION V.
CABLE SPLITTERS (OPTIONAL)
Most Power Center circuit boards include 2-qty. COM PORT sockets. However, if there is no unused
COM PORT socket available, it will be necessary to use a Cable Splitter (P/N 6CONDDUAL).
Disconnect the existing Indoor Remote cable from the COM PORT socket.
Plug the short cable (attached to one end of Cable Splitter) into COM PORT socket.
Plug existing Indoor Remote cable into one of the open sockets of the Cable Splitter.
Plug the silver cable (protruding from flexible conduit of Receiver) into the other open socket of the Cable Splitter.
SECTION VI.
HAND-HELD REMOTE
The Hand-held Remote will control four circuits.
Although the Remote is capable of duplicating any four of the Equipment Buttons located on the Indoor Remote, it
has been preset at the factory to control the following:
Spa
Pushbutton activates the Spa circuit (duplicates Spa Button on Indoor Remote).
“A”
Pushbutton activates Auxiliary 1 circuit (duplicates Button 1 on Indoor Remote).
“B”
Pushbutton activates Auxiliary 2 circuit (duplicates Button 2 on Indoor Remote).
“C”
Pushbutton activates Auxiliary 3 circuit (duplicates Button 3 on Indoor Remote).
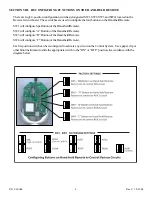
If you would like to control circuits other than Spa, Aux1, Aux2 and Aux3, it is possible to make adjustments to the
circuit board located inside the Receiver unit.
USING THE HAND-HELD REMOTE
To activate a circuit, press and hold the appropriate "ON" button for at least
a full second
. To deactivate, press
and hold the OFF button in the same manner.
IMPORTANT
The Hand-held remote may be used with wet hands, but should never be submersed in water, as this could damage the
unit. If accidental submersion occurs, dry unit out by removing battery cover and removing battery. Position unit so that
water can drain out. Reassemble when completely dry.
SECTION VII.
RECEIVER CIRCUIT BOARD
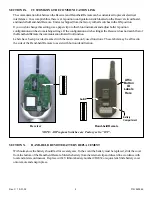
To access the circuit board inside the Receiver, remove the two retaining screws located on the underside of the
Receiver, and slide the Receiver case up and off of its backplate.The diagram below gives an overview of the Reveiver.


