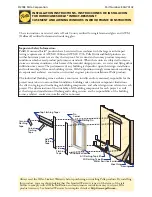
background image

5

EXTERIOR SEAL

A. 

Place a corner bead of sealant at the jambs and head


connecting the existing frame and the replacement 
window frame.

Caution: DO NOT seal the bottom exterior to allow for 
incidental water to weep.


5A

1”

5B

Sill

5A

B. 

Optional: Place a bead of sealant 

where the sill 

adapter meets the sill. If sealant is placed on the sill 
leave at least 1” of sill adapter unsealed at each end. 
This sill allow for incidental water to weep. 

POCKET REPLACEMENT

'ŽƚŽƉĂŐĞϭϭĂŶĚϭϮĨŽƌ/ŶƚĞƌŝŽƌĂŶĚdžƚĞƌŝŽƌ&ŝŶŝƐŚŝŶŐ/ŶĨŽƌŵĂƟŽŶ͘

    FIXED WINDOW REPLACEMENT:

FIXED WINDOW REPLACEMENT

6

FIXED SASH REMOVAL

I

N

TERIOR SASH STOP

1A

Interior 
sash stop

1A

1A

Note: Confirm the opening and window dimensions prior to removing the 
existing window sash.

A. 

Score paint or varnish along 
interior sash stops

 with sharp 

utility knife. Carefully remove the 
interior sash stops at jambs (sides) 
and head (top) using a putty knife 
and pry bar. Set aside for reuse.

B. 

Remove the old sash.

 Remove 

other trim, stops, flashing or 
brickmould as required.

6A

6A

C. 

Clean opening thoroughly 

and repair or replace any rotted or 

damaged framing if required. 

Note:  The end result should be a clean flat uninterrupted surface 
on the bottom, top and sides of the opening where the new window 
will be installed.

D.  

Test fit the window,

 make any adjustments to opening as needed.

6A

Summary of Contents for 816G0101

Page 1: ...Precision Fit Casement and is designed to replace the fixed center window that shares a common stool and sloped sill with the adjacent windows and has removable interior stops This application is typi...

Page 2: ...indow sash OUFSJPS TBTI TUPQ YUFSJPS CMJOE TUPQ 1BSUJOH TUPQ PUUPN TBTI 4UPPM 4JMM QSPO 5PQ TBTI PUUPN TBTI XFJHIU 5PQ CBMBODF DPSE BMBODF DPSE QVMMFZT 5PQ TBTI XFJHIU PUUPN CBMBODF DPSET OUFSJPS TBTI...

Page 3: ...be a small wedge of wood at the bottom of the upper sash that is next to the parting stops To make it easier to remove the parting stop use a chisel to knock off the wedge D Lower the top sash and cu...

Page 4: ...the leg groove multiple times at the desired dimension with a utility knife will help the leg break easier The sill adapter may also be trimmed to correct dimension using a table saw 3 SEALING AND FA...

Page 5: ...bove the partially driven factory supplied attachment screws in the jambs NOTE If the shims are aligned with the attachment screws the frame may bow away from the shims when driving the screws Drive e...

Page 6: ...ms or improper application of the foam may cause the window frame to bow and hinder operation A Apply insulation foam From the interior insert the nozzle of the applicator approximately 1 deep into th...

Page 7: ...ED SASH REMOVAL INTERIOR SASH STOP 1A Interior sash stop 1A 1A Note Confirm the opening and window dimensions prior to removing the existing window sash A Score paint or varnish along interior sash st...

Page 8: ...the bottom of the window Flashing Tape 2A 2B 6E 6F 7 PREPARE THE OPENING EXTERIOR Bracing 2D 7B A Remove plastic wrap and cardboard packaging from window Remove the wood spacers on the frame B Attach...

Page 9: ...tilting the top into place Make sure the window is up against the existing stool Center the window between the sides of the opening to allow clearance for shimming and partially drive one of the top...

Page 10: ...interior insert the nozzle of the applicator approximately 1 deep into the space between the window and the rough opening and apply a 1 deep bead of foam This will allow room for expansion of the foam...

Page 11: ...paint stain or finish the vertical and horizontal sash edges On single hungs and double hungs do not paint stain or finish the vertical sash edges any finish on the vertical sash edges may cause the s...

Page 12: ...systems which do not allow for proper management of moisture within the wall systems The determination of the suitability of all building components including the use of Pella products as well as the...

Reviews: