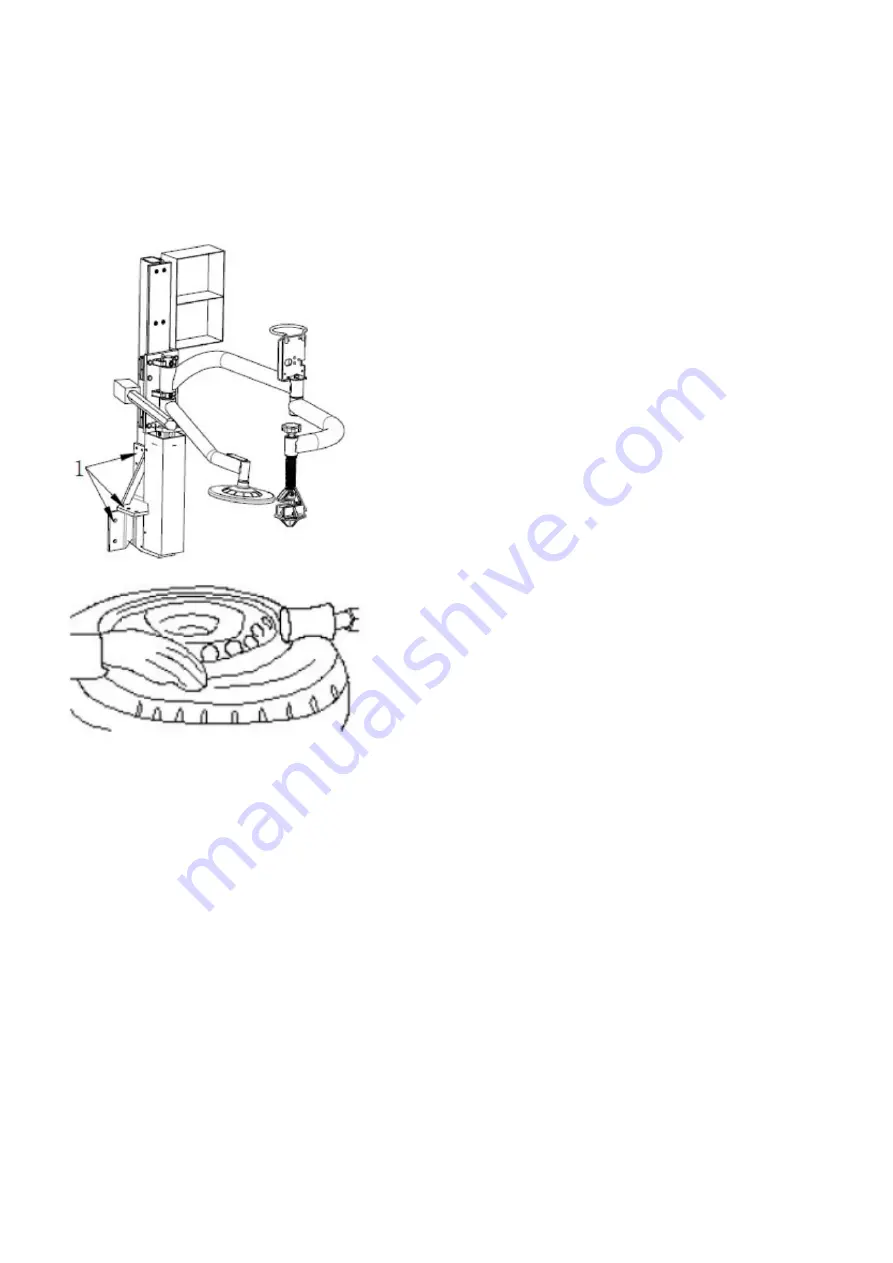
Assembly
1. Disconnect the tyre changer from the power
supply and air source.
2. Mount the 066 auxiliary arm to the
corresponding position on the machine body
in the ”1” area with the suitable bolt. (reserved
mounting hole)
3. Connect the air hose to the corresponding joint
through the back hole of the body.
Usage
Assembly and disassembly of large flat tyres is a
difficult job. With the help of 066, the arm helps to
mount/dismount the tyre from the tyre clutch and
makes the operation easier. This is a good help for
the tyre changer.
Fit the tyres
Loosen the clamp according to the manual.
Squeeze the tyre from the outside, tighten the
corresponding pedal to open the hooks. Place the
tyre on the mounting table. Press the
corresponding pedal to close the hooks until they
are close to the rim.
Disassembly of tyres
1. Normally the tyre is tightly attached to the rim.
Loosen the tyre with tyre weight rollers first, or
use the clinch press. Pull the auxiliary arm
above the tyre. Place the tyre weight rollers
above the tyres so that they do not touch them.
Lay down tyre weight rollers to push the tyre
down. Press the pedal that rotates the
assembly table. Loosen the clamp from the
tyre.
Fitting the tyre
Lubricate the tyre clincher and turn the mounting
table, mount the bottom clincher with the mounting
head. Pull out the hexagon bar, press the upper
clinch under the mounting head 5 mm with the
tyre pressure roller, turn the rotating arm and move
the tyre block above the tyre. Do not touch the rim
during the operation, otherwise, it may cause
damage to the rim due to friction. Press the
pedal to rotate the assembly table and tyre
pressure block, lower the auxiliary arm to press the
tyre under the rim. Mount the tyre with the
mounting head. Pay attention to safety during
operation.
Pump the tyre
Important: It is very dangerous during the inflation
operation, take it carefully and be aware that it can
be dangerous if there are problems with the tyres
or rims. The possible explosion causes a large
force that can cause injury or death to the user.
Warning: Lubricate the tyre weight rollers (upper)
and clinch before operation.
2. Disassembly of the upper clinch
a) Move the mounting head near the edge of the
rim, turn the tyre pressure lever to move the tyre
pressure block above the tyre, press the shift lever
to push in the tyre and insert the lift arm in the
space between the tyre and the rim, then hang the
clamp on the mounting head.
b) Raise the auxiliary lever, turn the tyre’s printhead
in the opposite direction. Press the tyre with the
shift lever to create enough space.
c) Press the pedal for the mounting table so that
it rotates. With the help of the tyre’s print head, the
upper tyre lock is released.
d) Raise the auxiliary arm to move the tyre press
block to its working position.
3. Disassembly of the lower clinch
Turn the tyre weight roller and move it under the
tyre, but do not touch it with the rim. Press the
pedal of the mounting table to rotate the table,
meanwhile gradually lifting the auxiliary arm to
loosen the tyre and disassemble the lower clutch.
Summary of Contents for 514019
Page 1: ...Tyre changer without a table Däckmaskin utan bord APO 3266 Item No 514019 ...
Page 10: ......
Page 19: ......
Page 20: ......
Page 21: ......
Page 22: ......
Page 23: ......
Page 24: ......
Page 25: ......
Page 26: ......
Page 27: ......
Page 28: ......
Page 29: ......
Page 30: ......
Page 31: ......


