background image

11

1.  Press 

More

 to view menu options.

2.  Press 

Clock

 to access menu options. 

3.  Press ▲/ ▼ to select 12 or 24 HR 

format, then press 

Next.

4.  Press 

to select clock hour, then 

press 

Next

.  

5.  Press ▲/▼to select clock minutes, then 

press 

Next

6.  Press ▲/ ▼ to select clock year, then 

press 

Next

7.  Press ▲/ ▼ to select current month, 

then press 

Next

.

8.  Press ▲/ ▼to select current date. 

Days

 and 

Mo

 (month) appears. 

9.  Press 

Done

 to fi nish clock mode. 
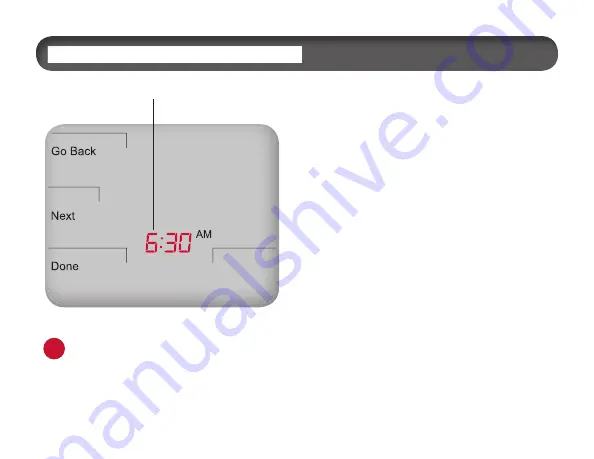
Note

: At any time, press 

Go Back

 to 

return to the previous menu, 

Next

 to 

advance and view more options, or 

Done


to save changes and return home.

i

PRESS ANY KEY TO BEGIN

In clock mode press 

to select clock hour.

Summary of Contents for Perfomance Pro T8000

Page 1: ...y 7 available outputs including economizer SD memory card interface 365 day 20 holiday programmability 7 day 5 1 1 5 2 programming OPERATING MANUAL T8000 Non ProgrammableModels T8500 ProgrammableModels Performance PRO Series T8000 Series ...

Page 2: ...e PRO T8000 Series offer the following standard features auto changeover optional remote sensors occupancy sensors three levels of keypad lockout a PIN access code filter replacement reminder and a heat cool Demand Indicator The T8500 programmable models contain up to four scheduled events per day a 365 day calendar 20 holidays holiday override temporary override a Power Harvesting feature also kn...

Page 3: ...play screen 7 Key operation 8 Set the clock month and day 11 Select Fahrenheit or Celsius temperature 12 Select the fan mode 13 Select system mode 14 Reset filter timer 15 T8500 Thermostat Program the thermostat T8500 models only 16 Program scheduled events 17 Program override 19 Select humidity setpoints 20 Program a holiday 21 Load SD Card settings 23 T8000 Series Product Specifications 24 ...

Page 4: ...iring with insulation rated for full thermostat operating voltage To avoid potential fire and or explosion do not use in potentially flammable or explosive atmospheres This product when installed will be part of an engineered system whose specifications and performance characteristics are not designed nor controlled by PECO All wiring and applications must conform to local and national building co...

Page 5: ...This is called the Default Display The Default Display appears after a short period of inactivity The Default Display can be custom configured to show user selected items only see Service Menu 520 in Performance PRO T8000 Series Installation Guide Note The Battery Indicator Service Indicator Filter Indicator and Secure Digital SD icons appear at bottom of digital display if user action is required...

Page 6: ...equence or reverts to Home Display Changes are not saved if user selects Go Back from the first option in sequence Done Saves settings and reverts to the Home Display Cancel Discards changes and reverts to the Home Display Home Display The Performance PRO T8000 Series has two Up and Down keys and four soft keys 1 3 6 below Press any key to enter Home Display from Default Display Press soft keys to...

Page 7: ...day see p 11 Keypad Lockout see p 10 Service Indicator see p 10 SD card see p 10 Override key Press to override scheduled events see pp 9 19 Current temperature see p 12 Fan Displays Fan Auto On when activated see pp 9 13 Recovery Indicates thermostat is in recovery mode Fan key Press to enter fan display see pp 9 13 Battery Indicator Appears when battery is low see p 10 Setpoint temperature see p...

Page 8: ...in cooling mode only Only one setpoint is displayed AUTO Allows system to control to both the Heat and Cool Setpoints The system will automatically changeover between heating and cooling modes as room temperature varies Cool Setpoint must always be greater than Heat Setpoint by the deadband value OFF Disables all thermostat outputs only zone temperature and time are displayed EMERGENCY Em Emergenc...

Page 9: ...by pressing the soft keys Demand Indicator Light emitting diode LED on lower left front panel that displays red when heating and green when cooling Available only when 24 VAC power is connected to the thermostat Up and Down keys Used in menus to increase or decrease variable settings or switch to the next input Note Pressing keys show the Override display unless Holiday mode is set Override key Us...

Page 10: ...f any type of keypad lockout is active Keypad lockout blocks access to certain features of the thermostat See Service Menu 340 to enable Keypad Lockout Filter Indicator Icon appears in the Default Display when the reminder timer expires see Service Menu 230 The thermostat will continue to return to the filter menu until the Done key is pressed After the Filter Indicator icon appears pressing Done ...

Page 11: ...ar then press Next 7 Press to select current month then press Next 8 Press to select current date Days and Mo month appears 9 Press Done to finish clock mode SET THE CLOCK MONTH AND DAY SET THE CLOCK MONTH AND DAY SET THE CLOCK MONTH AND DAY Note At any time press Go Back to return to the previous menu Next to advance and view more options or Done to save changes and return home i PRESS ANY KEY TO...

Page 12: ...mpleted your selection SELECT FAHRENHEIT OR CELSIUS TEMPERATURE SELECT FAHRENHEIT OR CELSIUS TEMPERATURE SELECT FAHRENHEIT OR CELSIUS TEMPERATURE Note To custom configure thermostat settings access more Service Menus See Table 2 Advanced Configuration in the Performance PRO T8000 Series Installation Guide i i Note After you complete your selection the Home Display will appear with temperature in t...

Page 13: ...icates continuous output Auto mode indicates that fan is activated only when there is demand for heat or cool Some exceptions apply see Advanced Configuration in the Performance PRO T8000 Series Installation Guide SELECT THE FAN MODE SELECT THE FAN MODE SELECT THE FAN MODE i PRESS ANY KEY TO BEGIN In Fan mode press to select desired option ...

Page 14: ...s temperature to the programmed Heat and Cool Setpoints Off mode disables all thermostat outputs and only the zone temperature and clock are displayed If Emergency Em heat is enabled in a Heat Pump system Emergency acts as the primary heat source SELECT SYSTEM MODE SELECT SYSTEM MODE SELECT SYSTEM MODE Note System modes available depend upon which system type is selected in Service Menus i PRESS A...

Page 15: ...imer Note Pressing Done restarts filter timer with previous time value selected 3 Press Go Back to bypass the reminder and return to the Home Display Note The thermostat will return to the Filter menu from the Default Display until Done is selected see Service Menu 230 in the Performance PRO T8000 Series Installation Guide i RESET FILTER TIMER RESET FILTER TIMER RESET FILTER TIMER PRESS ANY KEY TO...

Page 16: ...h factory default settings for seven days of the week as follows Time Period Start Time Heat Setpoint Temperature Cool Setpoint Temperature Occupied1 8 00 am 70 F 21 C 75 F 24 0 C Unocc1 10 00 pm 55 F 10 C 85 F 29 5 C Occupied2 Unocc2 Note To change the preprogrammed times and or setpoint temperatures follow the instructions under Program scheduled events Note See Service Menu 240 to enable two or...

Page 17: ...y flashes Continue pressing then press Select Day for multiple days 6 Press to highlight the day s to be programmed Note Selected day s for scheduled events must be underlined 7 Press Next to advance to event PROGRAM SCHEDULED EVENTS PROGRAM SCHEDULED EVENTS PROGRAM SCHEDULED EVENTS Note At any time press Go Back to return to the previous menu Next to advance and view more options or Done to save ...

Page 18: ...ashing after Next is selected Complete steps 3 11 for each scheduled event 12 Press Done to exit schedule mode Note Pressing Go Back after step 11 will show Select Day on display PROGRAM SCHEDULED EVENTS PROGRAM SCHEDULED EVENTS PROGRAM SCHEDULED EVENTS Note To return to the menu of scheduled events and continue programming select Next after Step 11 i Note To program 5 1 1 day or 5 2 days see Serv...

Page 19: ...ods until override remains in effect 5 Press Done to save changes and exit Note Override remains flashing in effect until the time period ends Note Press Cancel to exit Override PROGRAM OVERRIDE PROGRAM OVERRIDE PROGRAM OVERRIDE PRESS ANY KEY TO BEGIN Note Setpoints available depend on the system mode selected see Select System Preferences Override display options can be defined in Service Menus i...

Page 20: ...etpoints 1 Press More to view options 2 Press Humidity to view more options Note DE appears in clock area The Dehumidify Setpoint shows with 3 Press to select the desired Dehumidify Setpoint 4 Press Next 5 Press to select the desired Humidify Setpoint 6 Press Done Settings are saved SELECT HUMIDITY SETPOINTS SELECT HUMIDITY SETPOINTS SELECT HUMIDITY SETPOINTS Press Humidity to view more options an...

Page 21: ...appear 5 Press to select a month numerical then press Next 6 Press to select day numerical that holiday starts Days icon will appear then press Next 7 Press to select holiday length which is number of days that the holiday period lasts 1 99 then press Next PROGRAM A HOLIDAY PROGRAM A HOLIDAY PROGRAM A HOLIDAY Note Performance PRO supports 20 holidays leap years and daylight saving time i PRESS ANY...

Page 22: ... repeat steps 3 9 10 Press DONE to complete the holiday display mode PROGRAM A HOLIDAY CONT PROGRAM A HOLIDAY CONT PROGRAM A HOLIDAY CONT Note Select the Heat Setpoint and the Cool Setpoint for the holiday after selecting the number of days the holiday period lasts Note If Heat or Cool flashes during process the deadband value will be enforced the opposing Heat or Cool Setpoints will be automatica...

Page 23: ...tings from the thermostat to the SD card 4 Press Go Back to complete process Note After selecting one of the above options the SD card display remains active until user selects Go Back and the SD card is removed or menu reverts to Default Display LOAD SD CARD SETTINGS LOAD SD CARD SETTINGS LOAD SD CARD SETTINGS PRESS ANY KEY TO BEGIN i Note If SD card is locked only Paste appears user may only cop...

Page 24: ...y 5 to 95 RH non condensing Physical dimensions T8000 T8500 Thermostat 4 3 H x 5 7 W x 1 3 D with 3 2 x 2 5 8 square inch viewable liquid crystal display LCD T8000 SERIES PRODUCT SPECIFICATIONS T8000 SERIES PRODUCT SPECIFICATIONS T8000 SERIES PRODUCT SPECIFICATIONS Copyright 2010 PECO Inc All Rights Reserved P N 70477 3220 2266 REV 00 09 10 PECO is a registered trademark of PECO Inc The PECO Perfo...

Reviews: