background image

TM

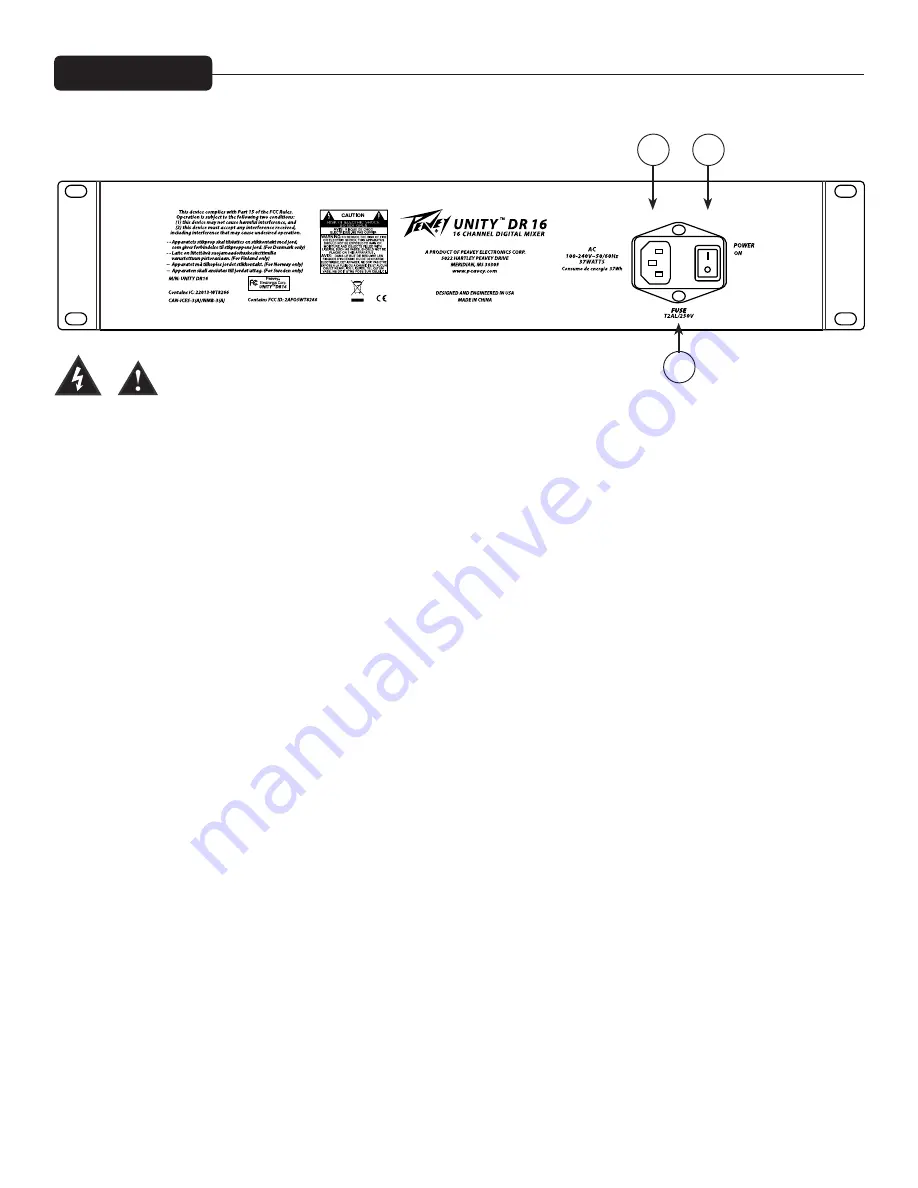
Rear Panel

10

11

12

IEC POWER CONNECTOR (10)

This is a standard IEC cable connector for use with standard voltages from AC wall outlets. Its safety ground pin 

is connected to the chassis and should never be removed (or defeated in the line cord) for any reason. The IEC 

connector contains an internal fuse holder. The fuse rating is T800mAL.

POWER SWITCH (11)

This switches the unit on or off. When the unit is powered ON, the front-panel blue LED will illuminate.

Fuse (12)

Summary of Contents for Unity DR16

Page 1: ...www peavey com Unity DR16 Digital Mixing Console Quick Start Guide TM...

Page 2: ...the limits for a Class B digital device pursuant to Part 15 of the FCC Rules These limits are designed to provide reasonable protection against harmful interference in a residential installation This...

Page 3: ...itar inputs Module bay for optional Dante interface and mixer link interface Input EQ selectable four band full parametric or Shelving and Mid Morph EQ Input Dynamics processing includes compressor an...

Page 4: ...The XLR balanced input is optimized for a microphone or other low impedance source 1 4 Inputs 7 1 4 jacks that can be used for an aux input with two being Hi Z Headphone Jack Volume control 8 The onbo...

Page 5: ...tlets Its safety ground pin is connected to the chassis and should never be removed or defeated in the line cord for any reason The IEC connector contains an internal fuse holder The fuse rating is T8...

Page 6: ...the input channels the bus send gains the active input processes etc 2 MONITOR This section displays the information for the headphone control room wedge monitor system 3 MAIN L R Out Gain controls th...

Page 7: ...Sect 7 Select Aux 1 2 3 4 Edit Sect 8 Select Output Aux Level Sect 9 Select Setup Sect 10 Click to open USB Audio Record Playback window 11 Click to show the monitor RTA channel window 12 Click to sav...

Page 8: ...se For example to modify any numeric value fields click and hold the left mouse button and move the mouse up to increase the value and move the mouse down to decrease the value To modify the Aux and E...

Page 9: ...the source select is MIC Polarity When the button is on orange color the polarity is set to 180 Link when activated orange color the Left Channel parameters will be copied to Right Channel Then all p...

Page 10: ...erworth filter First turn the function on by clicking the On Off button When On the button will turn Orange When enabled the user can input the frequency value range from 20Hz to 20kHz step 1Hz PST MU...

Page 11: ...gain What is Mid Morph Although full parametric EQ can be a powerful tool it is also takes time and experience to make it work well Mid Morph EQ provides a very easy to use solution to the most common...

Page 12: ...FF The filter type is Peak BELL the frequency can be set to a range 20Hz 20kHz step 1Hz the Gain of the filter can be changed to a range of 12dB and the Q factor of the filter can changed from 0 3 to...

Page 13: ...he single filter can be enabled or disabled using the ON OFF button The filter type is Peak BELL the frequency can be set to a range of 20Hz 20kHz step 1Hz the Gain of the filter can be changed to a r...

Page 14: ...PM button Beats Per Minute BPM to Frequency Rate Hz The modulation frequency rate value can be derived from the BPM using the follow ing formula Freq Hz BPM 60 K where K depends on the Note value as s...

Page 15: ...ll other channels without priority will be attenuated to the value set on the text box Att dB when there is signal on the channel with priority in the image above the input CH 3 will be attenuated to...

Page 16: ...assign the two Feedback Eliminators to the same channel The Feedback Eliminator is not active until the Enable button is set to ON The user can also set the Frequency Displacement on each Feedback Eli...

Page 17: ...This feedback elim is only for the mains The Feedback Eliminator is active only if the relative button is set to ON The user can also set the Frequency Displacement range from 2Hz to 8Hz DYN FILTER t...

Page 18: ...a 31 band Graphic EQ is also available To edit of view the GEQ Enable Disable the GEQ by engaging the ON OFF button in the Graphic EQ section Press the View button to display the GEQ values in the EQ...

Page 19: ...ATOR The Feedback Eliminator is independent of the FB Elim on inputs and mains The Feedback Eliminator is not active until the enable button is ON The user can also set the Frequency Displacement rang...

Page 20: ...1 Graphic EQ section 2 Parametric EQ section same filter used on the AUX frame 3 HP LP section same filter used on the AUX frame 1 2 3...

Page 21: ...the following 1 LED Clip Indicator 2 Compressor Activity Yellow Line 3 Vu Meter after processing 4 Vu Meter after fader output In this section the user can adjust the Level of the Aux 1 2 3 4 Outputs...

Page 22: ...N or LAN In the Model field is information concerning the extension card analog extension DR16A DANTE entension DR16D Digi tal SPDIF extension DR16E In the Unique ID field is a string of 16 characters...

Page 23: ...h in the network settings For example Remote device IP address 192 168 1 100 Netmask 255 255 255 0 Gateway 192 168 1 1 DR16 IP address 192 168 0 101 Netmask 255 255 255 0 Gateway 192 168 0 1 In the ca...

Page 24: ...he sw shows the mes sage Firmware successfully loaded NAME EDIT After clicking on the NAME EDIT button the sw shows the following window Here the user can change the label of the Input CH AUX DCA EFX...

Page 25: ...button then the sw shows the following window 1 Close window 2 Select RTA Source Channel Monitor Left Monitor Right Monitor L R Main Left Main Right Main L R AUX1 AUX2 AUX3 AUX4 3 Set number of sampl...

Page 26: ...tput Level Left and Right 2 Link Left and Right 3 Output Mute Left and Right 4 Select Monitor Source 5 Vu Meter Left and Right 6 Send monitor L R to the AUX3 4 Output or send monitor L R to AUX4 Outpu...

Page 27: ...t VuMeter Left after Fader Right after output MAIN process 4 Mute UnMute Left Right output Main 5 Led Clip Right indicators Right after fader Left after output MAIN process 6 Fader Output Main right l...

Page 28: ...d Clip indicator after Fader 5 Led activity GATE 6 Compressor Activity Yellow Line 7 Vu Meter after input channel process 8 Vu Meter after Fader 9 Assign to Mute Group sends to the Main Bus 10 Assign...

Page 29: ...RE PST selection for the Aux Bus Send 2 Channel Sends to the selected Bus 3 Selected Bus SOLO SOLO GROUP 4 DCA ASSIGN FX1 2 3 4 BUS SENDS To control the EFX1 4 bus mixing click the EFX1 4 button in th...

Page 30: ...up section the status of the Solo on all channel linked to this group will be set OFF ON DCA GROUP The remote device can manage up to 4 DCA Groups each channel can be assigned to one DCA i e if the CH...

Page 31: ...r go to the Setup page in the Unity PC APP and manually connect the DR16 mixerby clicking on the desired mixer and connection mode then clicking connect In the example below the Ethernet LAN connectio...

Page 32: ...Connection Parameters Remote Controller IP Addressing Static IP Address 192 168 0 xxx where xxx is in the range 1 254 and not equal to 100 Net Mask 255 255 255 0 Gateway 192 168 0 12 Appendix 2 Ethern...

Page 33: ...des 1 Point To Point mode In Point to Point mode the remote controller directly connects the mixer through a standard ethernet cable without any external router as shown below In this mode Static IP a...

Page 34: ...Note IP Address Net Mask and Gateway are automatically assigned by the DHCP server i e the DR16 WiFi module WiFi Connection The DR12 integrates a WiFi module for a full real time remote control and mo...

Page 35: ...nection Parameters WiFi Router SSID WiFi Router network name Security OPEN WEP WPA or WPA2 Key xxxxxxxx Password of the WiFi router network 2 WiFi Client Station mode In WiFi Client mode the module co...

Page 36: ...Gateway are automatically assigned by the DHCP server i e the WiFi router Mixed Ethernet WiFi Connection Examples 1 WiFi Remote Controllers using DR16 Ethernet Port 2 Mixed WiFi Ethernet Remote Contro...

Page 37: ...when the WiFi radios in the mixers are used in access point mode using the default mixer WiFi settings Solution 1 Control devices will primarily operate only one mixer It is a good idea to perform the...

Page 38: ...xer will be controlled by selecting the appropriate mixer on the Setup Connection screen Only one mixer can be controlled at a time but you can easily switch between mixers on the connections screen I...

Page 39: ...u wish to control You will notice that there are two listings for each of mixers The LAN connection was used to configure the mixer using an Ethernet link and the WLAN connection uses the WiFi network...

Page 40: ...is a two step process First you select the section of the mixer that the record signal will come from by clicking the button for one of the three sections Input Output or Pre GEQ Once that selection...

Page 41: ...dBu Bal XLR TRS combo jacks 1 8CH Gain 28dB 59dBu 23dBu 12dBu MIN G 10dB 41dBu 5dBu 8dBu Pin 1 Sleave Gnd Line MAX G 18dB 49dBu 13dBu 2dBu Pin 2 Tip 1 8CH Gain 0dB 31dBu 5dBu 18dBu Pin 3 Ring MIN G 18...

Page 42: ...ut Levels Frequency Response Mic Input to Left Right Output Max Input Gain Mic Input to Left Right Output Input Gain 20 20Hz to 20 kHz 1 dB 20Hz to 20 kHz 0 5dB Main Gain off to 12 dB Input Gain 12 dB...

Page 43: ...97dB 97dB 93dBu 85dB 81dBu Monitor Send 92dB 88dBu Channel Fader Kill 1 kHz 93dB Hum and Noise measurements 1 kHz Equivalent Input Noise 125 dBu input terminated with 150 ohms bandwidth 20kHz 85dB 81...

Page 44: ...d only to equipment manufactured after 13 August 2005 www peavey com Warranty registration and information for U S customers available online at www peavey com warranty or use the QR tag below Feature...

Reviews: